We’ve decided to initiate the migration to Office 365. For now, the plan is to start a phased migration of a third of all mailboxes to Exchange online. This will give us a chance to run an on-premise and cloud hybrid deployment in real time then determine whether to fully move forward or rollback. An Exchange Hybrid deployment can only be setup in an environment running Exchange Server 2010 and later versions. This task is an involved process that requires a number of prerequisite steps be completed successfully before start. As part of the initial steps, I already setup an Office 365 tenant account and added the relevant domain. Microsoft offers a 1 month 25 user Office 365 evaluation.
With the release of SP2 and SP3 for Exchange 2010,Microsoft has simplified and automated some of the tasks and saved the infrastructure engineer about 45 steps of manual hybrid server configuration.
A key component of deploying Hybrid co-existence is Directory Synchronization: It assures that user account objects are synchronized between the on-premises Active Directory and Azure Active Directory. Because objects are synchronized between both environments, mailboxes can be moved and users should see the same Global Address List regardless of where their mailbox is hosted. I have written about setting up Directory Synchronization with AADSync in a past post.
Some of the advantages of Exchange Hybrid Configuration include:
1) Natively moving mailboxes to and from on-premise Exchange and Exchange Online.
2) Almost seamless co-existence between Exchange Online and one or more1 on-premises Exchange organizations (over a longer period of time).
3) Among other benefits, Secure mail flow between the different platforms and users have the ability to share Free/Busy information.
4) Cloud-based archiving for on-premises mailboxes, also referred to as “Exchange Online Archiving”.
Since I already have a fully working AADSync setup. I’ll go ahead and login to the Exchange 2010 server and start the hybrid configuration tasks.
1) If running a physical Exchange server, my first task will be to create a working and tested virtual machine copy for DR and redundancy. At this time, I have Exchange 2010 running on a virtual machine with hyper-v replication in place.
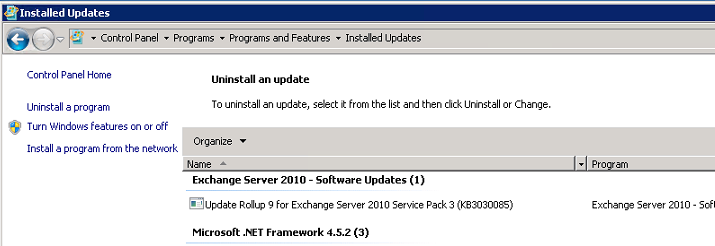
2) My Exchange 2010 box is running SP1. So I downloaded, extracted and installed SP3 on the server. Verify that the upgrade completed successfully:
3) Add the Office 365 Exchange online tenant environment to the on-premise Hybrid Exchange 2010 server. My server is a multi-role exchange server :

4) Enter a friendly name for the Exchange Online forest:
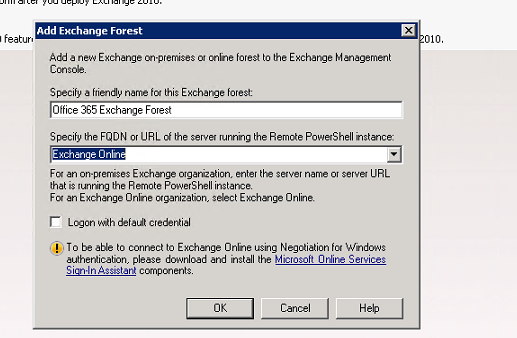
5) Enter credentials for an Office 365 Global Administrator account. By default, this account is also a member of the Exchange Online Organization Management role group . Also, in this case, I used an account that is not synchronized from my on-premise Active Directory environment :

6) Once added, the on-premise and Online exchange environments show up in Exchange Management Console :

7) Create a new Hybrid Configuration Active Directory Object. You can find the wizard under Organization Configuration in the On-Premises section of the Exchange Management Console. Ensure that the Office 365 account is a member of the Organization Management role group in the Office 365 organization:

8) The new Hybrid Configuration page:
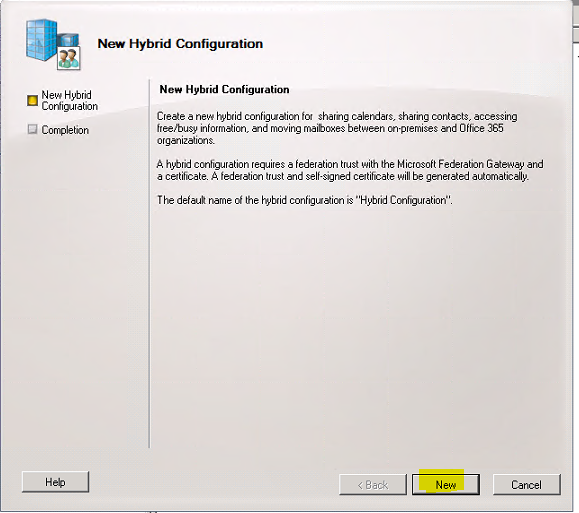
9) The New Hybrid Configuration wizard runs three separate cmdlets in the background to create a) A self signed certificate for the Exchange Delegation Federation b) Federation Trust with the Microsoft Federation Gateway c) And the actual New Hybrid Configuration AD object.

10) Click finish . After the commands execute successfully, you’ll see the Hybrid Configuration object in the Organizational Configuration section of the EMC. Right on the Hybrid Configuration object and select the Manage Hybrid Configuration to start the Manage Hybrid Configuration wizard.As you click through the wizard, several pages gather admin input and are then used to execute the configuration commands in the background. The first page gathers on-premises and cloud credentials. These credentials must have the appropriate admin rights on each side. The on-premises account must be a member of the Organizational Admins security group, and the Office 365 credentials must be a member of the Global Admins group within your Office 365 tenant :

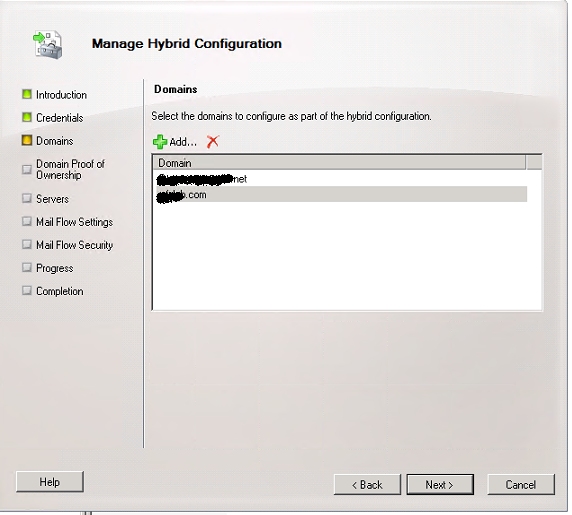
11) Select all the domains you want to add that will be part of your hybrid configuration. I added 2 domains :
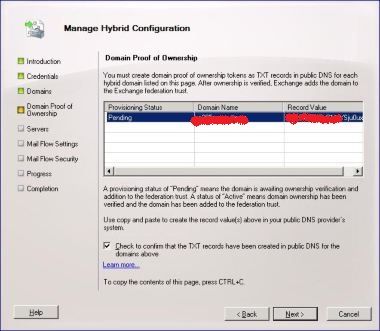
12) The domain proof of ownership page provides a text file, which you’ll use to prove ownership of the domain. I copied the text and used it to create a DNS TXT record within my public DNS zone file (in my case Godaddy). Be sure to select the box to confirm that the TXT record has been created in the public DNS. Microsoft uses this TXT record to verify that you own the public DNS namespace. Only authorized admins have the right to change public DNS records for your zone, so adding this record proves to Microsoft that you’re authoritative for your domain namespace :
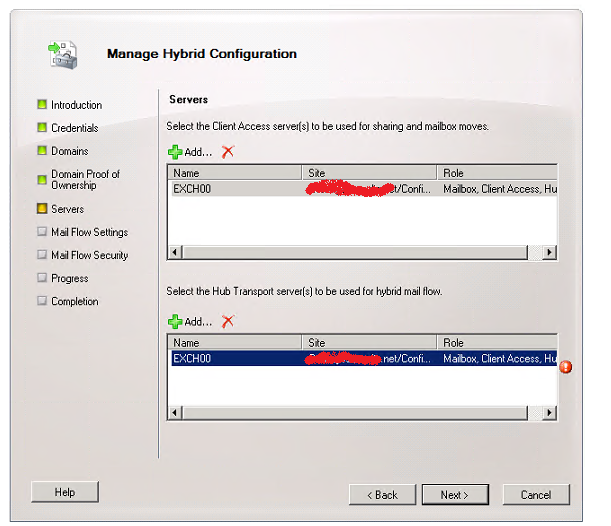
13) Select the Client Access and Hub Transport servers that will be used for mailbox moves, sharing, and hybrid mail flow :
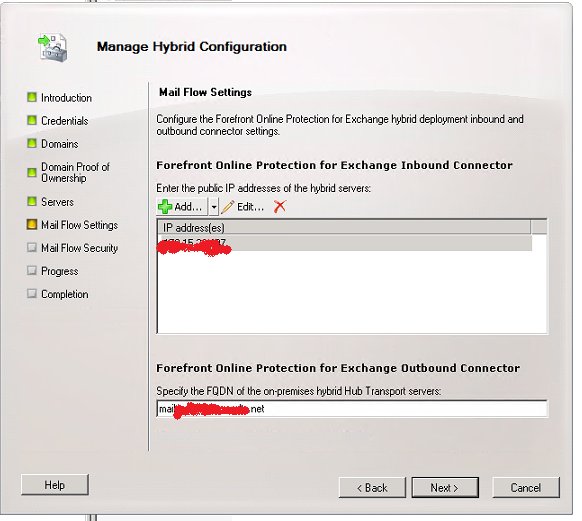
14) The Manage Hybrid Configuration Mail Flow Settings page, requires the public IP address and Fully Qualified Domain Name (FQDN) of my on-premises hybrid server:
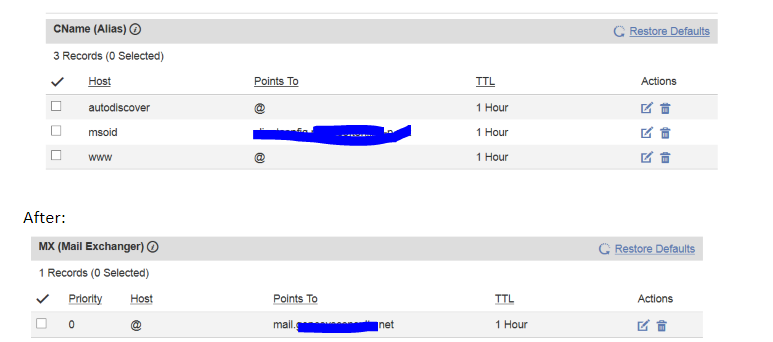
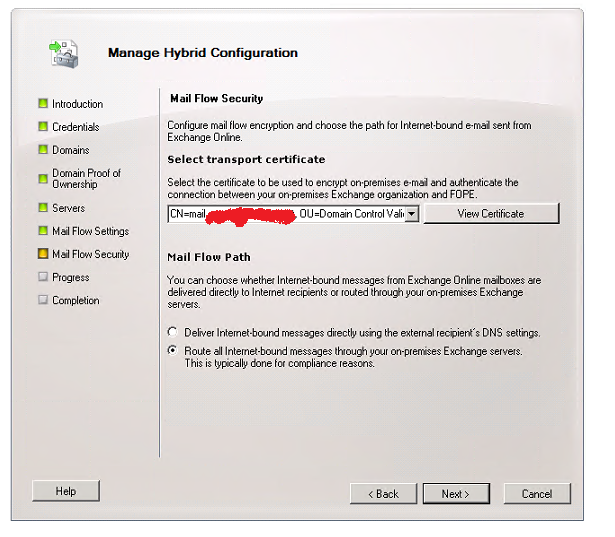
15) On the Manage Hybrid Configuration Mail Flow Security page, select the installed Exchange certificate. Also, choose how you want outgoing mail to be routed. I selected to “Route all internet-bound messages through my on-premise exchange server”. I must also add though that for this option to be configured correctly, the Autodiscover record and MX record in your public dns namespace must be properly setup:
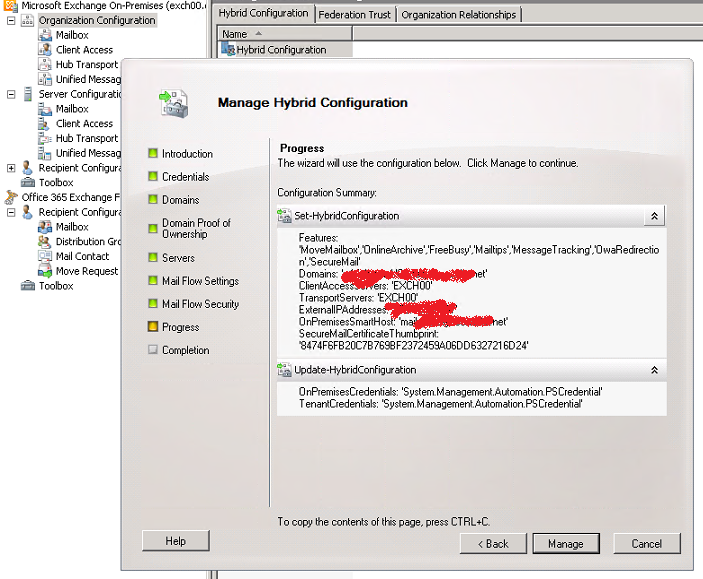

Click finish after the wizard completes successfully. The wizard failed one time I ran it because of a mistake with my public dns Autodiscover configuration. I tested the new hybrid configuration by starting a batch migration of on-premise mailboxes to exchange online, sending email from an exchange online mailbox to an on-premise mailbox and validating the Exchange online hybrid mail flow connector. Implementing a Hybrid Configuration is a detailed and involved process and requires much planning and research. Overall it’s a stable process if the initial tasks are completed correctly.
I also experienced some self-inflicted problems while troubleshooting that led me to delete all hybrid configuration changes and start again (since it’s a lab, I could do anything..). It turns out, there’s no direct way to delete/remove a hybrid configuration object from the EMC or powershell in Exchange server 2010. I intend to write a post in the coming days about how I successfully removed the hybrid configuration object, recreated it again and ran the wizard successfully. In addition I will post my experience testing the Hybrid Configuration by migrating mailboxes to the cloud and validating the Exchange online mail flow connector. I hope this post helps.
