BCDR (Business Continuity and Disaster Recovery options) is a big deal for any I.T. Pro. My decision to go with with Microsoft Azure Site Recovery cloud service was easy after considering other options available to me, cost and the specific needs of my infrastructure environment. It was by far a better solution in terms of CapEx, OpEx, and geographical redundancy and flexibility. Other options require an upfront cost that includes but is not limited to: renting a location, cost of buying or renting physical servers in addition to telecoms cost.
According to Microsoft, Site Recovery is an Azure service that contributes to your BCDR strategy by orchestrating replication of on-premises physical servers and virtual machines to the cloud (Azure) or to a secondary datacenter. When outages occur in your primary location, you fail over to the secondary location to keep apps and workloads available. You fail back to your primary location when it returns to normal operations.
Azure Site Recovery can be deployed in two scenarios. In an environment with System Center Virtual Machine Manager 2012R2 (SCVMM2012R2) or an environment without SCVMM2012R2, with just Hyper-V Manager. In this post, I attempt to document and outline my steps in deploying and configuring Site Recovery protection for my virtual workloads in a Hyper-V Manager environment.
The steps are are as follows:
1) Login to the Azure portal : https://portal.azure.com (assuming you already have a subscription and account. if not, you can create an account and pay-as-you-go subscription). Expand on the “More Services” link and navigate to “Recovery Services Vault” , click on Add to create a new Vault:
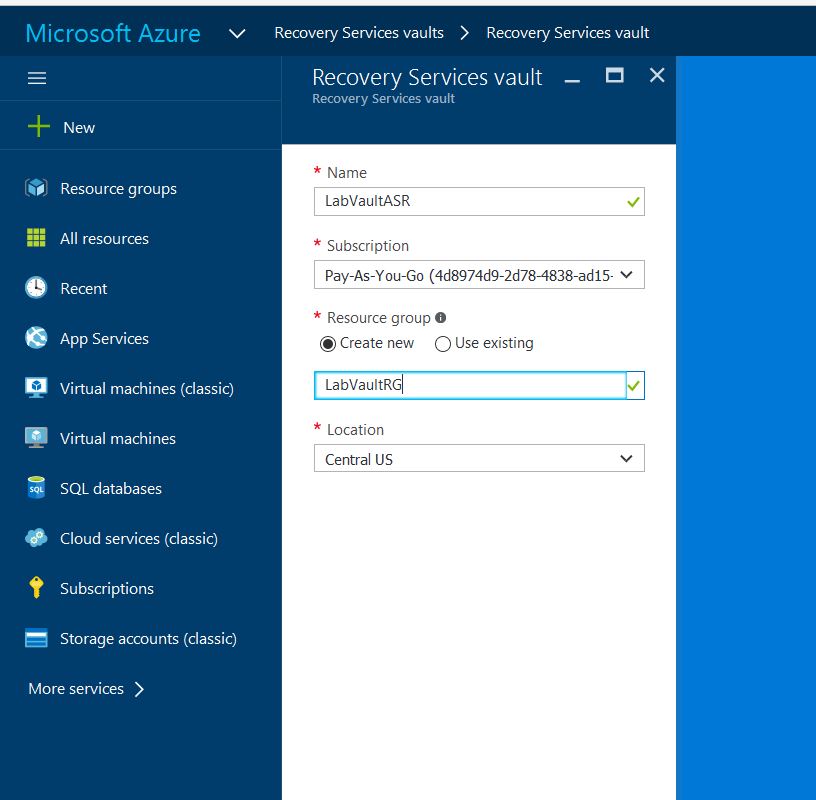
I made sure to create the new Recovery Vault resource in the same location as my Virtual Network. Click Create after filling the fields as shown in the screen shot above.
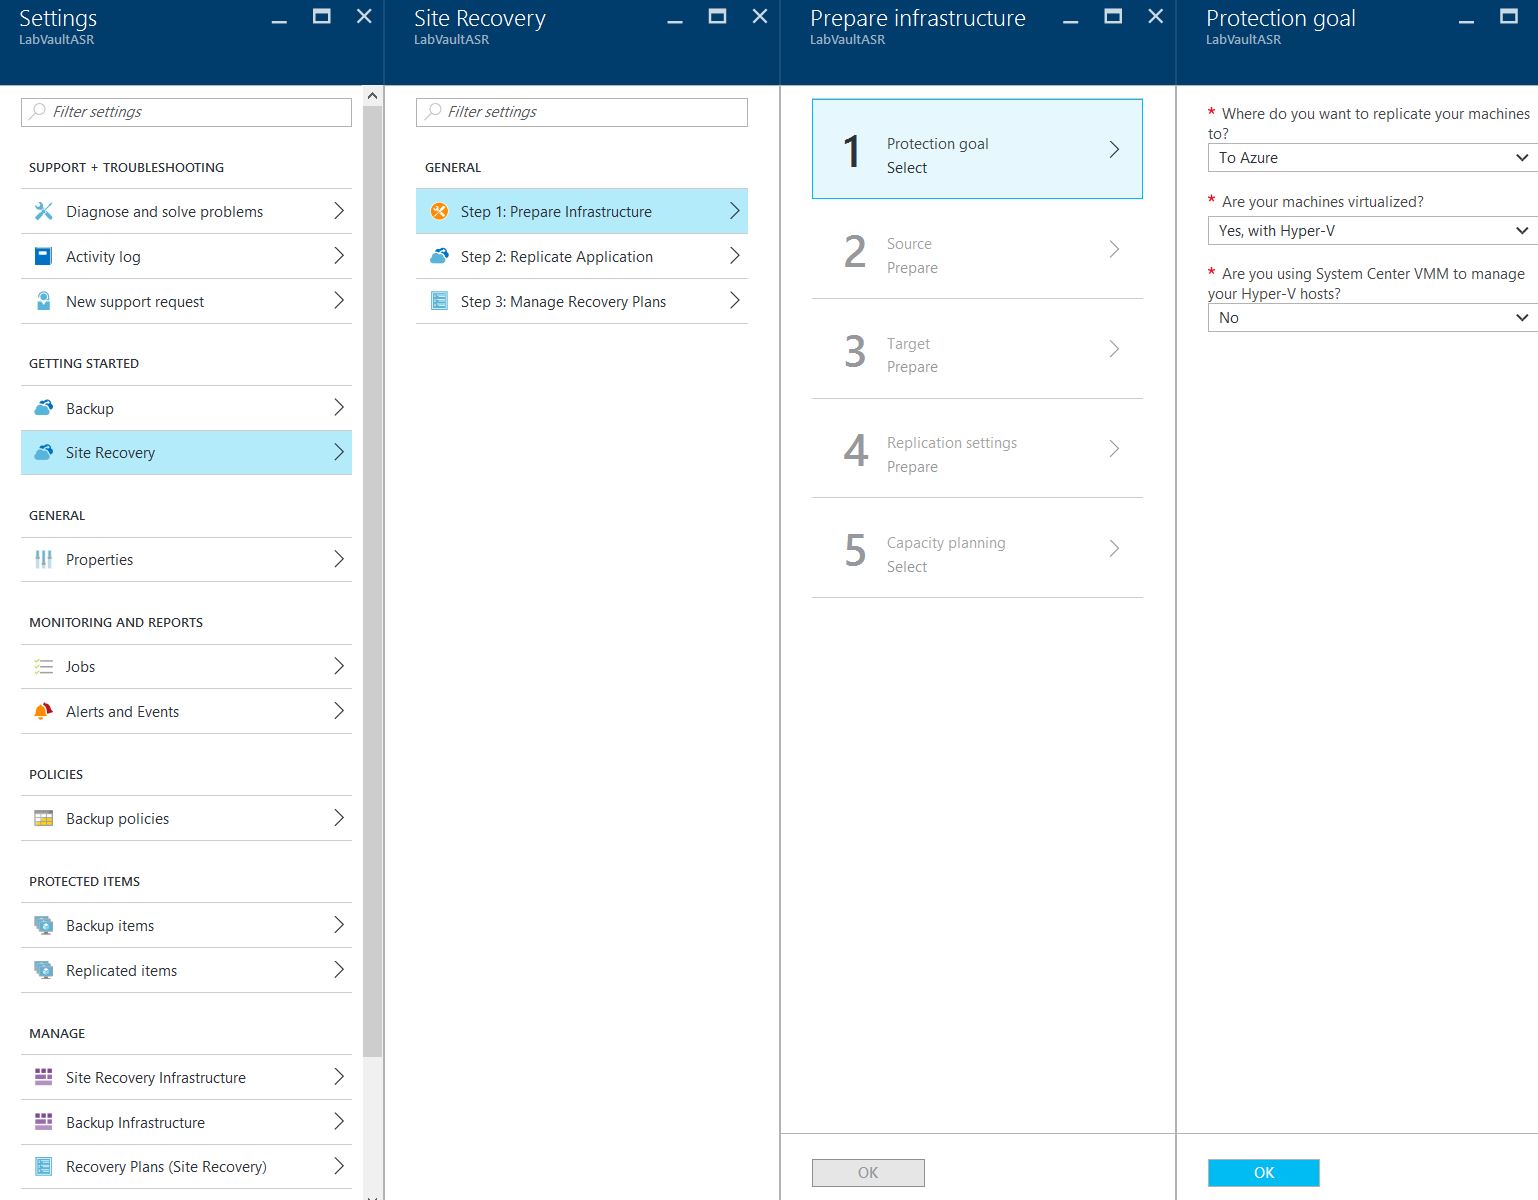
2) Click on the newly created Vault resource to view the available configuration options. If this is your first Site Recovery deployment, navigate to the Settings,Getting Started, Site Recovery, Step 1: Prepare Infrastructure, Protection goal.These options will quickly walk you through the deployment steps and scenarios that best suit your protection goals. In Protection goal select To Azure, and select Yes, with Hyper-V. Select No to confirm you’re not using VMM. Then click OK.
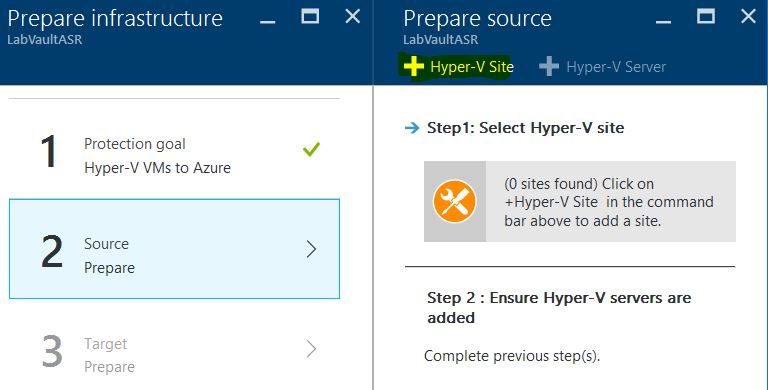
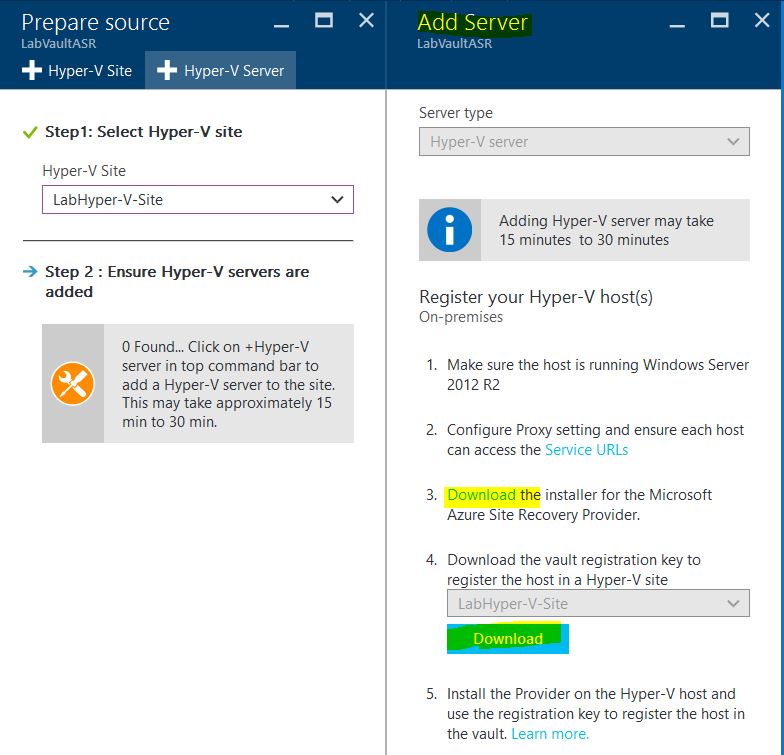
3) Select the Step 2: Prepare Infrastructure, Source. To add a new Hyper-V site as a container for your Hyper-V hosts or clusters, click +Hyper-V Site.
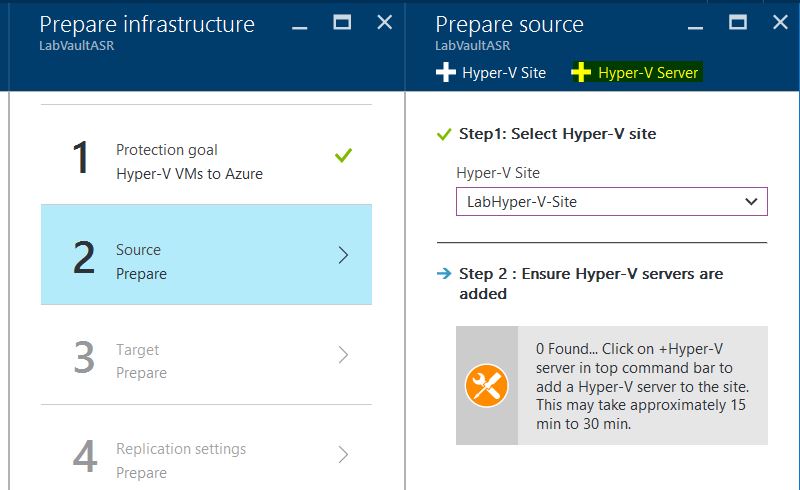
On the Create Hyper-V site page specify a name for the site. Then click OK. Select the newly created site and click +Hyper-V Server to add a server to the site.
On the Add Server page, for the Server type field, verify that Hyper-V server is displayed.Click the download link to download the Azure Site Recovery Provider installation file. Run this file to install both the Provider and the Recovery Services agent on each Hyper-V host. I’ll use the “Download” button to download the vault registration key to register my host in the newly created Hyper-V site. The key is valid for 5 days after it is generated.
Run the Provider setup file on each host you added to the Hyper-V site. If you’re installing on a Hyper-V cluster, run setup on each cluster node. Installing and registering each Hyper-V Cluster nodes ensures that virtual machines remain protected even if they migrate across nodes.
4) Run the Provider setup file. Choose to use Microsoft Update to update the software unless SCCM is in place to serve the same objective.Click install on the Provider Installation window.

5) After installation, click on the “Register” button to register with the ASR vault in Azure.On Vault Settings page, click Browse to select the vault key file that was downloaded previously. Selecting the Vault key will automatically fill the remaining vault settings field.
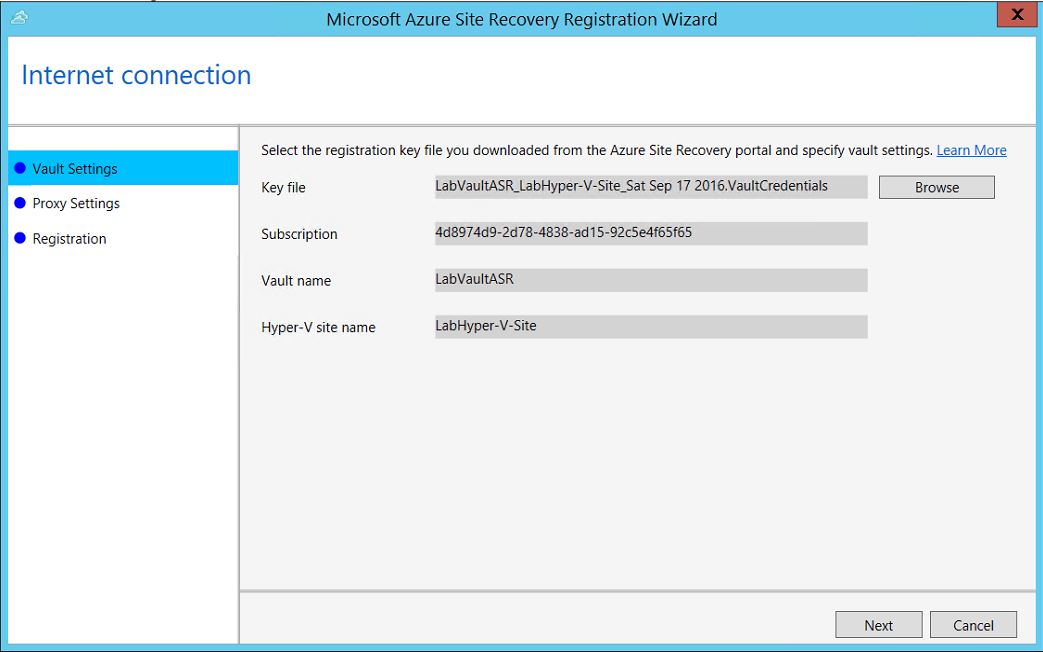
6) I don’t have a proxy server in my environment, so I’ll select the option to connect to ASR directly. Click next to complete the registration process with ASR. After registration completes, metadata from the Hyper-V server host is retrieved by Azure Site Recovery. I’ll hold off on the on premise configuration and move back to the Azure portal. After a page refresh, I can see Hyper-V host server is displayed on the Settings, Site Recovery Infrastructure, Hyper-V Hosts page. Click Ok to save the changes on the Azure Prepare Source page.

7) Click Prepare infrastructure, Target and select the Azure subscription you want to use. In step 2, I’ll select Classic as the deployment model to be used for my VMs after failover. This will enable me take advantage of my already existing storage account and virtual network (created in the Azure classic portal). If the Resource Manager deployment model is selected, I’ll use the +Storage Account button to create the Azure storage account to be used for replication.
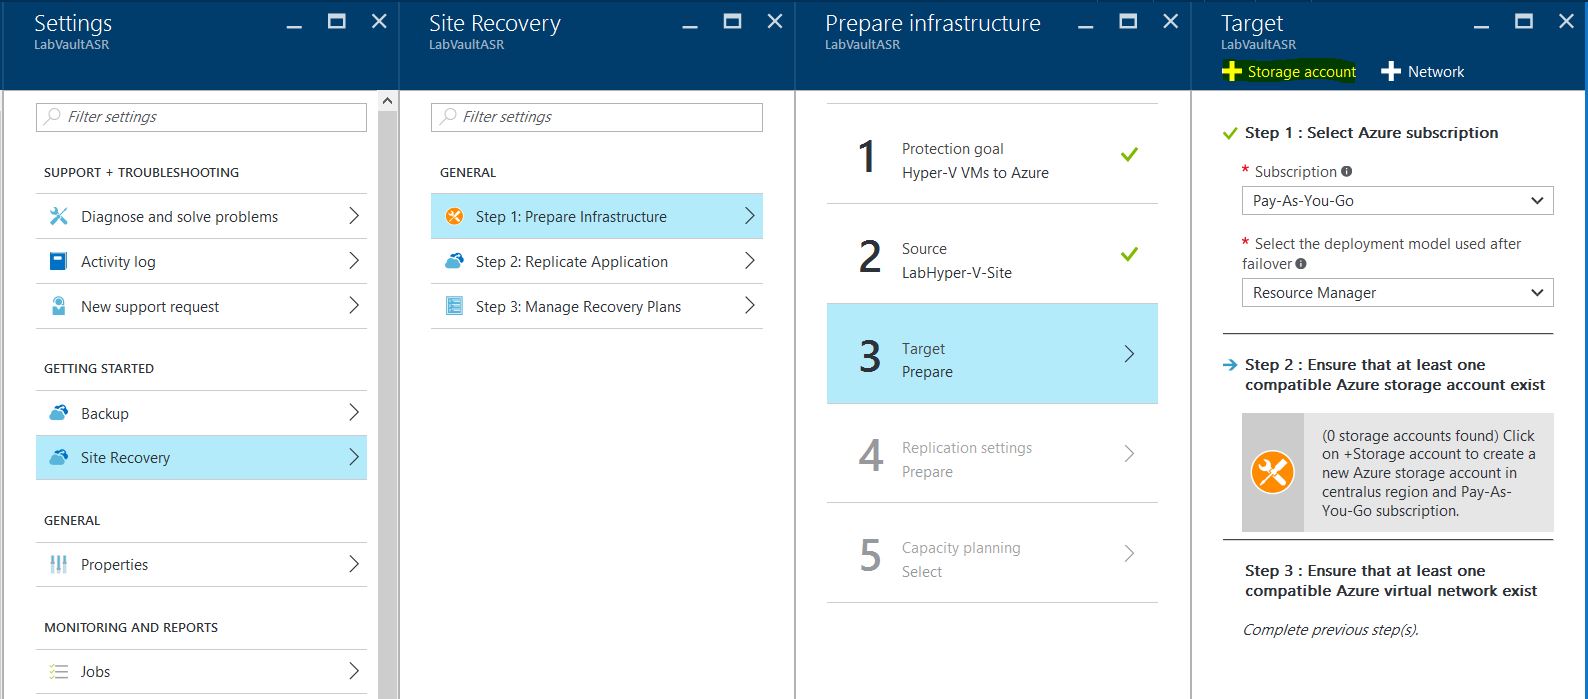
I’ll create a test storage account using ARM. On the Create Storage Account page, enter a name for the storage account in lower case letters (required). Select Geo-redundant storage under the Replication field. Click OK.

I’ve chosen to use the Classic deployment model, I’ll confirm my storage accounts and virtual network and click OK on the Target configuration page.

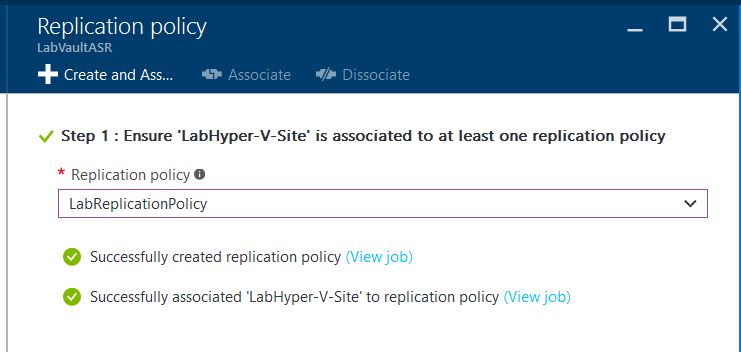
8) The next step is to configure replication settings.To create a new replication policy click Prepare infrastructure, Replication Settings, +Create and associate.
9) In Create and associate policy specify a policy name.
10) In Copy frequency specify how often you want to replicate delta data after the initial replication (every 30 seconds, 5 or 15 minutes).
11) In Recovery point retention, specify in hours how long the retention window will be for each recovery point. Protected machines can be recovered to any point within the window.
12) In App-consistent snapshot frequency specify how frequently (1-12 hours) recovery points containing application-consistent snapshots will be created. Hyper-V uses two types of snapshots — a standard snapshot that provides an incremental snapshot of the entire virtual machine, and an application-consistent snapshot that takes a point-in-time snapshot of the application data inside the virtual machine. Application-consistent snapshots use Volume Shadow Copy Service (VSS) to ensure that applications are in a consistent state when the snapshot is taken. Note that if you enable application-consistent snapshots, it will affect the performance of applications running on source virtual machines. Ensure that the value you set is less than the number of additional recovery points you configure.
13) In Initial replication start time specify when to start the initial replication. The replication occurs over your internet bandwidth so it is recommended to schedule it outside of busy hours. I want to start my replication immediately since this is a test environment. Then click OK.
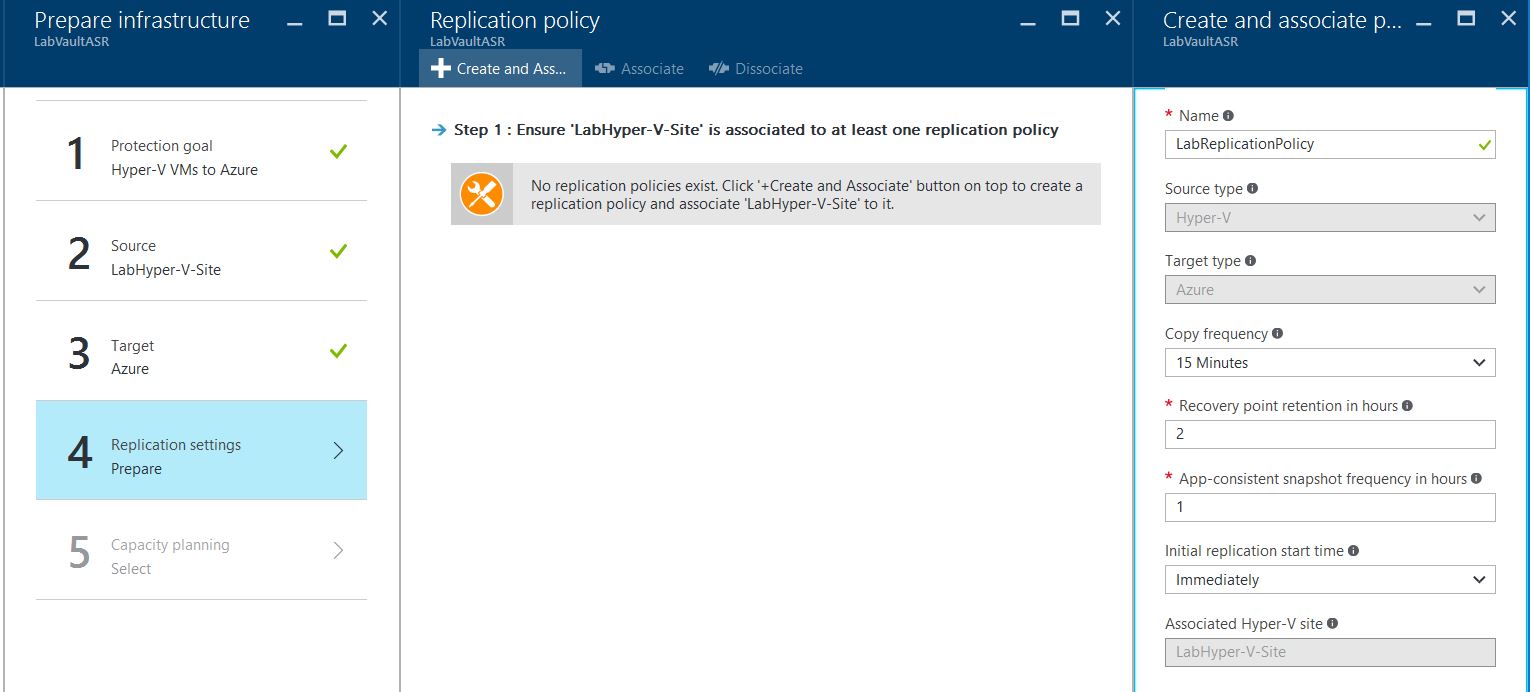
When you create a new policy it’s automatically associated with the Hyper-V site. Click OK. You can associate a Hyper-V site (and the VMs in it) with multiple replication policies in Settings, Replication, policy name, Associate Hyper-V Site.
14) I’ve chosen to download and run the Capacity planner for Hyper-V replica at a later date.
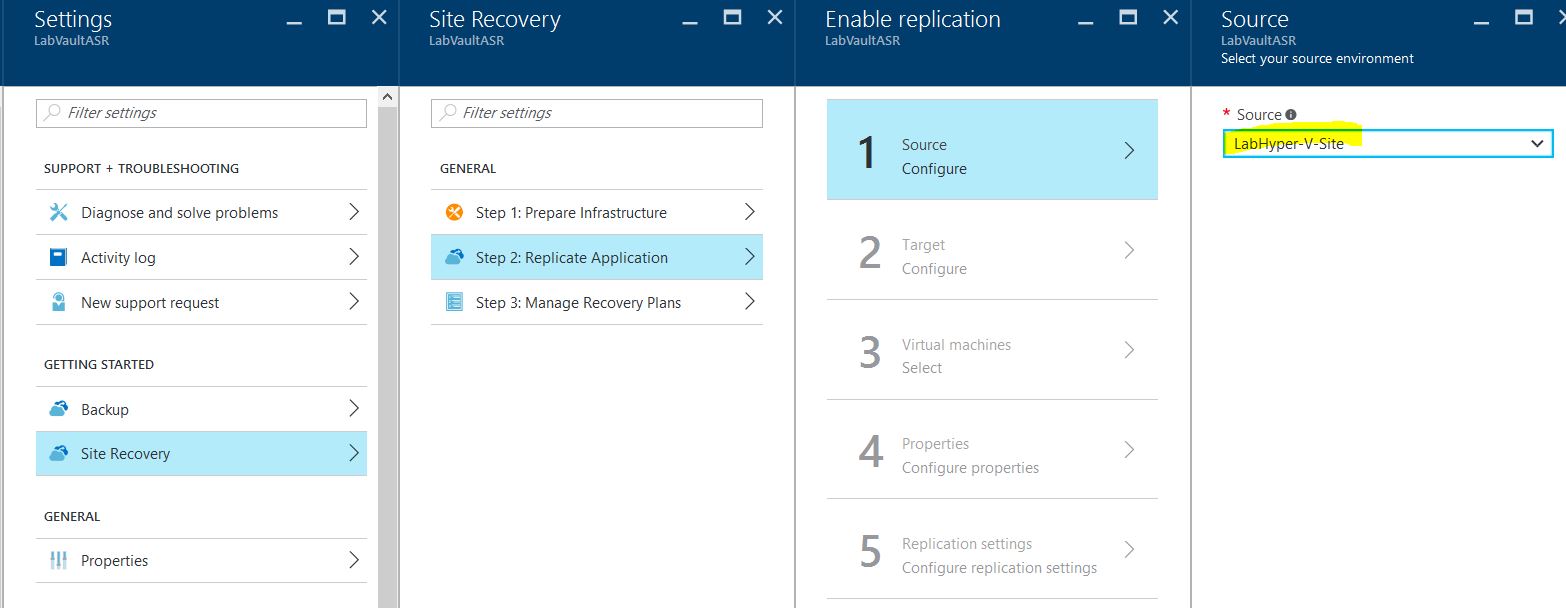
15) After Prepping the Infrastructure, we’ll go ahead and Enable Replication using the “Replicate Application” step. Click Step 2: Replicate application, Source. In the Source blade, select the Hyper-V site. Then click OK. After enabling replication for the first time, click +Replicate in the vault to enable replication for additional machines.
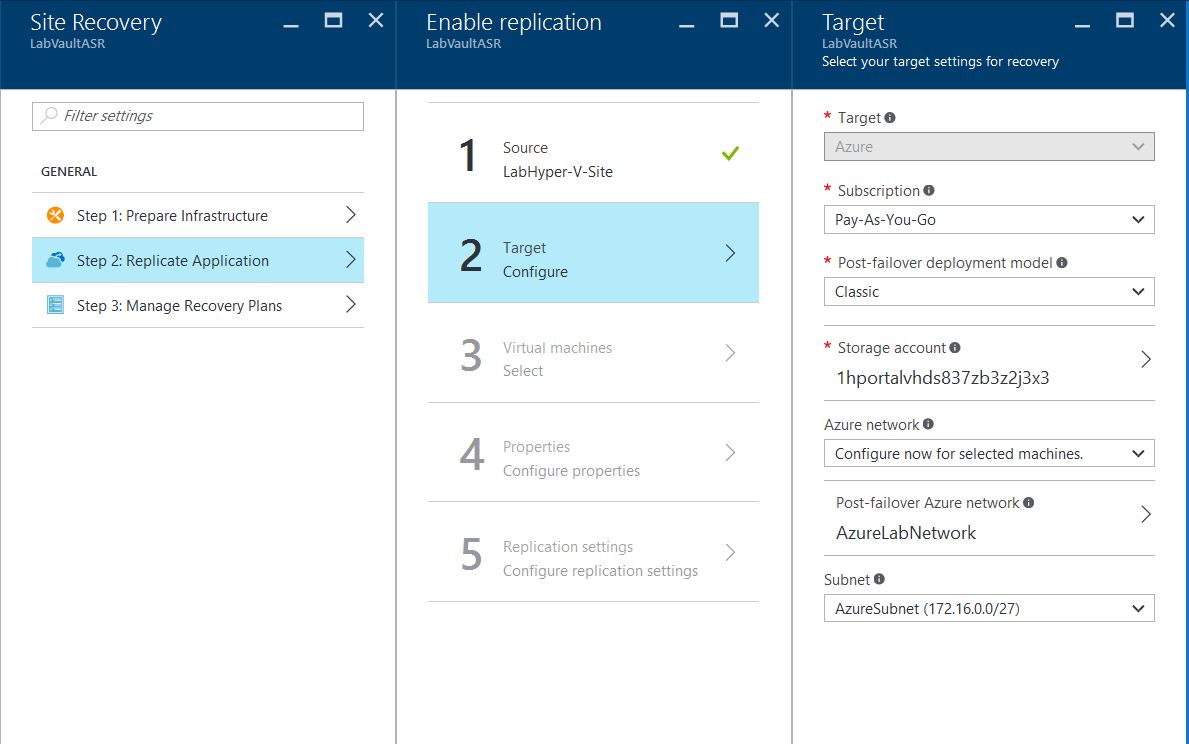
16) In Target I selected the vault subscription, and the failover model I want to use in Azure (classic, because I created my initial storage account and network in classic) after failover. I selected my Classic storage account. If you want to use a different storage account than those you have you can create one. To create a storage account using the ARM model click Create new. If you want to create a storage account using the classic model you’ll do that in the Azure portal. Then click OK. Select the Azure network and subnet to which Azure VMs will connect when they’re spun up after failover. Select Configure now for selected machines to apply the network setting to all machines you select for protection. Select Configure later to select the Azure network per machine. If you want to use a different network from those you have you can create one. To create a network using the ARM model click Create new.If you want to create a network using the classic model you’ll do that in the Azure portal. Select a subnet if applicable. Then click OK.
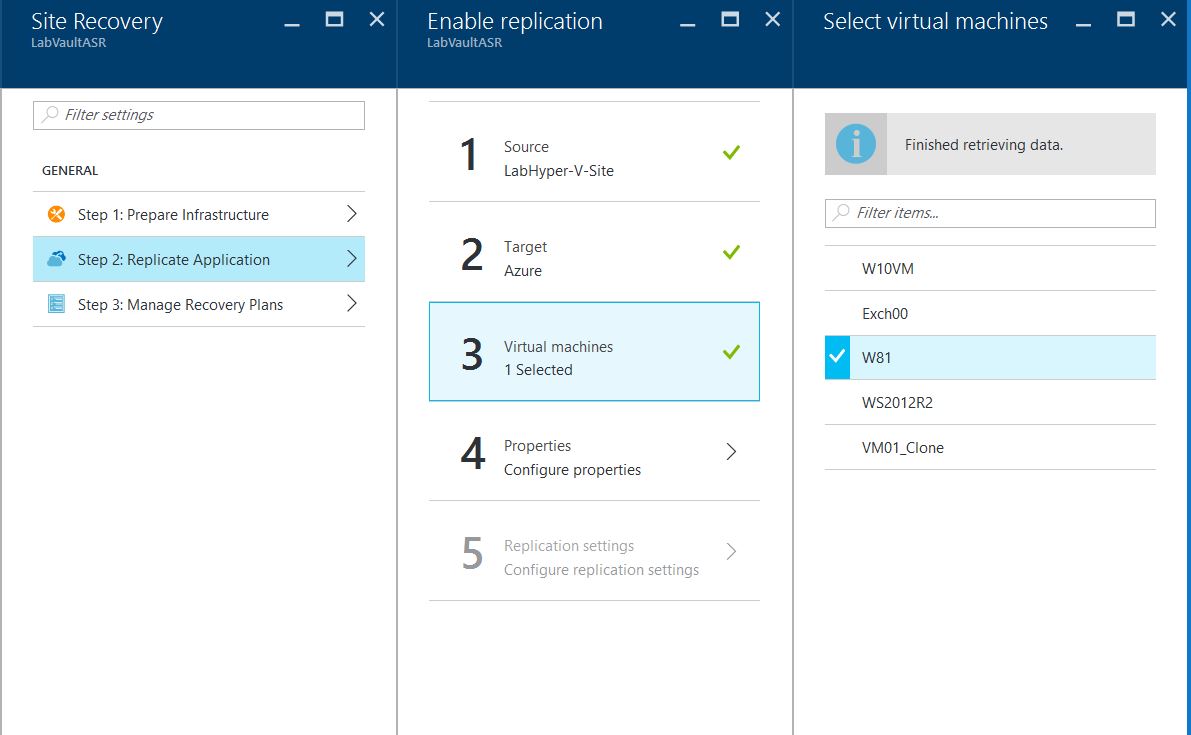
17) In Virtual Machines > Select virtual machines click and select each machine you want to replicate. You can only select machines for which replication can be enabled. I selected to replicate just one virtual machine from my Hyper-V host: W81. Click OK.
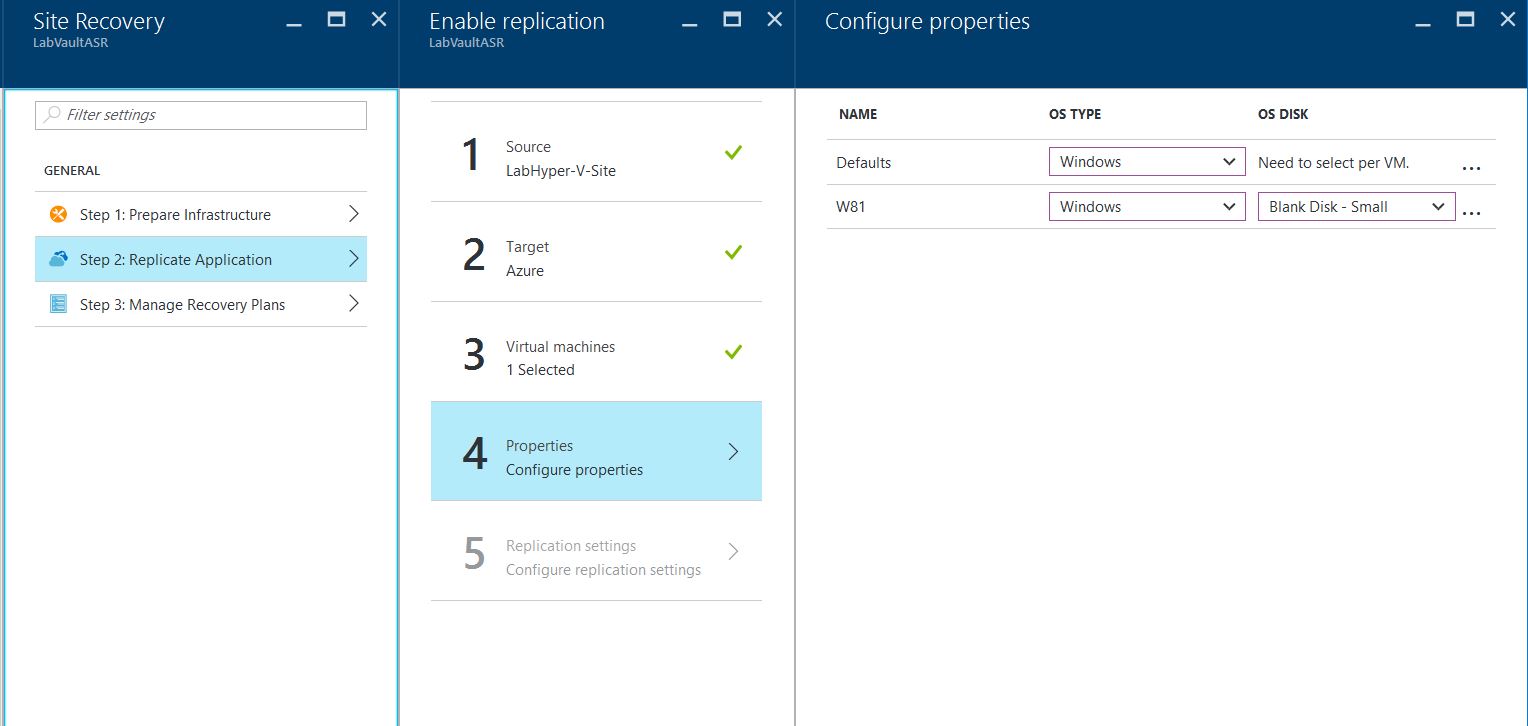
18) In Properties, Configure properties, select the operating system for the selected VMs, and the OS disk. Verify that the Azure VM name (Target Name) complies with Azure virtual machine requirements and modify it if you need to. Then click OK. You can set additional properties later.
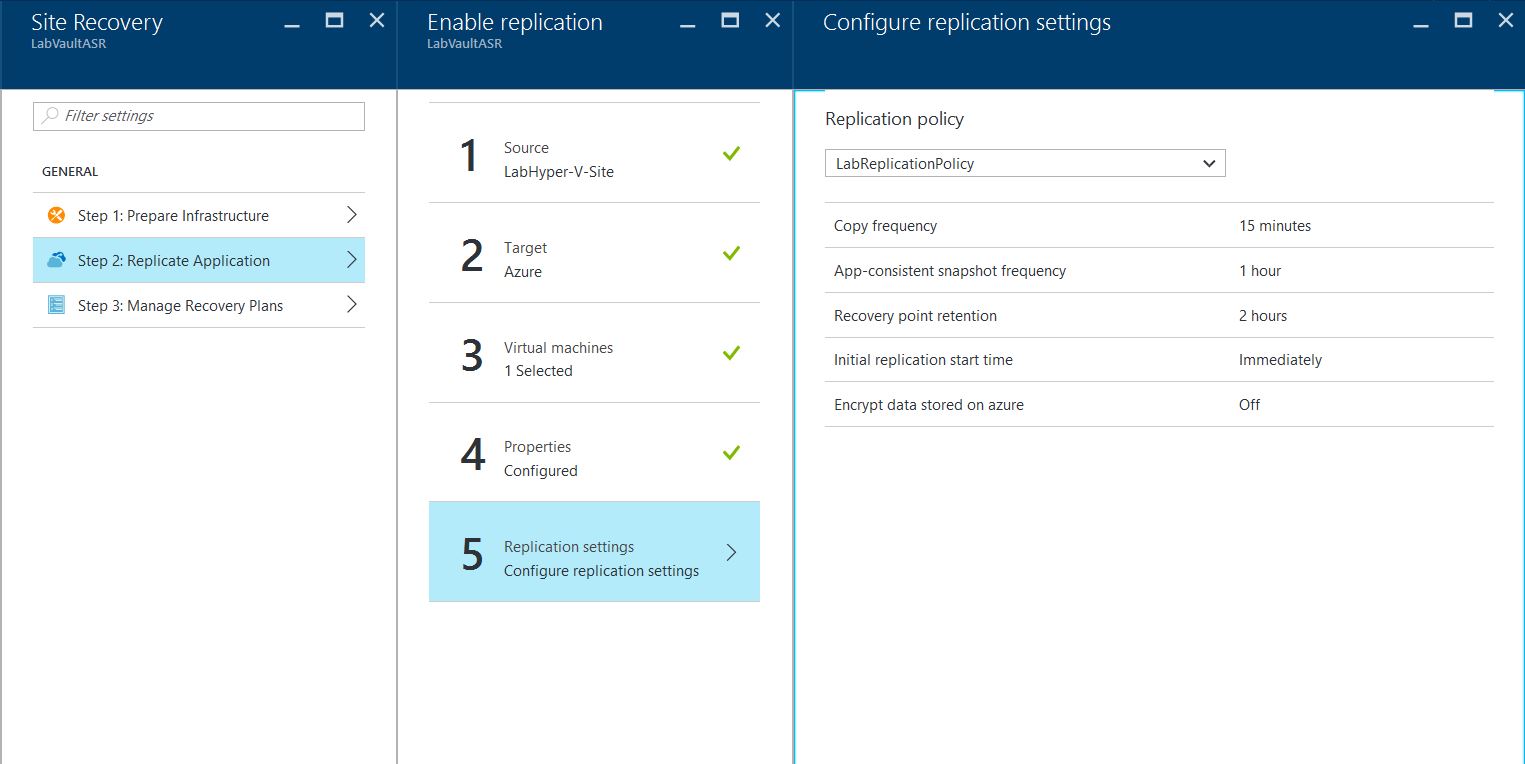
19) In Replication settings, Configure replication settings, select the replication policy you want to apply for the protected VMs. Then click OK. You can modify the replication policy in Settings > Replication policies > policy name > Edit Settings. Changes you apply will be used for machines that are already replicating, and new machines. Click the Enable Replication button after completing the Replicate Applications tasks.
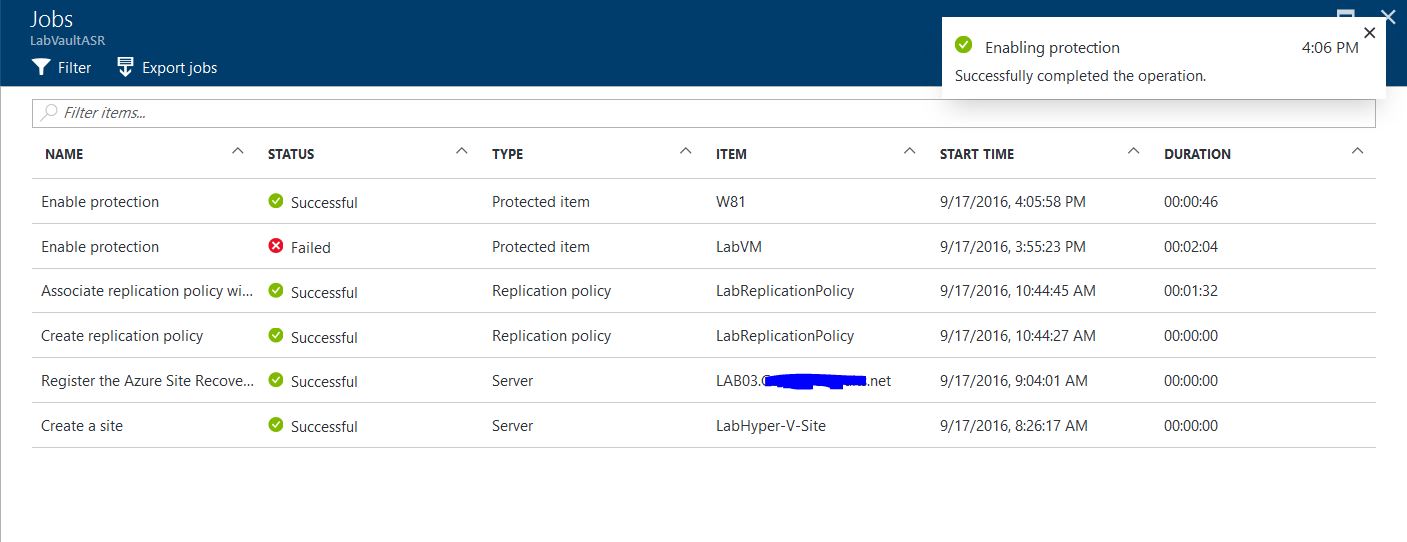
You can track progress of the Enable Protection job in Settings, Jobs, Site Recovery jobs. After the Finalize Protection job runs the machine is ready for failover.
View and manage VM properties.
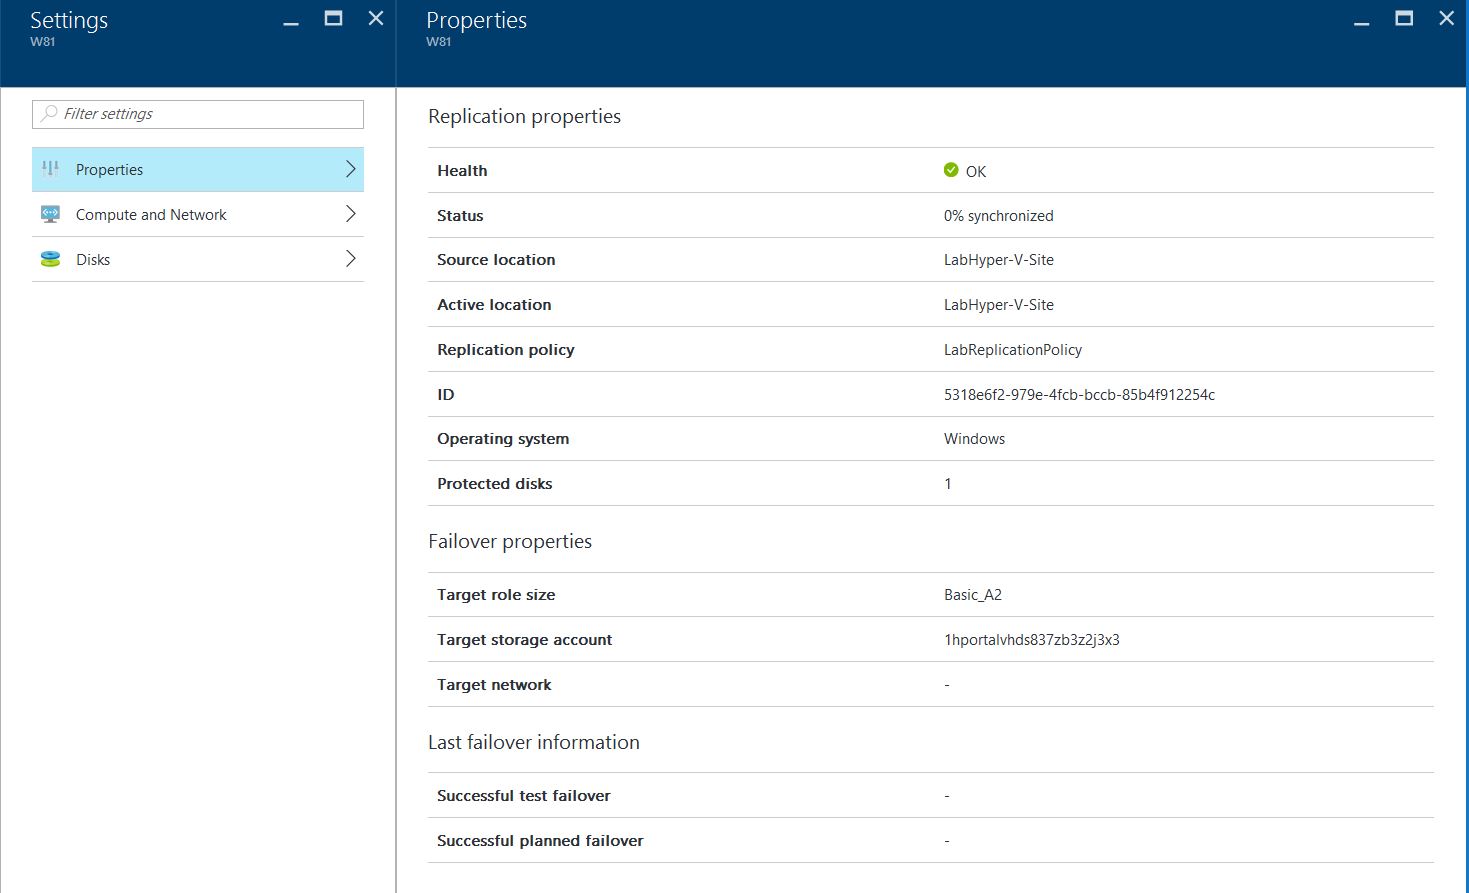
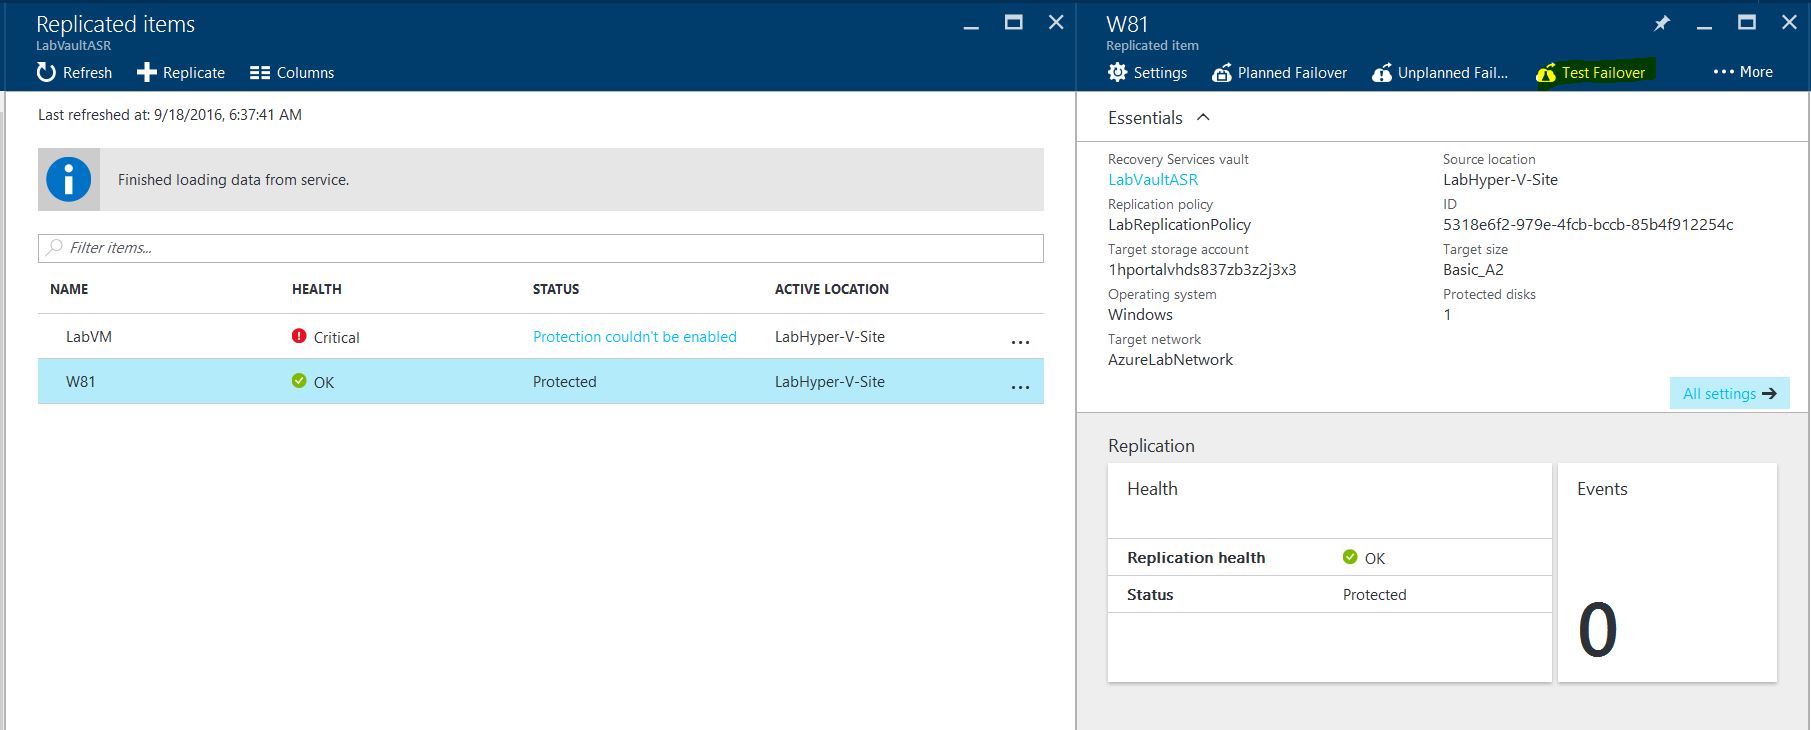
1) It is recommend to verify the properties of the source machine. Click Settings, Protected Items, Replicated Items and select the machine.
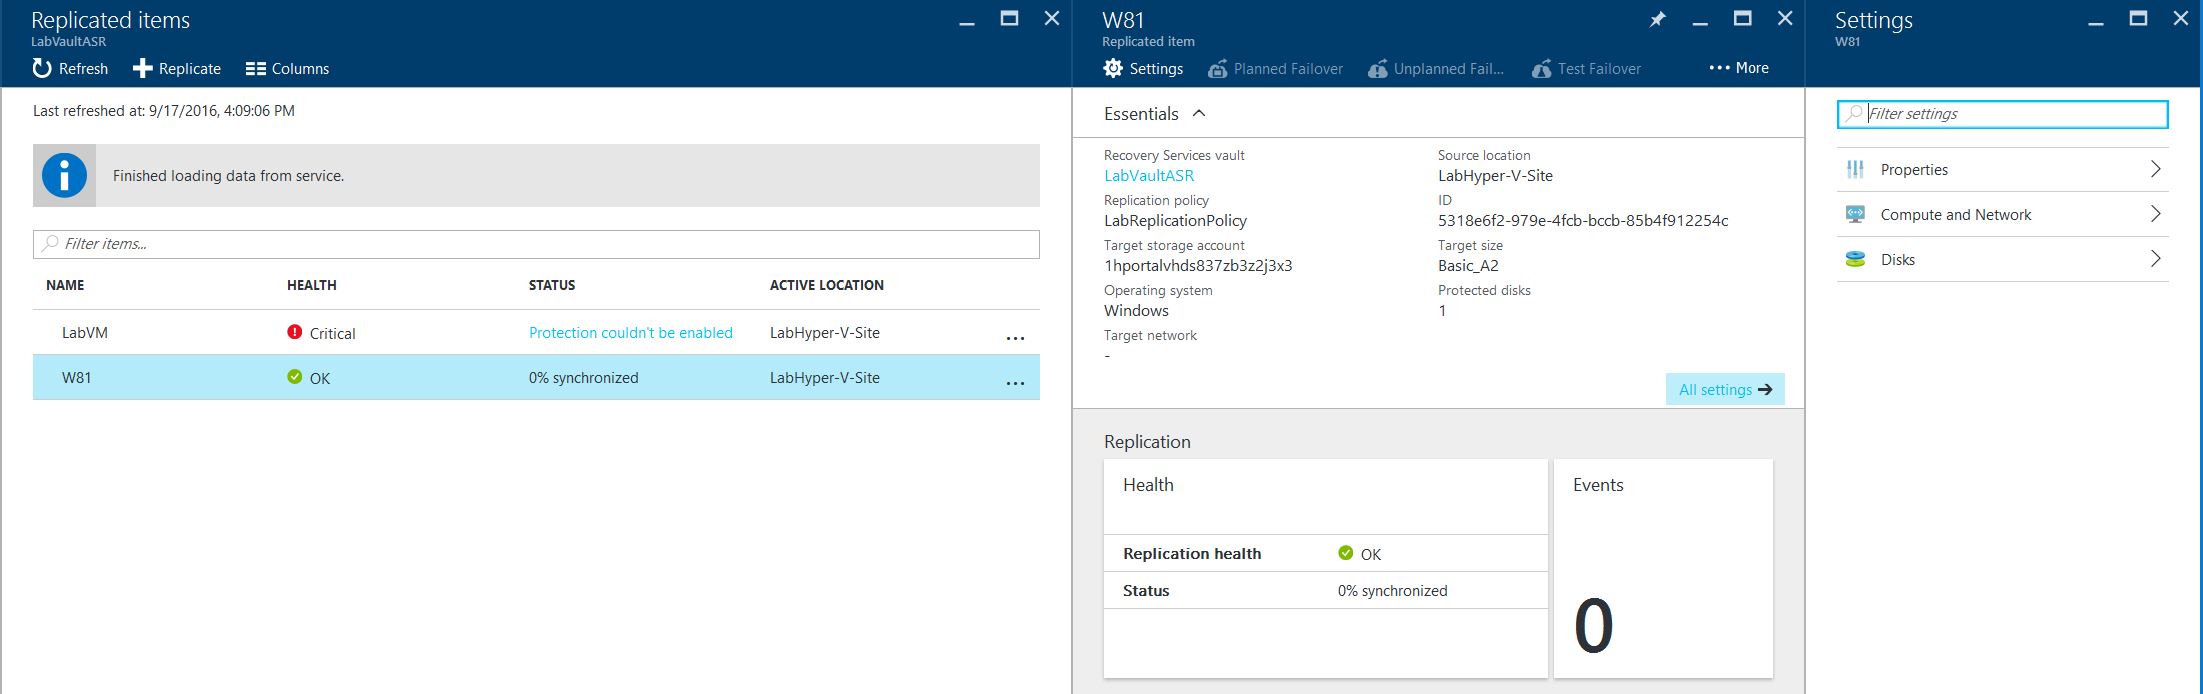
2) In Properties you can view replication and failover information for the VM.
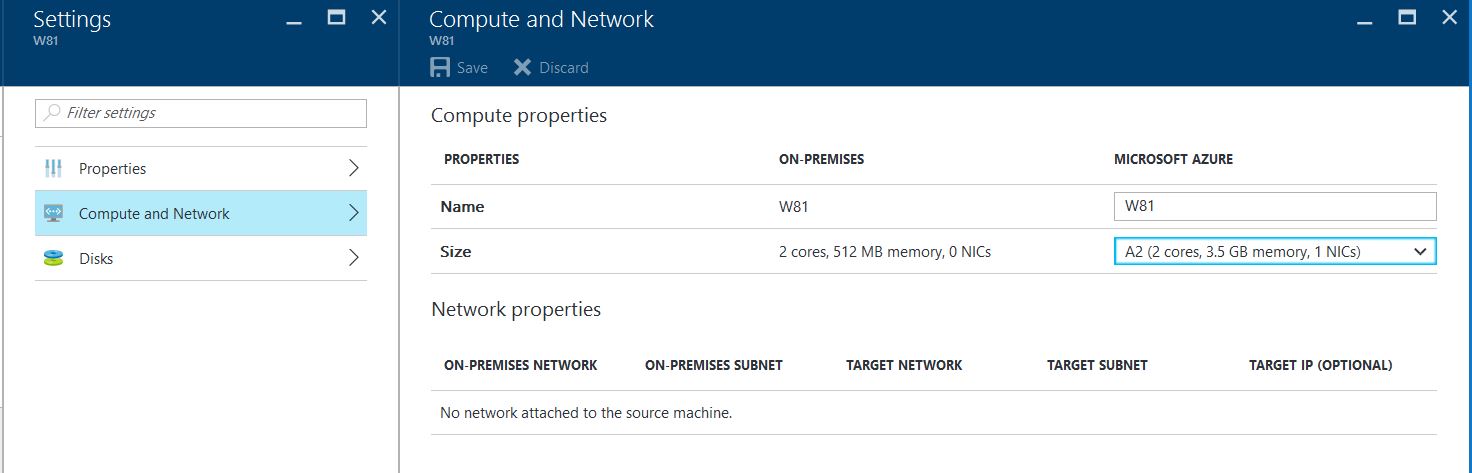
3) In Compute and Network, Compute properties you can specify the Azure VM name and target size. Modify the name to comply with Azure requirements if you need to. You can also view and modify information about the target network, subnet, and IP address that will be assigned to the Azure VM. Note the following:
You can set the target IP address. If you don’t provide an address, the failed over machine will use DHCP. If you set an address that isn’t available at failover, the failover will fail. The same target IP address can be used for test failover if the address is available in the test failover network.
The number of network adapters is dictated by the size you specify for the target virtual machine, as follows:
If the number of network adapters on the source machine is less than or equal to the number of adapters allowed for the target machine size, then the target will have the same number of adapters as the source.
If the number of adapters for the source virtual machine exceeds the number allowed for the target size then the target size maximum will be used.
For example if a source machine has two network adapters and the target machine size supports four, the target machine will have two adapters. If the source machine has two adapters but the supported target size only supports one then the target machine will have only one adapter.
If the VM has multiple network adapters they will all connect to the same network.
4) In Disks you can see the operating system and data disks on the VM that will be replicated.
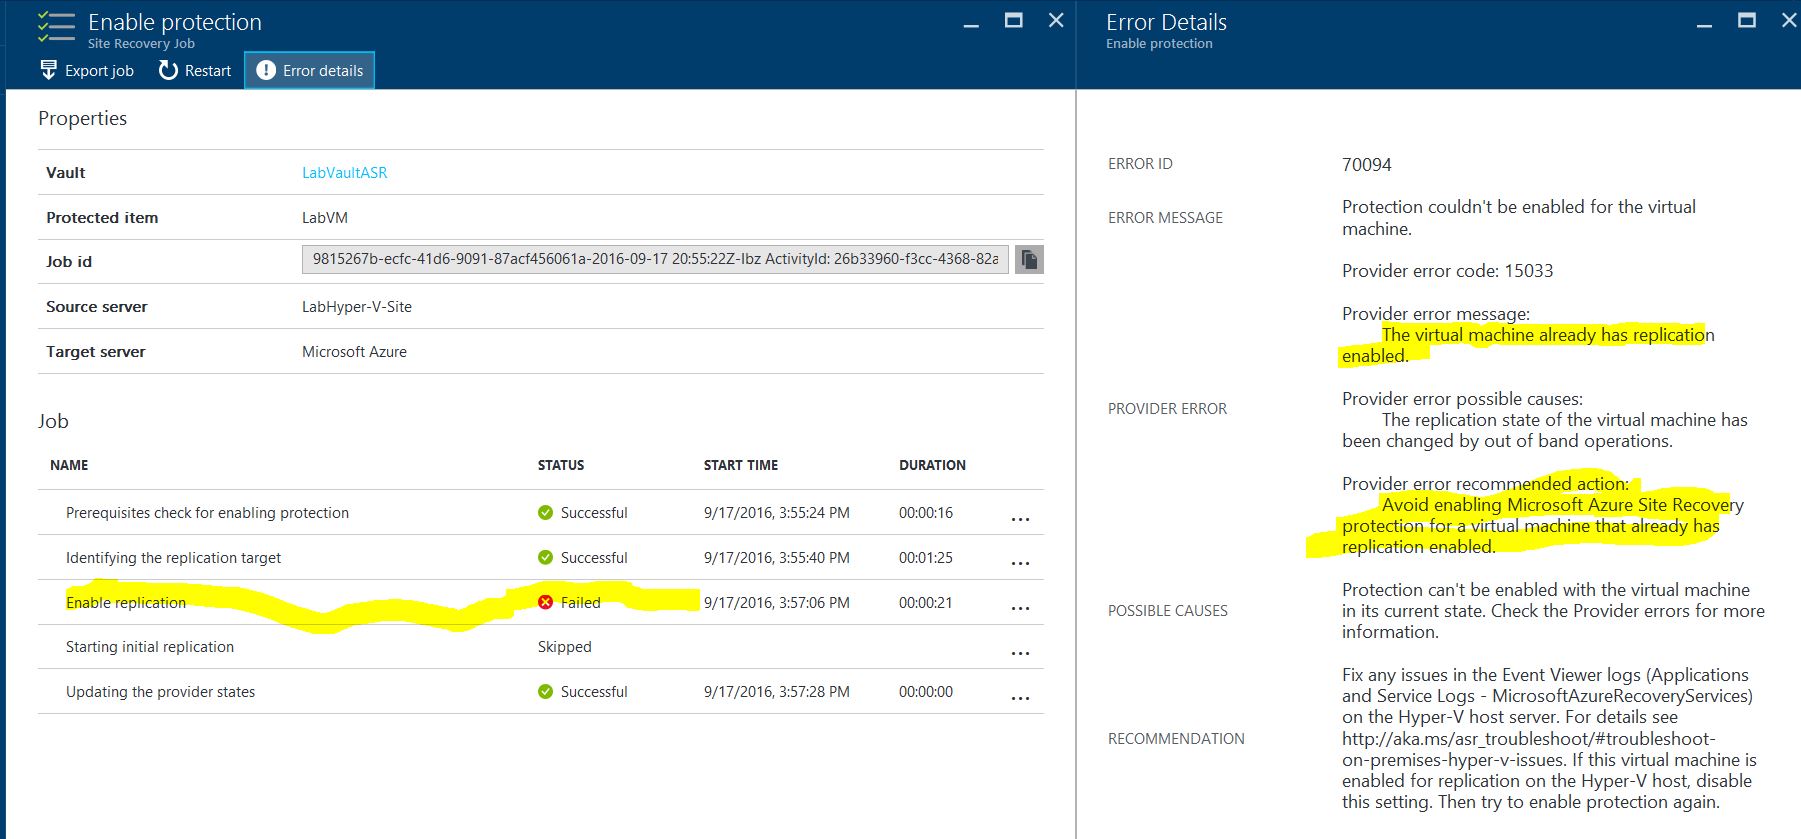
5) At this time, the Azure Replicated Items synchronization status is at 31%. After it’s complete, I will test failover to my virtual network. I initially tried to enable Azure Site Recovery protection on a replica virtual machine. The task failed with the following error: “Avoid enabling Microsoft Azure Site Recovery protection for a virtual machine that already has replication enabled.” More details are displayed in the screen shot below.

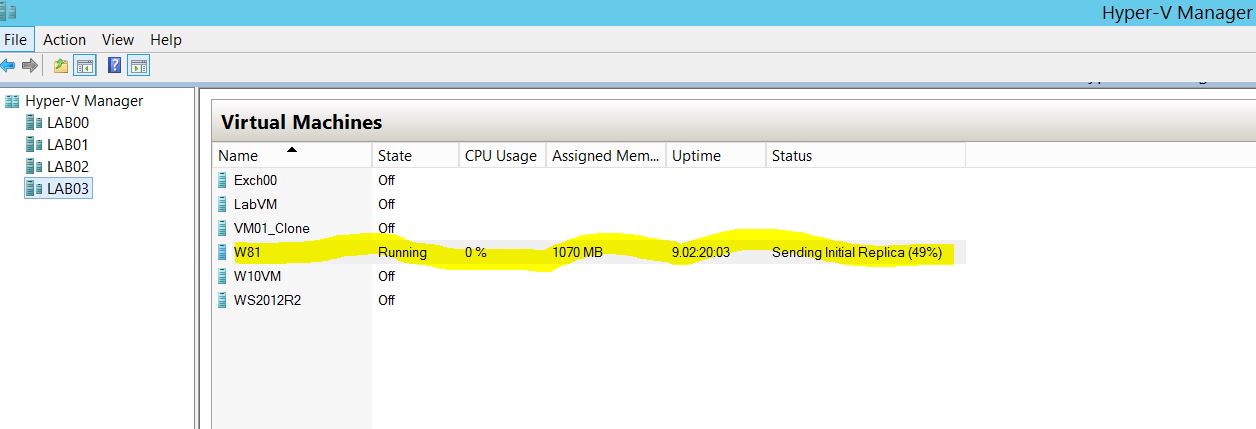
The following screen shot displays the current status of the VM replication to the Azure Recovery Vault at the on premise Hyper-V manager.
Test Failover.
1) With the Replicated virtual machine fully synchronized to Azure, I’ll go ahead and Test Failover. As a first step, I’ll install the Azure VM Agent. This is recommended by Microsoft. It gets the best performance from the VM, makes booting faster and helps with troubleshooting. I installed the agent from the PowerShell console as Administrator.
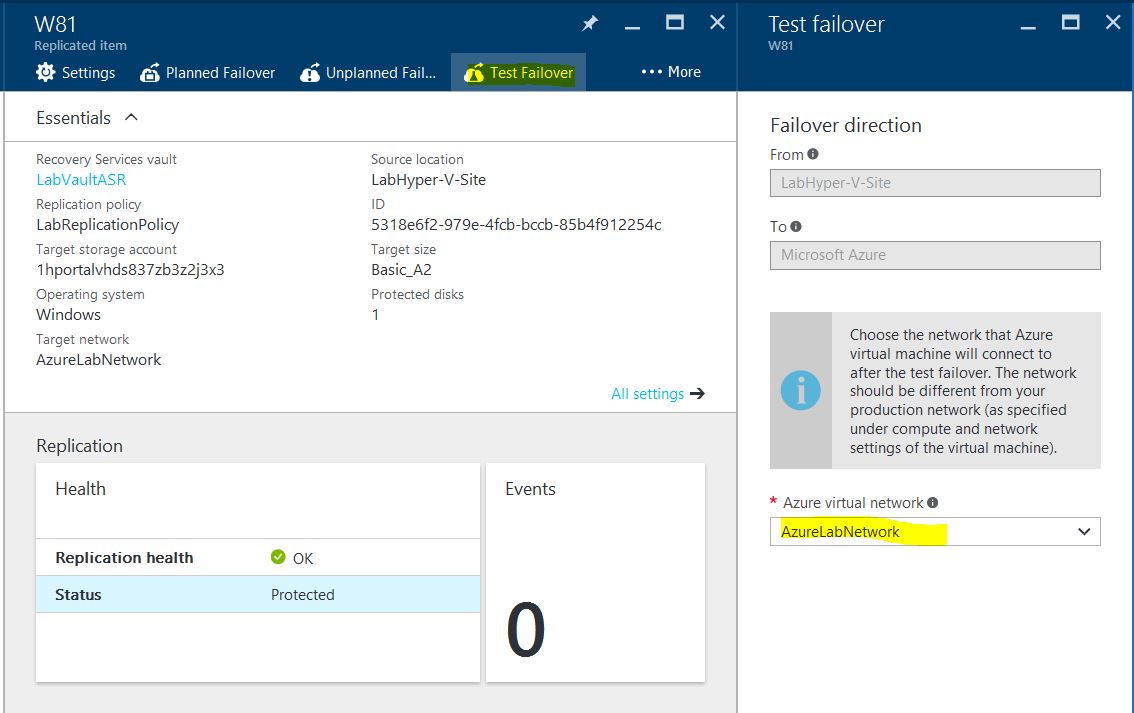
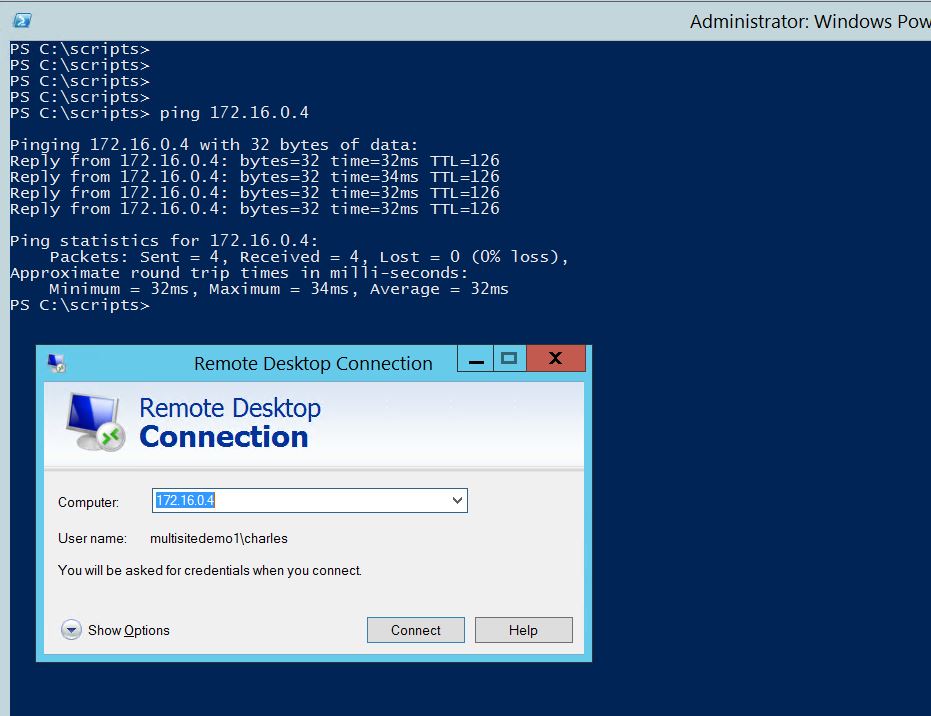
2) To test the failover of my virtual machine, I’ll login to the Azure portal, navigate to the Recovery Services Vault, Settings, Protected Items, Replicated Items, select the virtual machine and select the Test Failover button.
3) On the Test Failover page, I’ll select the Azure network to which the Azure VM will be connected after failover occurs. At this point, I will verify that the on premise Primary virtual Machine is set to DHCP before shutting it down.
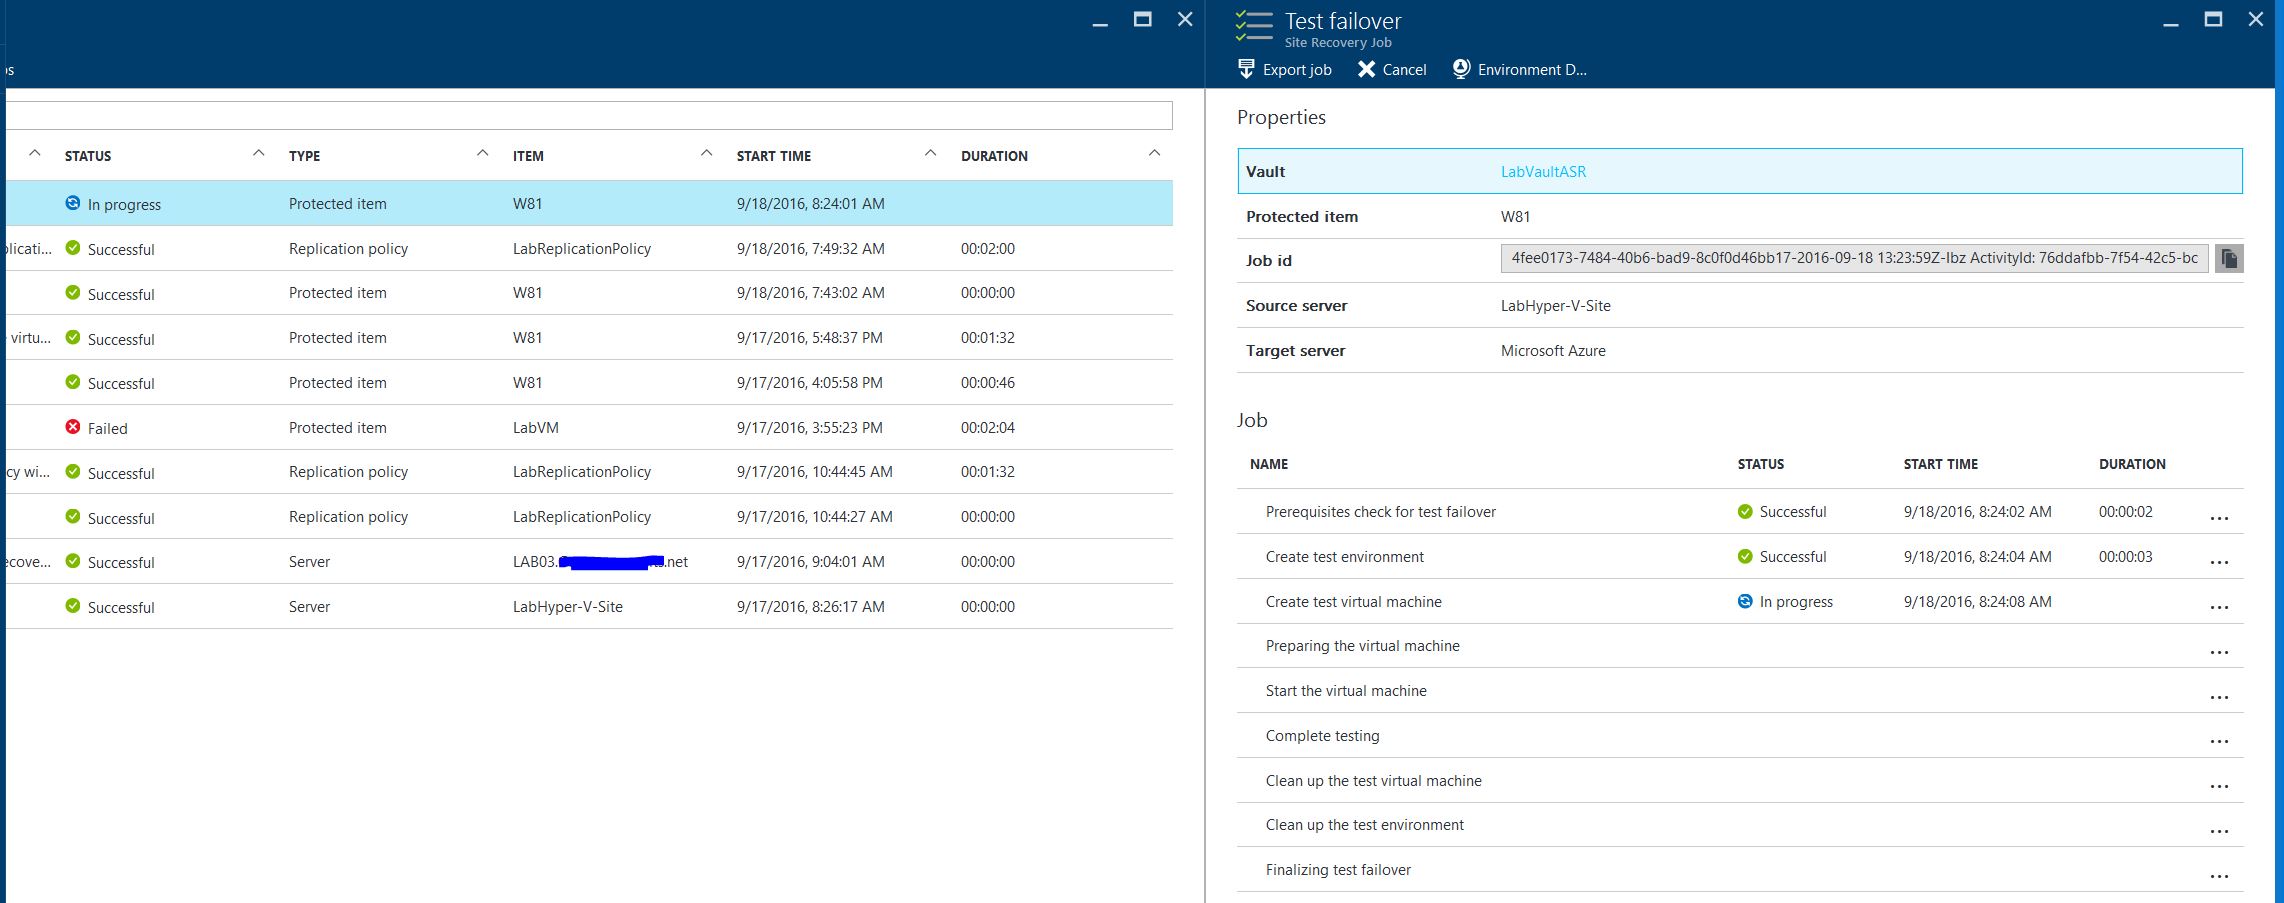
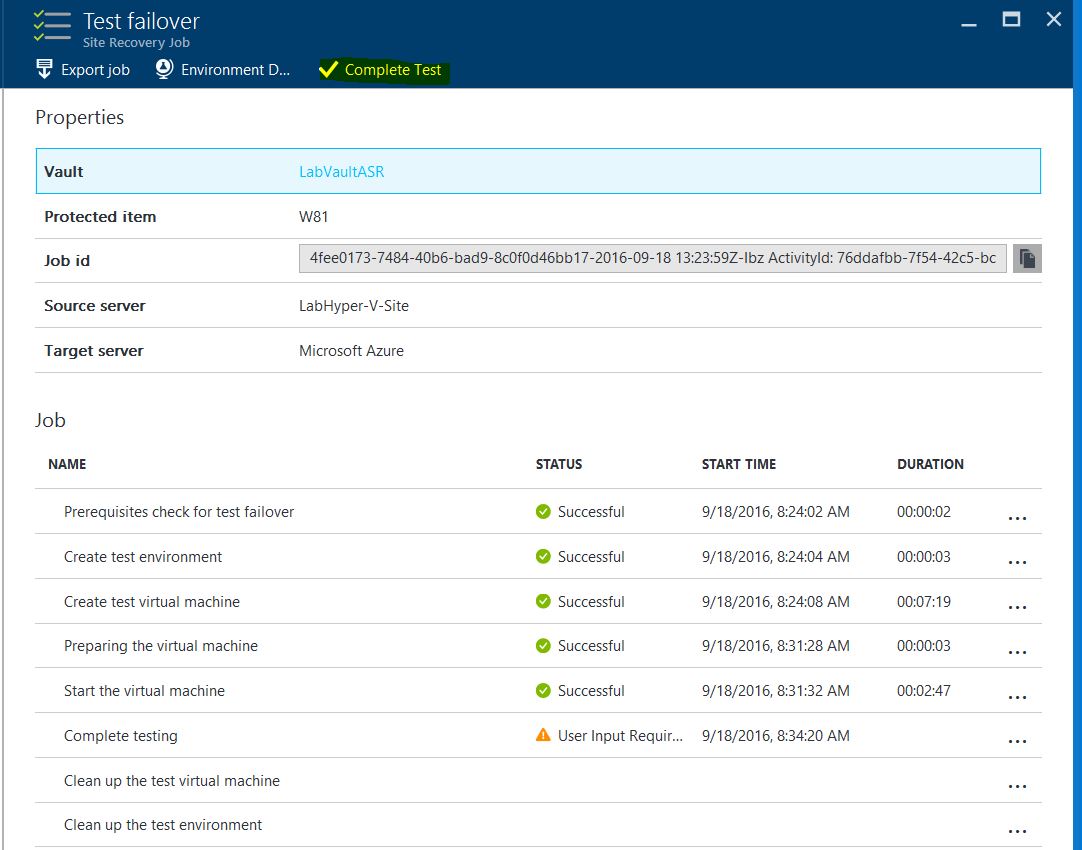
4) Click OK to begin the failover. I can track the progress of the failover by clicking on the VM to open its properies, or navigate to the Test Failover job in Settings, Site Recovery jobs.
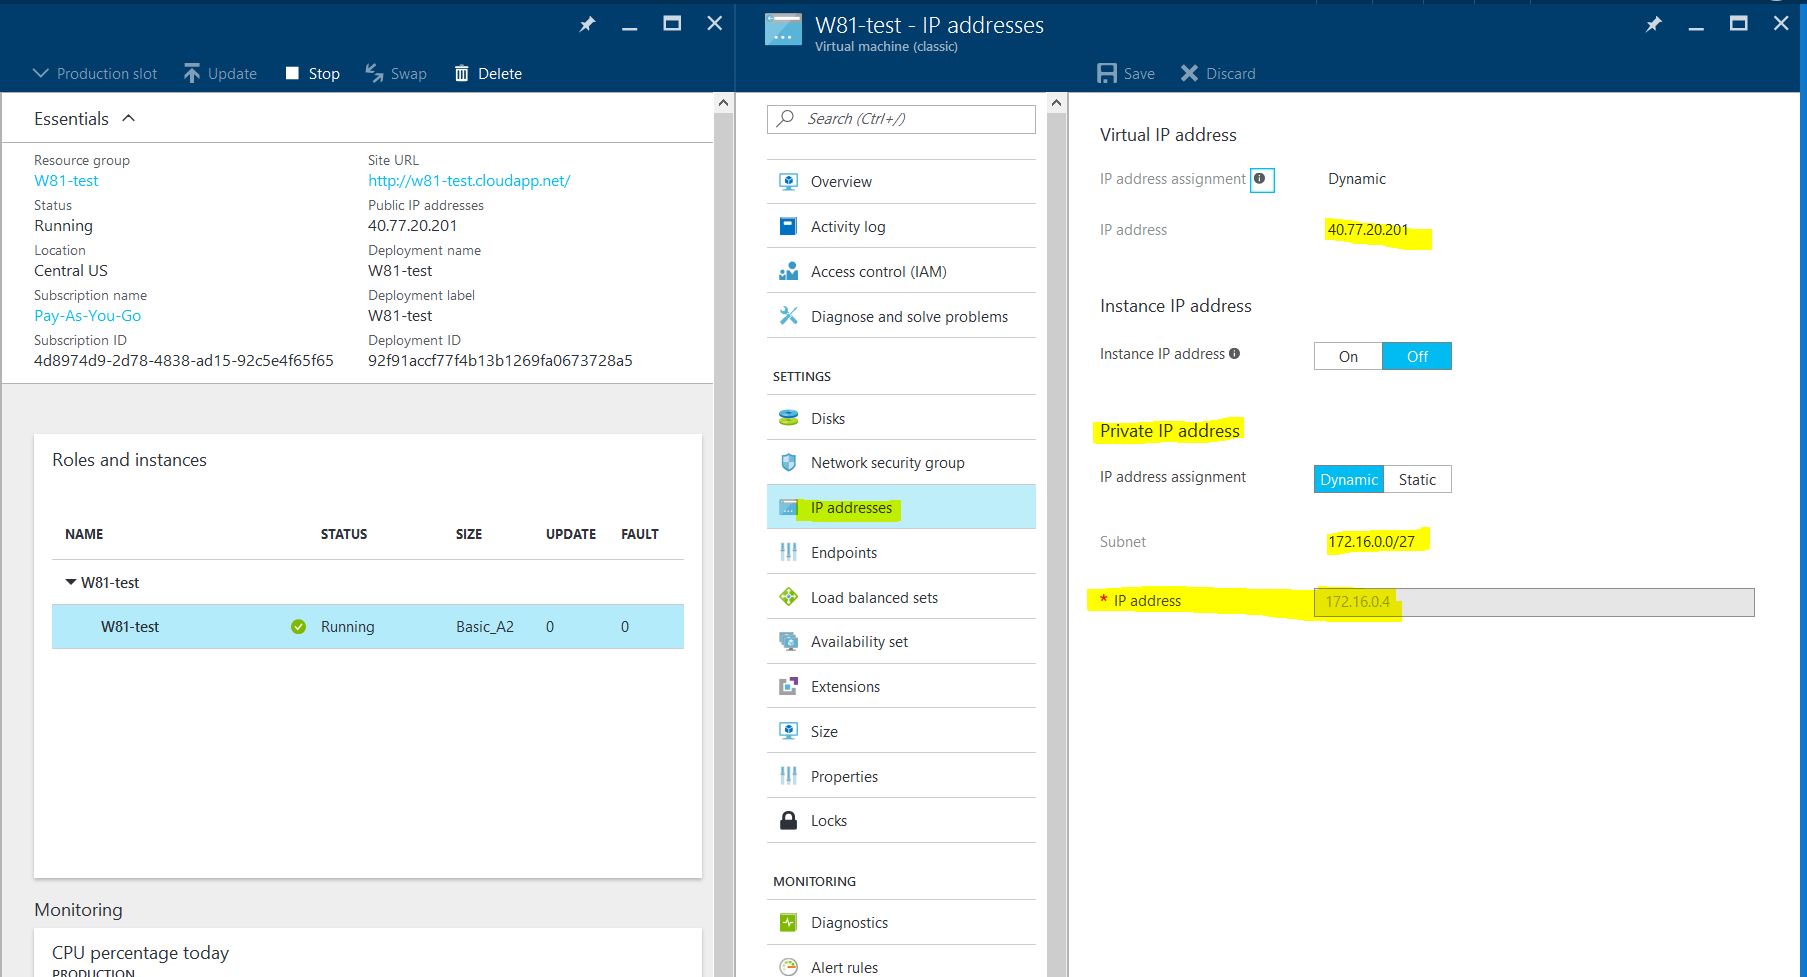
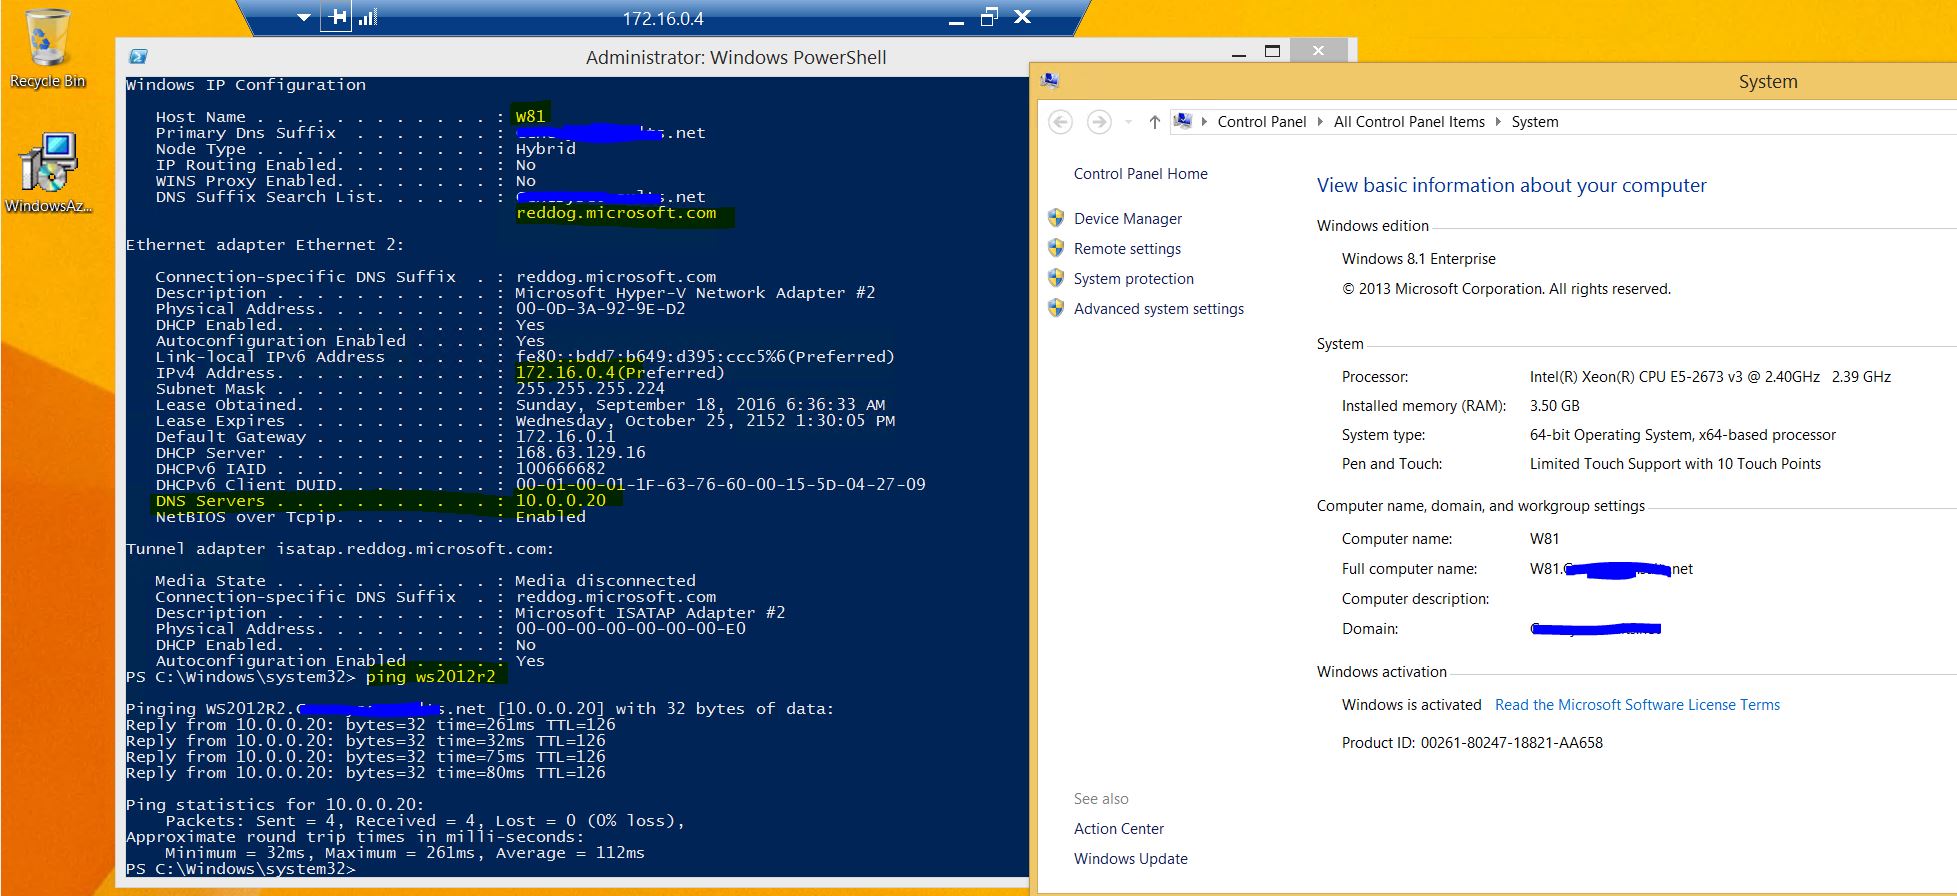
5) When the failover reaches the Complete testing phase as shown below, I navigated to the Azure Portal Virtual Machine page to verify that the VM started successfully, view the properties of the Azure test VM and retrieve it’s private IP Address based on my Azure virtual Network. I already setup Azure Site to Site VPN to my on premise infrastructure as described in an earlier post, so I’m able to internally RDP into the test Azure VM. The below screen shot shows the internal DHCP IP Address of the Azure test VM.

6) I disabled the windows firewall on the on premise primary VM before shutdown, so I’m able to successfully ping the Azure test VM. RDP into the Azure test VM using it’s internal IP Address.
7) I am able to successfully ping my on premise WS 2012 r2 domain controller. I successfully verified the settings and state of the Azure test VM W81-test. I verified that the VM disk is the right size. There’s also a temporary disk attached by Azure. There is a Data Loss warning file on this disk with message : Any data stored on this drive is SUBJECT TO LOSS and THERE IS NO WAY TO RECOVER IT.Please do not use this disk for storing any personal or application data.
8) Click Complete the test on the Site Recovery Jobs page to finish it. Click Notes to record and save any observations associated with the test failover. Click “The test failover is complete . Clean up the test environment” check box to automatically power off and delete the test virtual machine. Click Ok. At this stage any elements or VMs created automatically by Site Recovery during the test failover are deleted. Any additional elements you’ve created for test failover aren’t deleted. If a test failover continues longer than two weeks it’s completed by force.
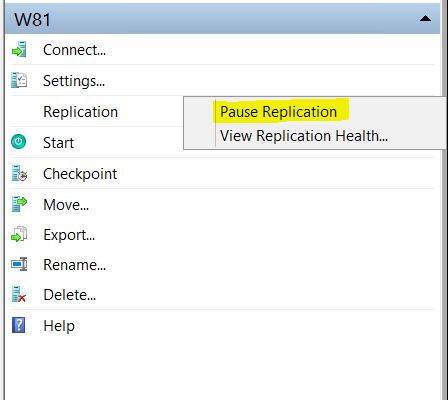
9) After successfully cleaning up the test failove environment, I will turn on my primary on prem VM. Please note that I did not have to turn off the primary VM for the failover testing. This is a testing environment, so I can afford to shutdown theh VM. In my production environment, I would isolate the Azure virtual network preferrably to run this test successfully and avoid any conflict between the on premise primary VM and the Azure test replica. At anytime, I could also pause the replication from the on premise primary VM.

3 responses to “Implementing Azure Site Recovery Protection for my non-SCVMM Hyper-V Virtual Machines.”
Hallo wishing you all the best in 2017, your posting are really helpful, How can I pay for Azure abo?.
Regards
Humphrey
Thanks for stopping by Humphrey. You can sign up for free on the Azure website.
The word you’re looking for is “premises.” With an S. A premise is an idea. “The premise of the story is that aliens invade Earth.” A building or facility is a premises, even if it’s just one.