Windows Server 2012 R2 with PowerShell 4.0 has hugely expanded support for configuring multiple NICs on a Cluster/ISCSI Initiator node via command line. After deploying multiple Network Interface Cards on my Hyper-v host, it took me a while to figure out how to properly configure the NICS with PowerShell .
Prior to Windows Server 2012, NIC configurations could be accomplished with the GUI, Netsh command line utility or mainly WmiObject classes. The following cmdlets enabled me complete the configuration of multiple NICs on a cluster node:
List Available NICs on Host Server.
Get-NetAdapter -Physical
![]()
Rename Network Adapter for Storage/ISCSI Connection.
Get-NetAdapter -InterfaceIndex 15 | Rename-NetAdapter -NewName StorageNIC1
![]()
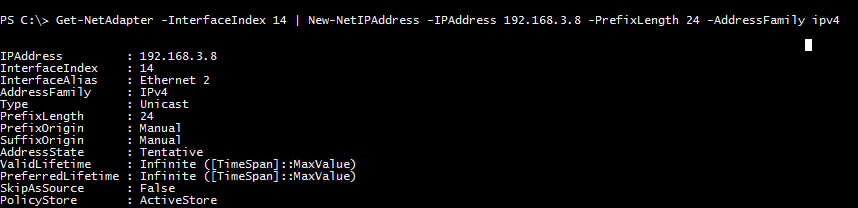
Set Private IP Address on Selected NIC.
Get-NetAdapter -InterfaceIndex 14 | New-NetIPAddress -IPAddress 192.168.3.8 -PrefixLength 24 -AddressFamily ipv4
Disable Network Adapter Bindings.
Usually the Storage Network Adapter needs just the IPv4 TcpIp binding enabled:
PS C:\ Get-NetAdapterBinding -Name StorageNIC1
Name DisplayName ComponentID Enabled
---- ----------- ----------- -------
StorageNIC1 Link-Layer Topology Discovery Responder ms_rspndr True
StorageNIC1 Link-Layer Topology Discovery Mapper I/O Driver ms_lltdio True
StorageNIC1 Microsoft LLDP Protocol Driver ms_lldp False
StorageNIC1 Microsoft Network Adapter Multiplexor Protocol ms_implat False
StorageNIC1 Client for Microsoft Networks ms_msclient True
StorageNIC1 QoS Packet Scheduler ms_pacer True
StorageNIC1 File and Printer Sharing for Microsoft Networks ms_server True
StorageNIC1 Internet Protocol Version 6 (TCP/IPv6) ms_tcpip6 True
StorageNIC1 Internet Protocol Version 4 (TCP/IPv4) ms_tcpip True
PS C:\ Get-NetAdapterBinding -Name StorageNIC1 | ?{ $_.ComponentID -ne 'ms_tcpip'} | % {Disable-NetAdapterBinding -Name $_.Name -ComponentID $_.ComponentID}
The above command gets the current Network Adapter bings, pipes the result to the Where-Object cmdlet to filter out the ms_tcpip binding and further pipes the remaining collection of bindings to the Disable-NetAdapter cmdlet.
PS C:\ Get-NetAdapterBinding -Name StorageNIC1
Name DisplayName ComponentID Enabled
---- ----------- ----------- -------
StorageNIC1 Link-Layer Topology Discovery Responder ms_rspndr False
StorageNIC1 Link-Layer Topology Discovery Mapper I/O Driver ms_lltdio False
StorageNIC1 Microsoft Network Adapter Multiplexor Protocol ms_implat False
StorageNIC1 Client for Microsoft Networks ms_msclient False
StorageNIC1 QoS Packet Scheduler ms_pacer False
StorageNIC1 File and Printer Sharing for Microsoft Networks ms_server False
StorageNIC1 Internet Protocol Version 6 (TCP/IPv6) ms_tcpip6 False
StorageNIC1 Internet Protocol Version 4 (TCP/IPv4) ms_tcpip True
Disable Dynamic DNS Registration and TcpipNetbios.
PS C:\> Get-WmiObject -Class win32_networkadapterconfiguration -Filter "Index = '0'" |Select DomainDNSRegistrationEnabled,FullDNSRegistrationEnabled,TcpipNetbiosoptions | ft -AutoSize
DomainDNSRegistrationEnabled FullDNSRegistrationEnabled TcpipNetbiosoptions
---------------------------- -------------------------- -------------------
False True 0
The above command, displays the current values of the selected properties. Please note that the index property value for WMIObject is not the same for the InterfaceIndex in the Get-NetAdapter cmdlet. The following command, disables dynamic DNS registration and TcpipNetbios.
PS C:\> Get-WmiObject -Class win32_networkadapterconfiguration -Filter "Index = '11'" |%{$_.SetDynamicDNSRegistration($false,$false) -and $_.SetTcpipNetbios(2)}
The result after disabling the selected NIC properties:
PS C:\> Get-WmiObject -Class win32_networkadapterconfiguration -Filter "Index = '9'" |Select DomainDNSRegistrationEnabled,FullDNSRegistrationEnabled,TcpipNetbiosoptions | ft -AutoSize
DomainDNSRegistrationEnabled FullDNSRegistrationEnabled TcpipNetbiosoptions
---------------------------- -------------------------- -------------------
False False 2
These cmdlets could be edited and reused with any combination of their available parameters to properly configure any number of Network Adapters on a Hyper-v Host to meet specific cluster network requirements.

4 responses to “Configuring Hyper-v Host Network Adapters for ISCSI Storage Connectivity with Powershell .”
[…] ← Configuring Hyper-v Host Network Adapters for ISCSI Storage Connectivity with Powershell … […]
Reblogged this on Exchange Times.
Cool series on the iSCSI configuration, tgey helped me a lot in bootstraping my own setup!
(W2k8 R2 didn’t have these PowerShell cmdlets back then) I wanted to drop you a note that for the DNS registration there is the ‘Set-DNSClient’ cmdlet:
Set-DnsClient -RegisterThisConnectionsAddress $false -InterfaceAlias gbe3-iscsi
All my iSCSI NICs have “iscsi” in the nameso I can do a quick loop:
$iSCSIAdapters = Get-NetAdapter *iscsi*
foreach ($Adapter in $iSCSIAdapters) {
Set-DnsClient -RegisterThisConnectionsAddress $false -InterfaceAlias $Adapter.Name
}
Similarly also on the binding cleanup I took an approach with less lines (maybe it has other gotchas):
Get-NetAdapterBinding *iscsi* | Set-NetAdapterBinding -Enabled $false
Get-NetAdapterBinding *iscsi* | Enable-NetAdapterBinding -ComponentID ms_tcpip
Awesome. Thanks for the comments Mathieu. I came across the DNSClient module and it’s cmdlets much after writing this post and realized it saved all the lines from the Get-WMIObject cmdlet 🙂
Thanks again for the comments, I totally appreciate.