This post will be focused mainly on the ISCSI Initiator host and configuring multipath IO paths to an ISCSI Target. The ISCSI Target portal has already been configured with 2 network paths for ISCSI.
The ISCSI Service by default is in a ‘Stopped’ state. So, we’ll begin by starting the service:
[hyperv00]: PS C:\Users\admin\Documents> Start-Service -Name msiscsi
Change the StartMode/StartupType to Automatic across reboots:

The same thing can be achieved with the following command:
[hyperv00]: PS C:\Users\admin\Documents> Set-Service -Name msiscsi -StartupType Automatic
Discover and Create a new ISCSI Target Portal:

At this point, the ISCSI Target connection is still in a disconnected state as indicated in the screenshot.
Installing and Configuring Multipath IO Feature and ISCSI Initiator.
![]()
We’ll display the list of commands available to the Multipath IO feature in Windows Server 2012 and determine what cmdlets will enable us configure global MPIO settings:
PS C:\> Get-Command -Module mpio
CommandType Name ModuleName
----------- ---- ----------
Function Clear-MSDSMSupportedHW mpio
Function Disable-MSDSMAutomaticClaim mpio
Function Enable-MSDSMAutomaticClaim mpio
Function Get-MPIOAvailableHW mpio
Function Get-MPIOSetting mpio
Function Get-MSDSMAutomaticClaimSettings mpio
Function Get-MSDSMGlobalDefaultLoadBalancePolicy mpio
Function Get-MSDSMSupportedHW mpio
Function New-MSDSMSupportedHW mpio
Function Remove-MSDSMSupportedHW mpio
Function Set-MPIOSetting mpio
Function Set-MSDSMGlobalDefaultLoadBalancePolicy mpio
Function Update-MPIOClaimedHW mpio
Enable automatic claiming of all iSCSI volumes, set default load balance policy to Round Robin and set the disk timeout to 60 seconds:
PS C:\> Enable-MSDSMAutomaticClaim -BusType iscsi

False

PS C:\> Set-MSDSMGlobalDefaultLoadBalancePolicy -Policy RR

PS C:\> Set-MPIOSetting -NewDiskTimeout 60

WARNING: Settings changed, reboot required.

PS C:\>
We will go ahead and restart the server after configuring the disk timeout value.
The next step, will involve connecting to the ISCSI Target and configuring Multipath with multiple network adapters. We’ll start by listing the available host network adapters and their IP Addresses:
[hyperv03]: PS C:\Users\admin\Documents> Get-NetAdapter | Get-NetIPAddress -AddressFamily ipv4
IPAddress : 192.168.2.4
InterfaceIndex : 13
InterfaceAlias : iSCSI
AddressFamily : IPv4
Type : Unicast
PrefixLength : 24
PrefixOrigin : Manual
SuffixOrigin : Manual
AddressState : Preferred
ValidLifetime : Infinite ([TimeSpan]::MaxValue)
PreferredLifetime : Infinite ([TimeSpan]::MaxValue)
SkipAsSource : False
PolicyStore : ActiveStore
IPAddress : 192.168.2.14
InterfaceIndex : 22
InterfaceAlias : ISCSI00-USB
AddressFamily : IPv4
Type : Unicast
PrefixLength : 24
PrefixOrigin : Manual
SuffixOrigin : Manual
AddressState : Preferred
ValidLifetime : Infinite ([TimeSpan]::MaxValue)
PreferredLifetime : Infinite ([TimeSpan]::MaxValue)
SkipAsSource : False
PolicyStore : ActiveStore
IPAddress : 10.0.0.108
InterfaceIndex : 19
InterfaceAlias : vEthernet (Switch00)
AddressFamily : IPv4
Type : Unicast
PrefixLength : 24
PrefixOrigin : Dhcp
SuffixOrigin : Dhcp
AddressState : Preferred
ValidLifetime : 7.08:08:53
PreferredLifetime : 7.08:08:53
SkipAsSource : False
PolicyStore : ActiveStore
Connect to the ISCSI Target and Setup MPIO on multiple Network Adapters:
[hyperv03]: PS C:\Users\admin\Documents> Get-IscsiTarget | Connect-IscsiTarget -InitiatorPortalAddress 192.168.2.4 -IsMultipathEnabled $true -IsPersistent $true -TargetPortalAddress 192.168.2.2
AuthenticationType : NONE
InitiatorInstanceName : ROOT\ISCSIPRT000_0
InitiatorNodeAddress : iqn.1991-05.com.microsoft:hyperv03.domainname.net
InitiatorPortalAddress : 192.168.2.4
InitiatorSideIdentifier : 400001370001
IsConnected : True
IsDataDigest : False
IsDiscovered : True
IsHeaderDigest : False
IsPersistent : True
NumberOfConnections : 1
SessionIdentifier : fffffa800d4d9020-4000013700000005
TargetNodeAddress : iqn.1991-05.com.microsoft:labtarget-target00-target
TargetSideIdentifier : 0300
PSComputerName :
[hyperv03]: PS C:\Users\admin\Documents> Get-IscsiTarget | Connect-IscsiTarget -InitiatorPortalAddress 192.168.2.14 -IsMultipathEnabled $true -IsPersistent $true -TargetPortalAddress 192.168.2.12
AuthenticationType : NONE
InitiatorInstanceName : ROOT\ISCSIPRT000_0
InitiatorNodeAddress : iqn.1991-05.com.microsoft:hyperv03.domainname.net
InitiatorPortalAddress : 192.168.2.14
InitiatorSideIdentifier : 400001370005
IsConnected : True
IsDataDigest : False
IsDiscovered : False
IsHeaderDigest : False
IsPersistent : True
NumberOfConnections : 1
SessionIdentifier : fffffa800d4d9020-4000013700000006
TargetNodeAddress : iqn.1991-05.com.microsoft:labtarget-target00-target
TargetSideIdentifier : 0400
PSComputerName :
Let us display the current ISCSI connections:
[hyperv03]: PS C:\Users\admin\Documents> Get-IscsiConnection
ConnectionIdentifier : fffffa800d4d9020-2bb4
InitiatorAddress : 192.168.2.4
InitiatorPortNumber : 56050
TargetAddress : 192.168.2.2
TargetPortNumber : 3260
PSComputerName :
ConnectionIdentifier : fffffa800d4d9020-2bb5
InitiatorAddress : 192.168.2.14
InitiatorPortNumber : 56306
TargetAddress : 192.168.2.12
TargetPortNumber : 3260
PSComputerName :
We observe that the ISCSI connections were made using the Network Adapters specifically configured for storage. A previous post shows how to configure Network Adapters for storage by tweaking the component bindings and DNS registration properties.
Viewing the current ISCSI Sessions, shows the sessions are persistent across reboots.
[hyperv03]: PS C:\Users\admin\Documents> Get-IscsiSession
AuthenticationType : NONE
InitiatorInstanceName : ROOT\ISCSIPRT000_0
InitiatorNodeAddress : iqn.1991-05.com.microsoft:hyperv03.domainname.net
InitiatorPortalAddress : 192.168.2.4
InitiatorSideIdentifier : 400001370001
IsConnected : True
IsDataDigest : False
IsDiscovered : True
IsHeaderDigest : False
IsPersistent : True
NumberOfConnections : 1
SessionIdentifier : fffffa800d4d9020-4000013700000005
TargetNodeAddress : iqn.1991-05.com.microsoft:labtarget-target00-target
TargetSideIdentifier : 0300
PSComputerName :
AuthenticationType : NONE
InitiatorInstanceName : ROOT\ISCSIPRT000_0
InitiatorNodeAddress : iqn.1991-05.com.microsoft:hyperv03.domainname.net
InitiatorPortalAddress : 192.168.2.14
InitiatorSideIdentifier : 400001370005
IsConnected : True
IsDataDigest : False
IsDiscovered : False
IsHeaderDigest : False
IsPersistent : True
NumberOfConnections : 1
SessionIdentifier : fffffa800d4d9020-4000013700000006
TargetNodeAddress : iqn.1991-05.com.microsoft:labtarget-target00-target
TargetSideIdentifier : 0400
PSComputerName :
Finally, I need to change the state of the iSCSI disk/volume from offline to online:
Set-Disk -Number 1 -IsOffline $false (Sets the disk into an online state)

Set-Disk -Number 1 -IsReadOnly $false(Makes the disk writable)
I decided to test the multipath configuration to the new Volume and the Round Robin Load Balancing policy.
I created a 5GB file and prepared to copy the file to the new ISCSI Volume with drive letter E:\. Starting Task Manager and navigating to the Performance tab confirms the presence of the 2 NICs.
After starting the copy, I noticed that both NICs were utilized in the copy process, since I set the Global Load Balance policy to Round Robin. The following screen shot will show this:
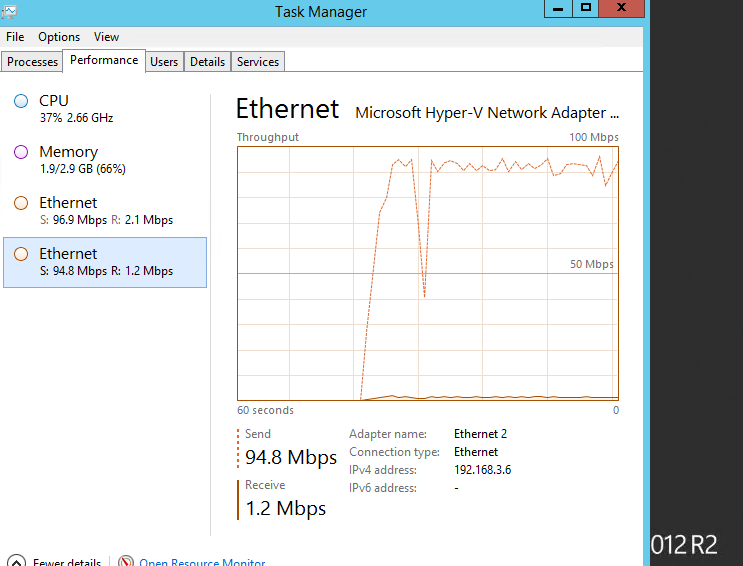
I disabled NIC 2 . The copy stopped for about 30 seconds, but the file transfer did not close. MPIO detected the failed path and resubmitted the copy on the new available path. After enabling NIC 2, the copy continued on both NICs.
I also observed an increase in copy speed/throughput with the Round Robin Load Balance policy.

One response to “Configuring multiple ISCSI Connections for Multipath IO using PowerShell.”
Reblogged this on chinny chukwudozie,it pro.