Microsoft has finally introduced Active Directory group filtering with the release of Azure AD Connect. The one tool to replace AADSync and include ADFS functionality.In this post, I will outline my steps for setting up AAD Connect with Single sign-on, password sync, group filtering and the exchange online attributes sync.
1) Download the Microsoft Azure Active Directory Connect tool at this url.
2) Operating system platform is Windows Server 2012R2.
3) Create an Office 365 tenant.
4) Setup an Office 365 Global Administrator account.
5) Setup an on premise Active Directory account with Enterprise Admin. group membership.
6) Login to the server with the on premise Enterprise Administrator account and run the AzureADConnect.msi.
7) On the Welcome screen, select the Customize button (option).
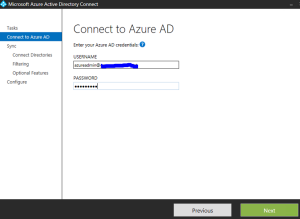
8) Enter the username and password of an Office 365 and Azure global admin on the “Connect to Azure AD” screen:
9) On the “Connect to AADS” screen enter the Enterprise Admin credentials mentioned in point 5.
10) On the “Filter users and devices” page, select the Synchronize Selected radio button. In the group field, enter the distinguished name of the intended Active Directory group. I preferred to locate all my hybrid users in a group for ease of management:
11) On the “Optional Features” page, based on my Hybrid Exchange needs, I selected the options I need synchronized with Office 365 and Azure:
12) On the “Azure AD Apps” page, I checked the boxes for Exchange Online and Officepro Plus:
13) On the “Azure AD Attributes” page, I decided to keep all default attributes for the options selected in the previous page:
14) On the last “Ready to Configure” page, I unchecked the Start synchronization process check box and clicked install to complete installation. I need to make a few more configuration changes before the actual synchronization to avoid any errors:
15) Logout of the Sync server and log back in to enable the Enterprise admin account run the AD Connect tool.
Specific Configuration points to help prevent Synchronization Errors:
1) In my experience so far, the Windows Azure Active Directory management agent (as seen in the Synchronization Service Manager) is set up with a default synchronization account (during installation) for Office 365 tenant and on premise synchronization. This account appears as “Sync_ServerHostName_8bdc123456bb@domain.onmicrosoft.com”. The initial sync process failed the first time because the default sync account is not a member of the global admin group in Office 365. I changed the sync service account to the Office 365 global admin account (Azure AD Sync) I already created and added to the global admin group. I also disabled password expiration for the Azure AD Sync account as indicated below:
PS C:\>Connect-MsolService

PS C:\>Get-MsolUser -UserPrincipalName azureadmin@labdomain.net | Set-MsolUser -PasswordNeverExpires $true
2) The Azure AD Sync task Scheduler failed to lunch a few times. The resolution for this problem was to make sure the task run account had “Logon As A batch” privileges. I set this up using domain group policy.
3) A failed synchronization has also led to a “stopped-extension-dll-exception”. After much troubleshooting, it appears this could have been caused by outdated binaries of the MSOL Sign-in Assistant installed. In this scenario, I did a full uninstall of all the dependent tools, deleted all file and folder references and registries, restarted and did a fresh install.


This was great too read