I’ve been exploring the requirements for extending my on premise infrastructure to the Microsoft Azure IaaS public cloud. Azure Site to Site IPsec VPN is a key part of achieving that objective.There are two deployment models in Azure; the Azure Service Manager(Using the Azure Classic Portal) and the Azure Resource Manager (the new Azure Portal). My deployment steps in this implementation use the Azure Classic Portal. Moving forward though, I intend to use the Azure Resource Manger for future deployments.The following are key requirements:
1) Public IP Addresses of both VPN Endpoints (Azure and On Premise environments).
2) A Pre-shared key.
3) Remote Networks of both Endpoints.
Azure Side VPN Components:
1) Azure Virtual Network and address space.(The private address range with Subnet Mask. Allows you to add private IP Addresses to your servers and Azure side virtual machines.)
2) Local Network.(Public IP Address of the Endpoint we are establishing a VPN with.Also contains the remote networks which can be found at the remote endpoint.This tells the VPN where it might find our on premise networks.)
3) The Azure Gateway.(The public IP of our Azure Endpoint.Routing type is set up here:Dynamic Routing enables multi site to site VPN and Static routing enables only Site to Site VPN.)
4) The Azure VPN Scripts.(Azure generated VPN script that auto configures the remote endpoint on premise RRAS Server).
The IP Address space in Azure is specified using the CIDR notification (Classless Interdomain Routing. A way of subnetting networks into smaller networks to save addresses).
Required Azure VPN Firewall Ports:
UDP 1701
UDP 4500
UDP 500
Protocol 50
The steps are as follows:
1) Login to https://manage.windowsazure.com.
2) Navigate to the Networks tab and click on the Create a virtual network link.

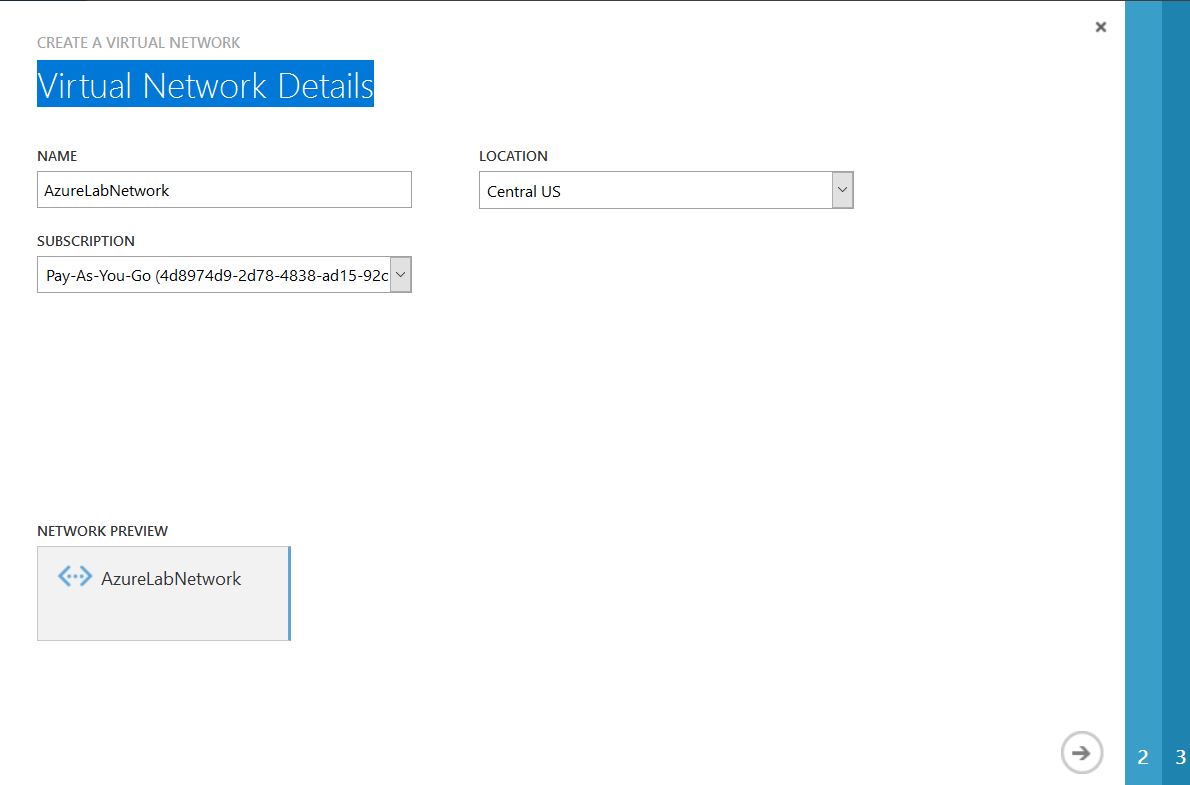
3) On the Virtual Network Details page, enter a name for your virtual network and location and click next.
4) Ignore the DNS Servers and VPN Connectivity page and click next.
5) On the Virtual Network Address Spaces page, enter your designated address space and subnet.I’m using the Class B 172.16.0.0/24 for my address space which gives me 254 hosts. For the subnet, I’m using a /27 subnet which will give me 30 hosts. I renamed my subnet to AzureSubnet. I still have enough address spaces for my gateway network. I can add more subnets and rename them if I choose to. Click next;
IP Address Space : 172.16.0.0
Address Class : Classless /24
Network Address : 172.16.0.0
Subnet-1 Address : 172.16.0.0
Subnet Mask : 255.255.255.224
Hosts per Subnet : 30


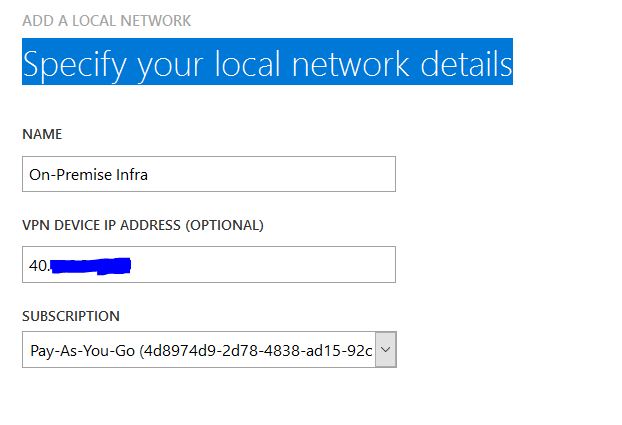
6) In the next step, we will create the Local Network. The Local Network defines the IP Address space of our On Premise remote networks. Still on the “Networks” page, navigate to the “Local Networks” tab and click on the Add a local network link. On the Specify your local network details, enter a name for the On Premise endpoint network and corresponding public IP Address is available.Click next.
7) On the Specify the address space page, enter the address space of the On-Premise remote endpoint network you intend to work with and finish.

8) Create the DNS Servers. Still on the networks page, select the DNS Server tab. Click on the Register a DNS server link to create a DNS server. I’m using my On Premise DNS server.


9) In the next step, we’ll configure the Gateway network. On the “Networks” page, under the virtual network tab, click on the newly created virtual network.On the virtual network page, select the Configure tab.In the dns servers section, select the newly created DNS server.In the Site-to-Site Connectivity section, tick the “Connect to the local network” box. For the “Local Network” field, select the On-PremiseInfra local network from the drop down.
In the Virtual Network Address Spaces, Azure automatically added the Gateway network with the /29 in the address space with 3 host addresses. Save the configuration changes.


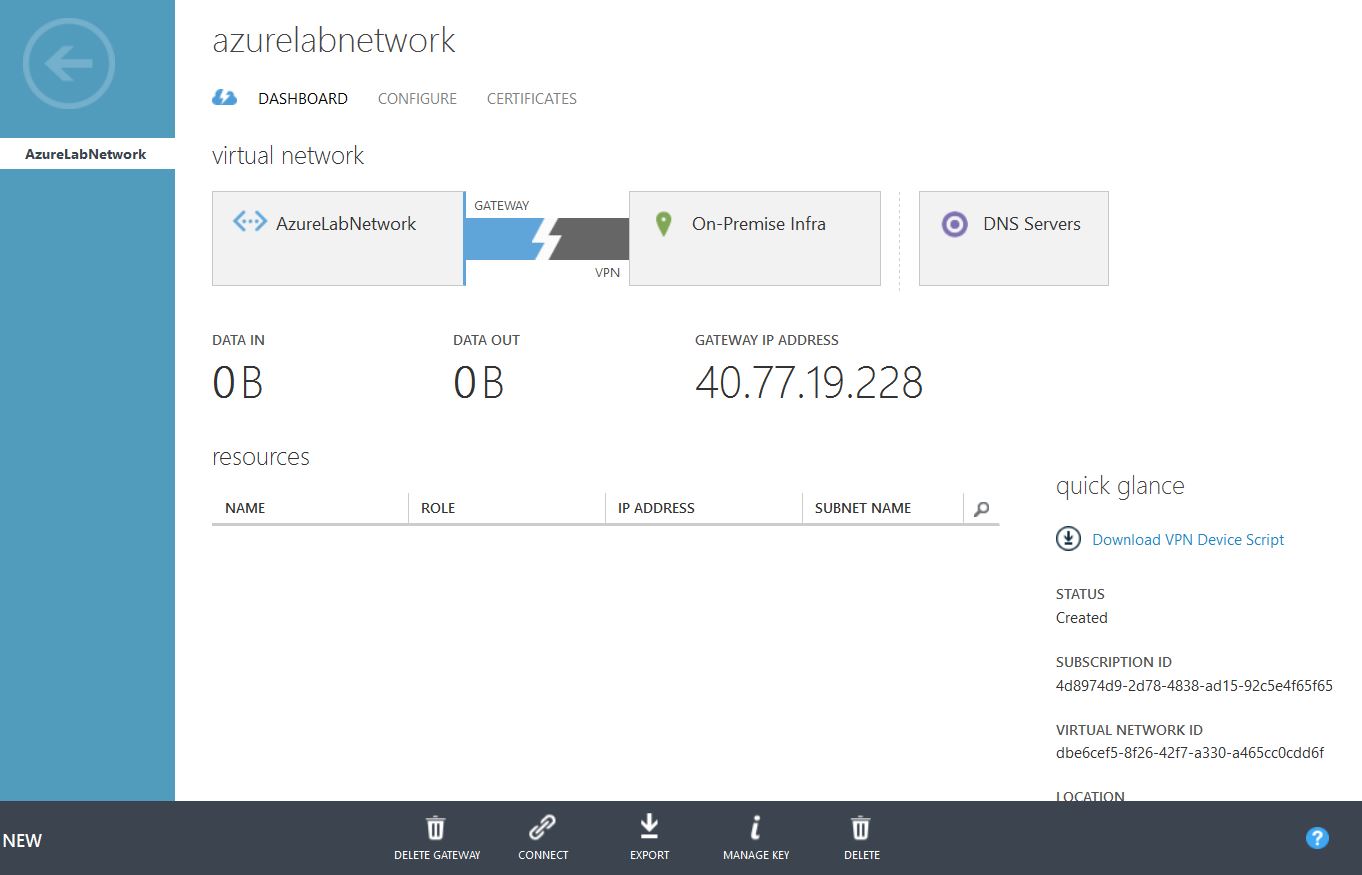
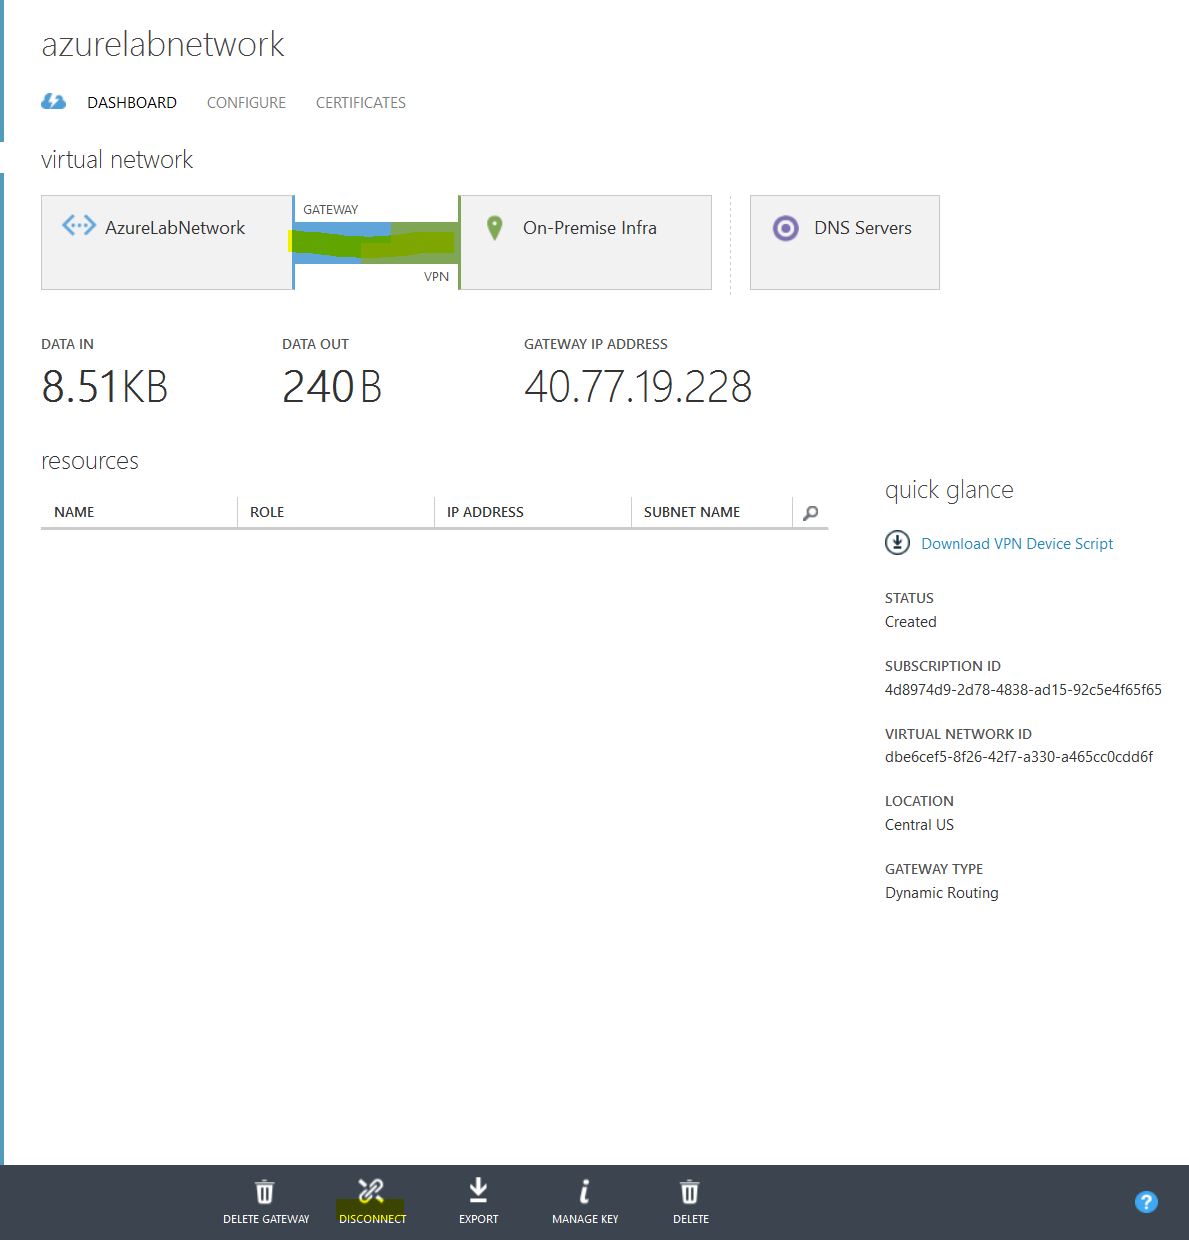
10) On the Dashboard tab, click on the Create Gateway button at the bottom of the page and select Dynamic Routing to create the Gateway.

As indicated in the following screen shot, the Gateway was created successfully but is still disconnected.
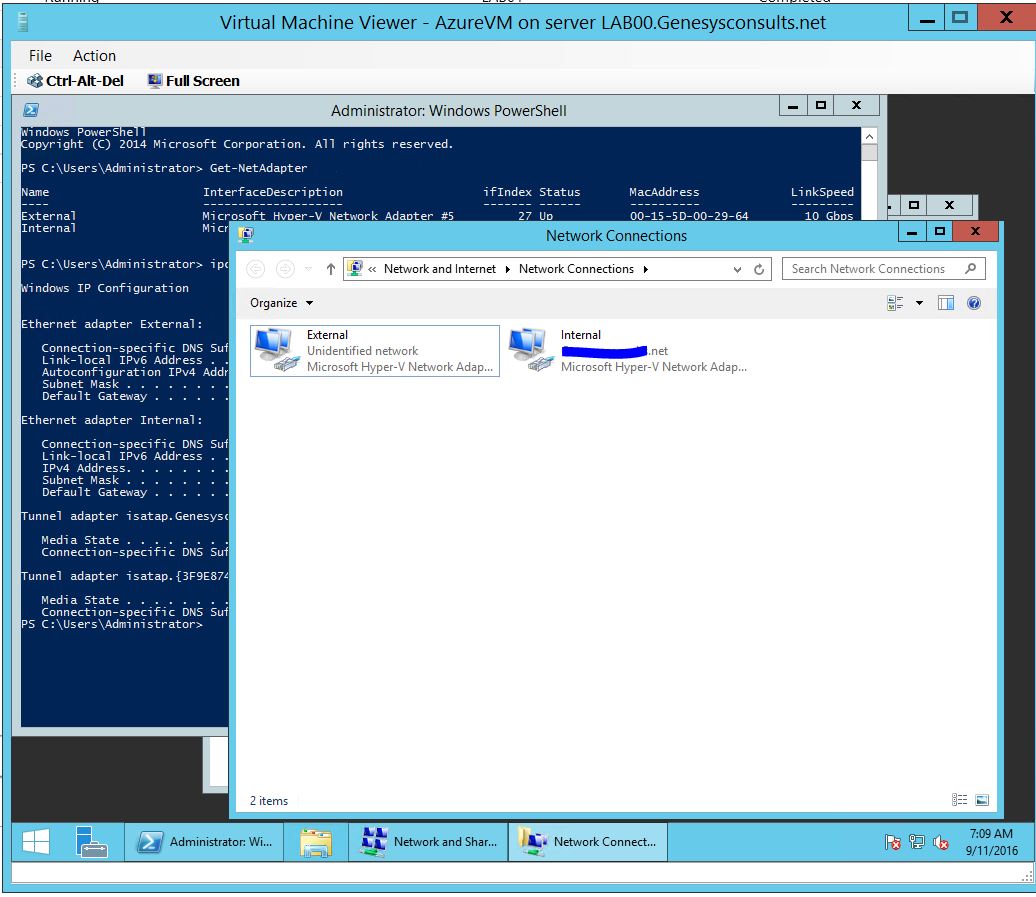
11) In the next steps, we will setup and configure the On Premise RRAS (Routing and Remote Access Server ) for connection to the Azure VPN endpoint.For this step, I have created a virtual machine running Windows Server 2012R2 to act as the RRAS server. I’m using the RRAS server as my On Premise endpoint router because it supports Dynamic Routing.
In my System Center Virtual Machine Manager 2012R2 environment, I’ll create the external host virtual switch for connecting the Azure virtual machine to the internet.
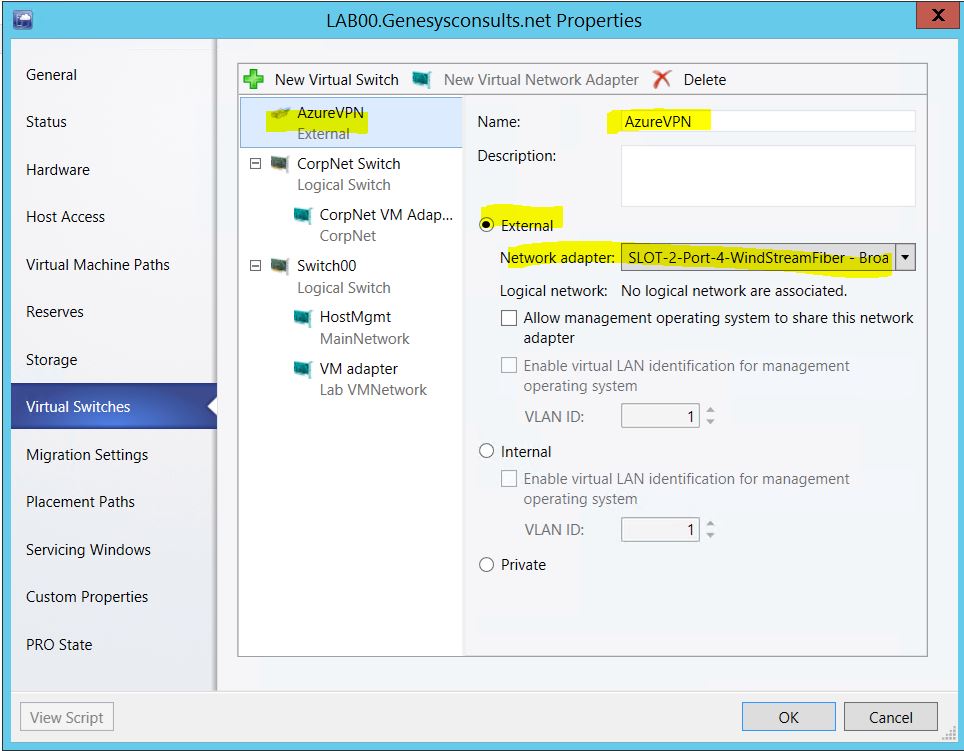
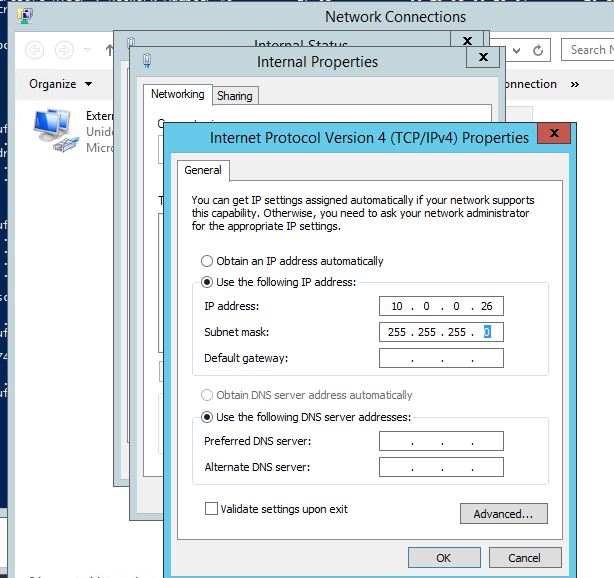
12) In the SCVMM 2012R2 VMs and Services pane, I’ll console into the virtual machine designated for the Azure VPN setup and rename the network adapters. Select the designated external network adapter and rename it to External.Rename the internal NIC to Internal. In the network properties for the External NIC, enter the IP Address configuration as follows:

13) After configuring the networking on the RRAS Virtual Machine, we’ll proceed to to setup RRAS by downloading the “VPN Device Script” from the Azure portal.Navigate to “Networks”, click on the virtual network and on the Dashboard page, download the VPN script. On the “Download a VPN Device Configuration Script” page, select Vendor as Microsoft, platform is RRAS and operating system is Windows Server 2012 R2. After download, rename the VpnDeviceScript.cfg file to VpnDeviceScript.ps1 (PowerShell file):

14) Run the VpnDeviceScript.ps1 script to auto install and configure routing and Remote Access on the endpoint rras virtual machine.
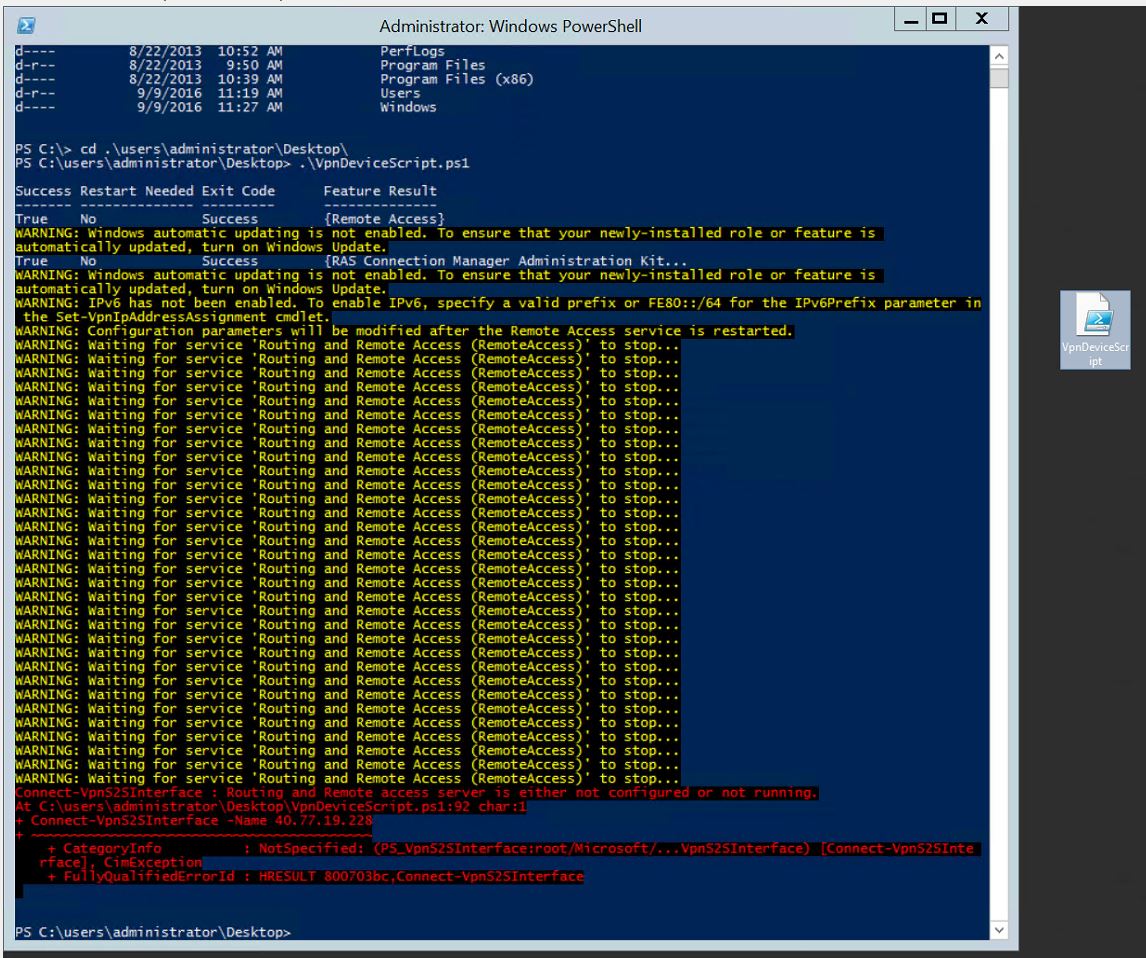
It might seem the script run ended in error. But in the few times I have run through this process, I find that the script actually executed successfully and RRAS was well setup. This can be verified by logging into the Azure portal to find that the gateway automatically established a vpn connection to my On Premise network.
15) In this step, I will setup a virtual machine in Azure to test connectivity with my on premise infrastructure and extend my on premise network to Azure cloud. Login to the Azure classic portal, navigate to the Virtual Machines option and click on the Create a virtual machine link.

On the “New” page, select Compute-Virtual Machine and select the “From Gallery” option which allows you to better customize your VM.

On the “Choose an Image” page, I selected Microsoft, Windows Server, and Windows Server 2012 R2 Datacenter . Click next.

On the “Virtual machine configuration”, I filled the values as shown in the screen shot. Click next.

It is important that we pay attention to this screen. The Cloud Service DNS Name must be unique. To make sure the server goes into my virtual network, I made sure to select my virtual network (AzureLabNetwork) in the Region/Virtual Network field. I left the default endpoint configurations of the Remote Desktop and PowerShell ports for access to the VM.This field can be edited as needed.Click next to install the VM agent and Finish.

It took about 5 minutes to complete the provisioning process for the VM.
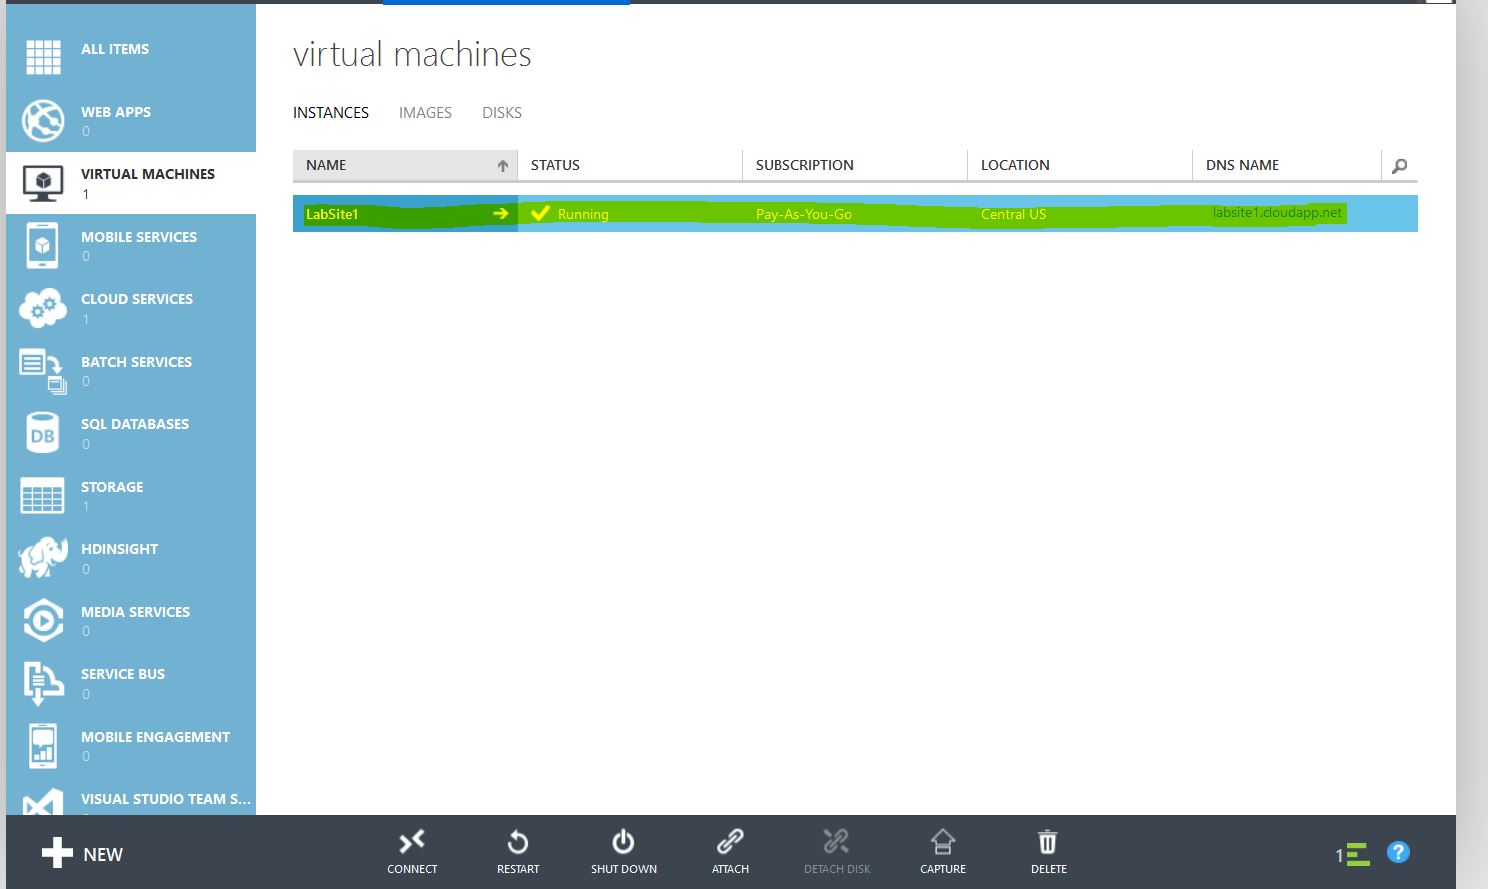
I can verify the internal IP Address of the Azure Virtual Machine by clicking on the VM instance and selecting the Dashboard tab.

By default, Ping is disabled on the Azure VM. The Windows Firewall is turned on . I turned off the firewall (it’s a test environment. Another option is to create an Allow Firewall rule for Ping packets. To test vpn connectivity, I was able to successfully rdp into the Azure VM using it’s internal IP Address from my on premise RRAS server. I can also successfully ping the Azure VM on it’s internal IP Address from my on premise RRAS server as shown below and vice versa.

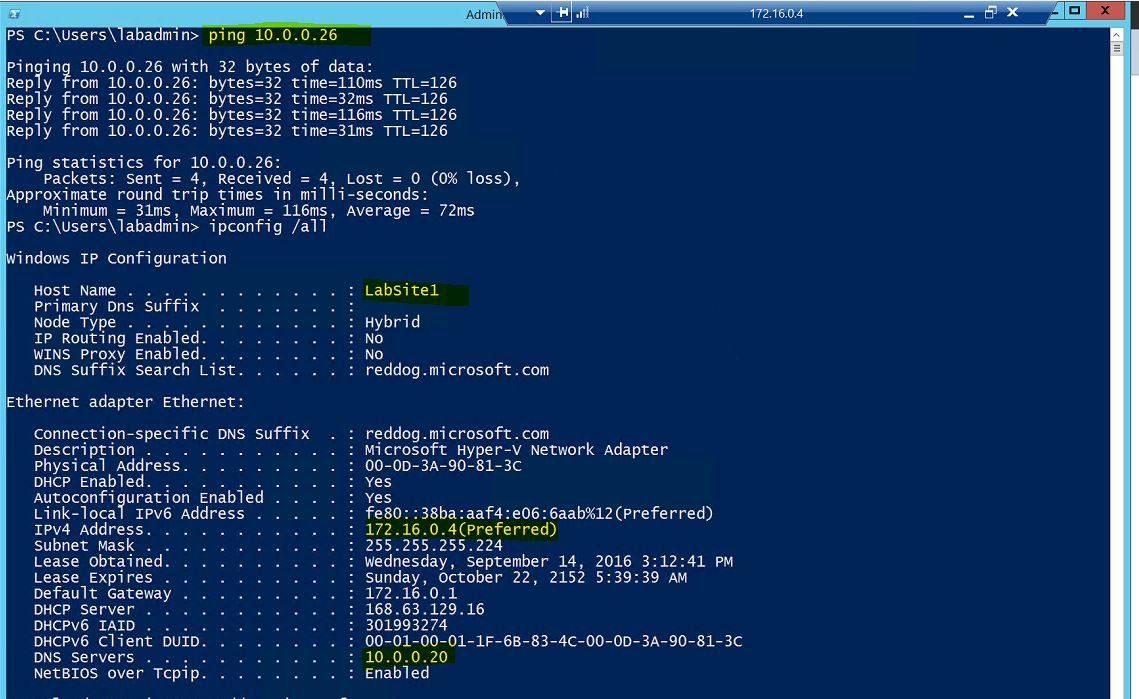
We can verify from the above screen shot that the Azure Virtual machine is using the on premise domain controller (10.0.0.20) as it’s DNS server. I have configured a route to the Azure virtual network on my on premise Cisco router/gateway:
LabL3Switch(config)#ip route 172.16.0.0 255.255.255.0 10.0.0.26
This will enable connectivity from the rest of the on premise network to the virtual network and vice versa, I can ping a local network machine by name.At this point I could go ahead and configure the Azure VM as a domain controller for on premise to Azure virtual network multi master replication and domain controller redundancy. The Azure virtual machine will require a static IP Address if it is to be configured as a domain controller. This can be achieved by using the new Azure Portal (ARM) as indicated in the following screen shot:

