In my limited experience with processing big data workloads on the Azure Databricks platform powered by Apache Spark, it has become obvious that a significant part of the tasks are targeted towards Data Quality. Data quality in this context mostly refers to having data that is free of errors, inconsistencies, redundancies, poor formatting and other problems that might prevent the data from being used readily for either building distributed models or data visualization. Some of these tasks involve :
a) ensuring that data exploration and clean up are performed so that table column/property data types are correctly defined,
b) verifying schema length,
c) removal or replacement of “null”/missing values in table records/rows where necessary,
d) removing trailing and leading spaces in dataset values as they are migrated to Apache Spark on Azure Databricks,
e) verifying record counts and performing a comparison of source/target output datasets.
f) handling data duplication.
In this write-up, I demonstrate the implementation of Apache Spark Python API (PySpark), for developing code that accomplishes some of these tasks.
I also walk through steps to show how Databricks-Connect, a Spark client library, enables the ability to develop Apache Spark application code locally in Jupyter Notebooks and execute the code remotely, server-side on an Azure Databricks Cluster. I’ll show a quick demonstration of installing and configuring Databricks Connect on a Windows 10 machine. Please note that all code samples and tokens used in this post are for testing purposes only and are not to be directly used in production.
In other sections of this post, I’ll be showing code samples for:
1) Configuring Databricks-Connect to enable my local Apache Spark setup to interact with a remote Azure Databricks Cluster.
2) Creating a CSV file dataset on a remote Azure Databricks Workspace using the DBUtils PySpark utility on my local machine.
3) Ingest the csv dataset and create a Spark Dataframe from the dataset.
4) Create a Database by persisting the Dataframe to an Azure Databricks Delta table on the remote Azure Databricks workspace.
5) Verify the table schema, data types and schema count.
6) Use PySpark functions to display quotes around string characters to better identify whitespaces.
6) Explore Pyspark functions that enable the changing or casting of a dataset schema data type in an existing Dataframe to a different data type.
7) Using Pyspark to handle missing or null data and handle trailing spaces for string values.
8) Run a comparison between two supposedly identical datasets.
Toolset:
1) I’m currently running Python version 3.7.2 as a virtual environment on a Windows 10 machine. The Python virtual environment was setup using the Python Venv module.
2) Jupyter notebook version 4.4.0. This can be installed using the pip install jupyter command. I have configured the Jupyter notebook Kernel to run against my local Python virtual environment.
3) Databricks-Connect 5.3 PyPI Spark client library. This is an awesome tool that allows me write my Spark application locally while executing on a remote Azure Databricks Cluster.
Install and configure Databricks Connect on a windows 10 machine Python virtual environment.
Open a Powershell console, navigate to the Python virtual environment path and activate:
PS C:\virtualenv\dbconnect> .\Scripts\activate
Install Databricks Connect:
(dbconnect) PS C:\virtualenv\dbconnect> pip install databricks-connect
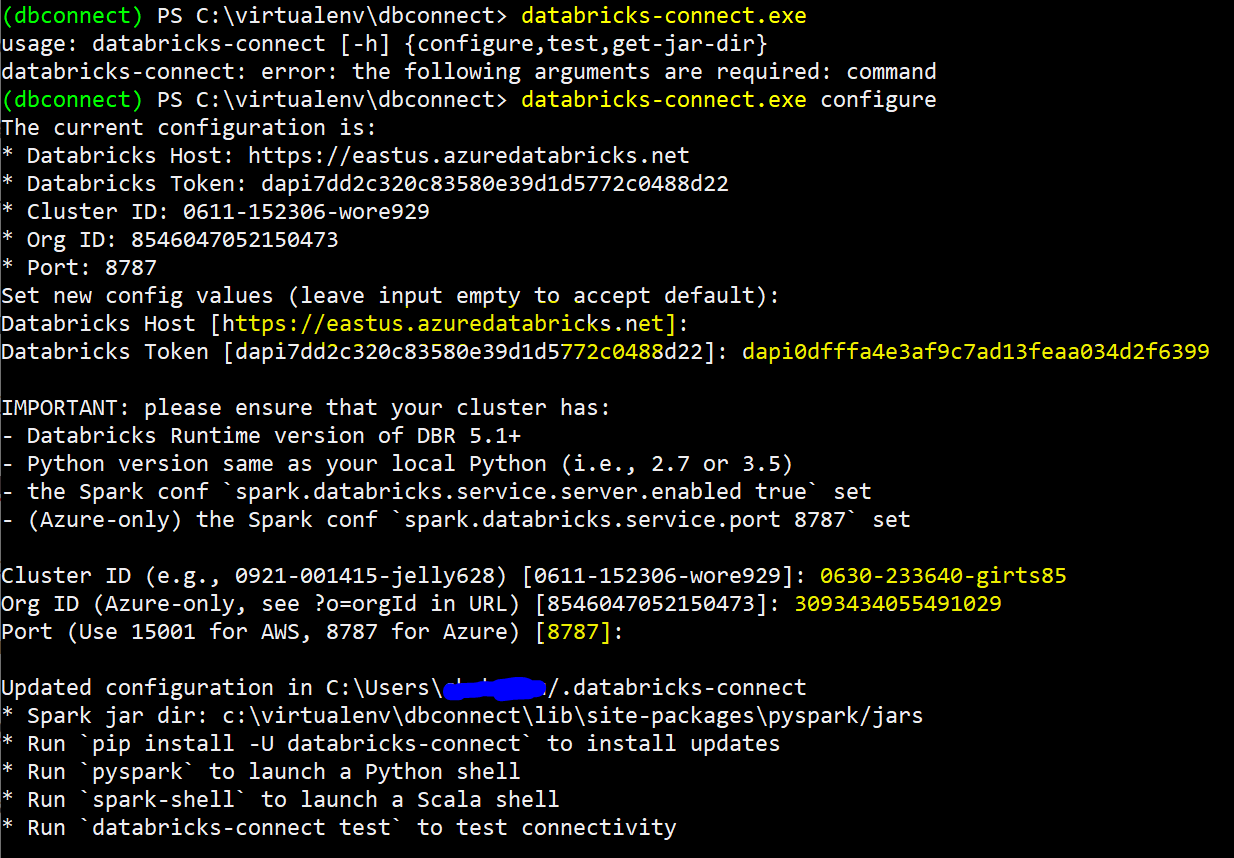
Configure Databricks Connect with remote Azure Databricks Cluster and Workspace parameters. The parameters displayed in the screen shot were provisioned in a lab workspace and have since been deprovisioned:
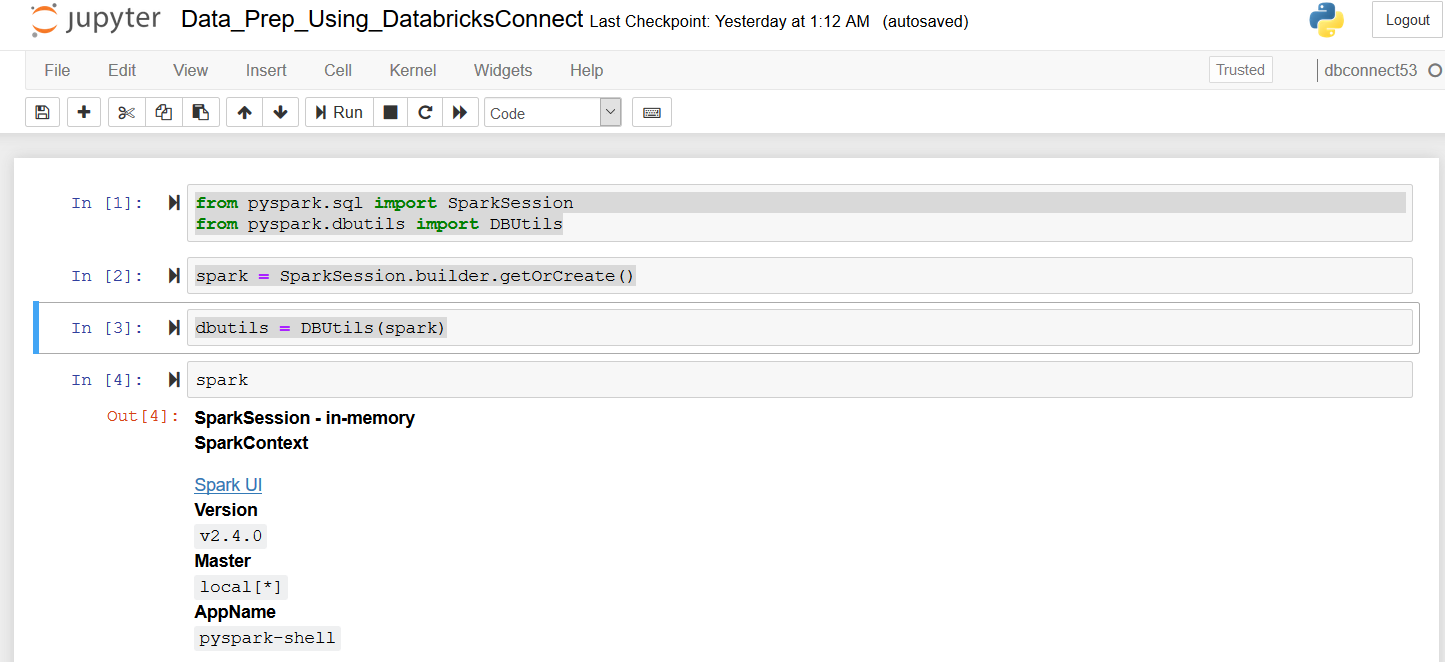
Create a SparkSession in my Jupyter Notebook and import the required PySpark dbutils library:
from pyspark.sql import SparkSession

from pyspark.dbutils import DBUtils

spark = SparkSession.builder.getOrCreate()

dbutils = DBUtils(spark)
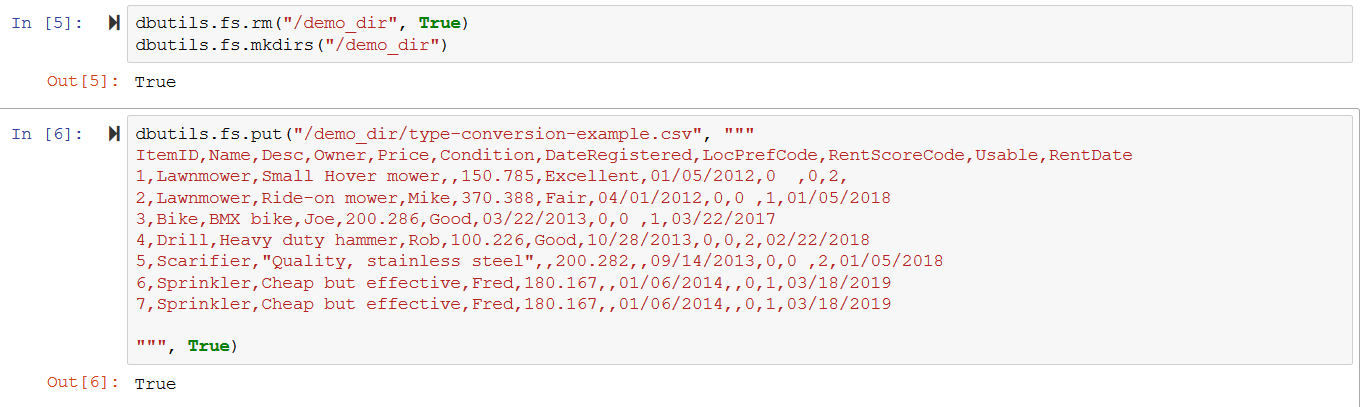
Use the DBUtils PySpark utility to create a folder and csv file sample dataset in the remote Databricks Workspace:
dbutils.fs.rm("/demo_dir", True)

dbutils.fs.mkdirs("/demo_dir")
dbutils.fs.put("/demo_dir/type-conversion-example.csv", """
ItemID,Name,Desc,Owner,Price,Condition,DateRegistered,LocPrefCode,RentScoreCode,Usable,RentDate
1,Lawnmower,Small Hover mower,,150.785,Excellent,01/05/2012,0 ,0,2,
2,Lawnmower,Ride-on mower,Mike,370.388,Fair,04/01/2012,0,0 ,1,01/05/2018
3,Bike,BMX bike,Joe,200.286,Good,03/22/2013,0,0 ,1,03/22/2017
4,Drill,Heavy duty hammer,Rob,100.226,Good,10/28/2013,0,0,2,02/22/2018
5,Scarifier,"Quality, stainless steel",,200.282,,09/14/2013,0,0 ,2,01/05/2018
6,Sprinkler,Cheap but effective,Fred,180.167,,01/06/2014,,0,1,03/18/2019
7,Sprinkler,Cheap but effective,Fred,180.167,,01/06/2014,,0,1,03/18/2019
""", True)
Create PySpark Dataframe from the ingested CSV source file:
#Create Dataframe from the ingested CSV source file

df = spark.read.format("csv").options(header=True, inferschema=False).load("/demo_dir/type-conversion-example.csv")
![]()
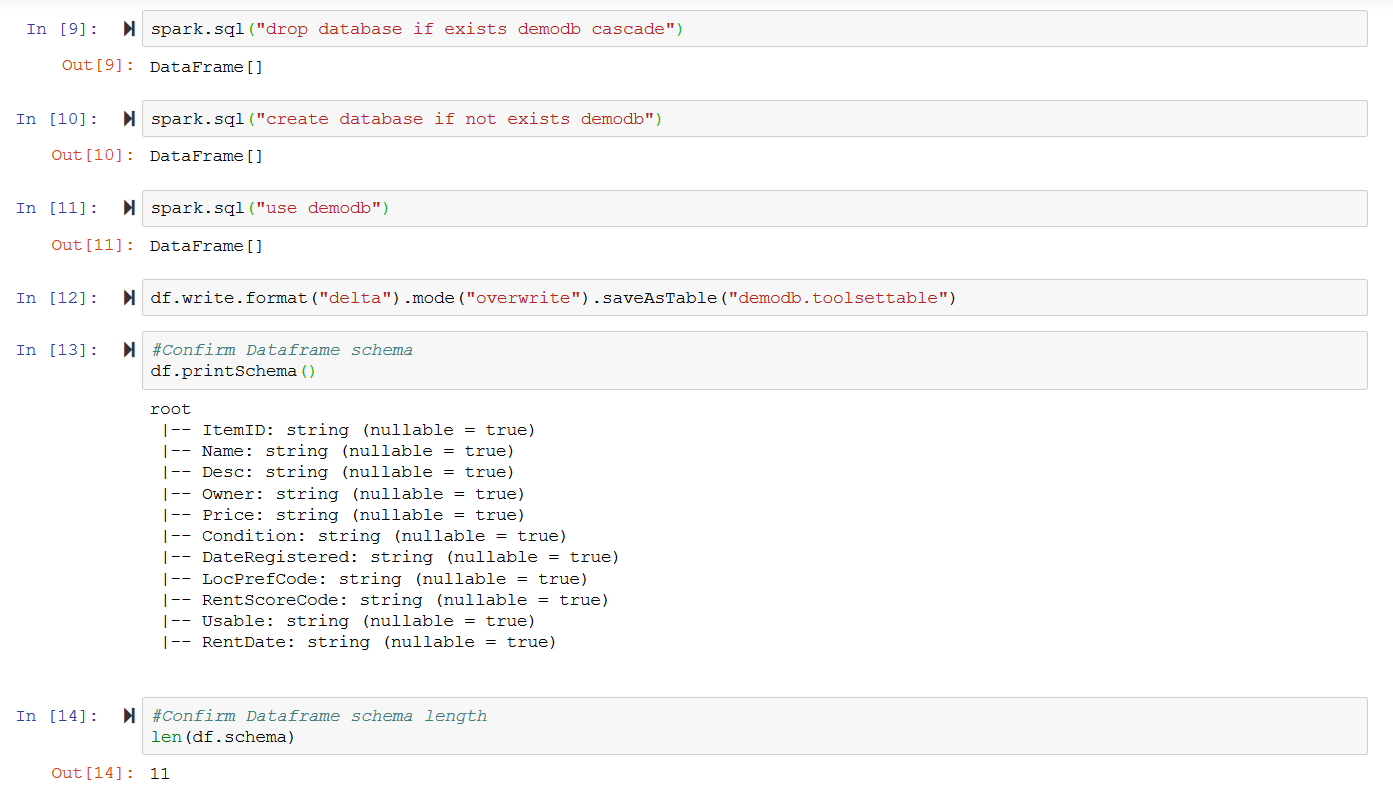
Create a database and write the tools dataframe to a “toolsettable” table in the remote Azure Databricks hive metastore:
Here we use a combo of Spark SQL and the PySpark saveAsTable function to create a database and Databricks Delta table.
spark.sql("drop database if exists demodb cascade")

spark.sql("create database if not exists demodb")

spark.sql("use demodb")

df.write.format("delta").mode("overwrite").saveAsTable("demodb.toolsettable")
#Confirm Dataframe schema

df.printSchema()
#Confirm Dataframe schema length
len(df.schema)
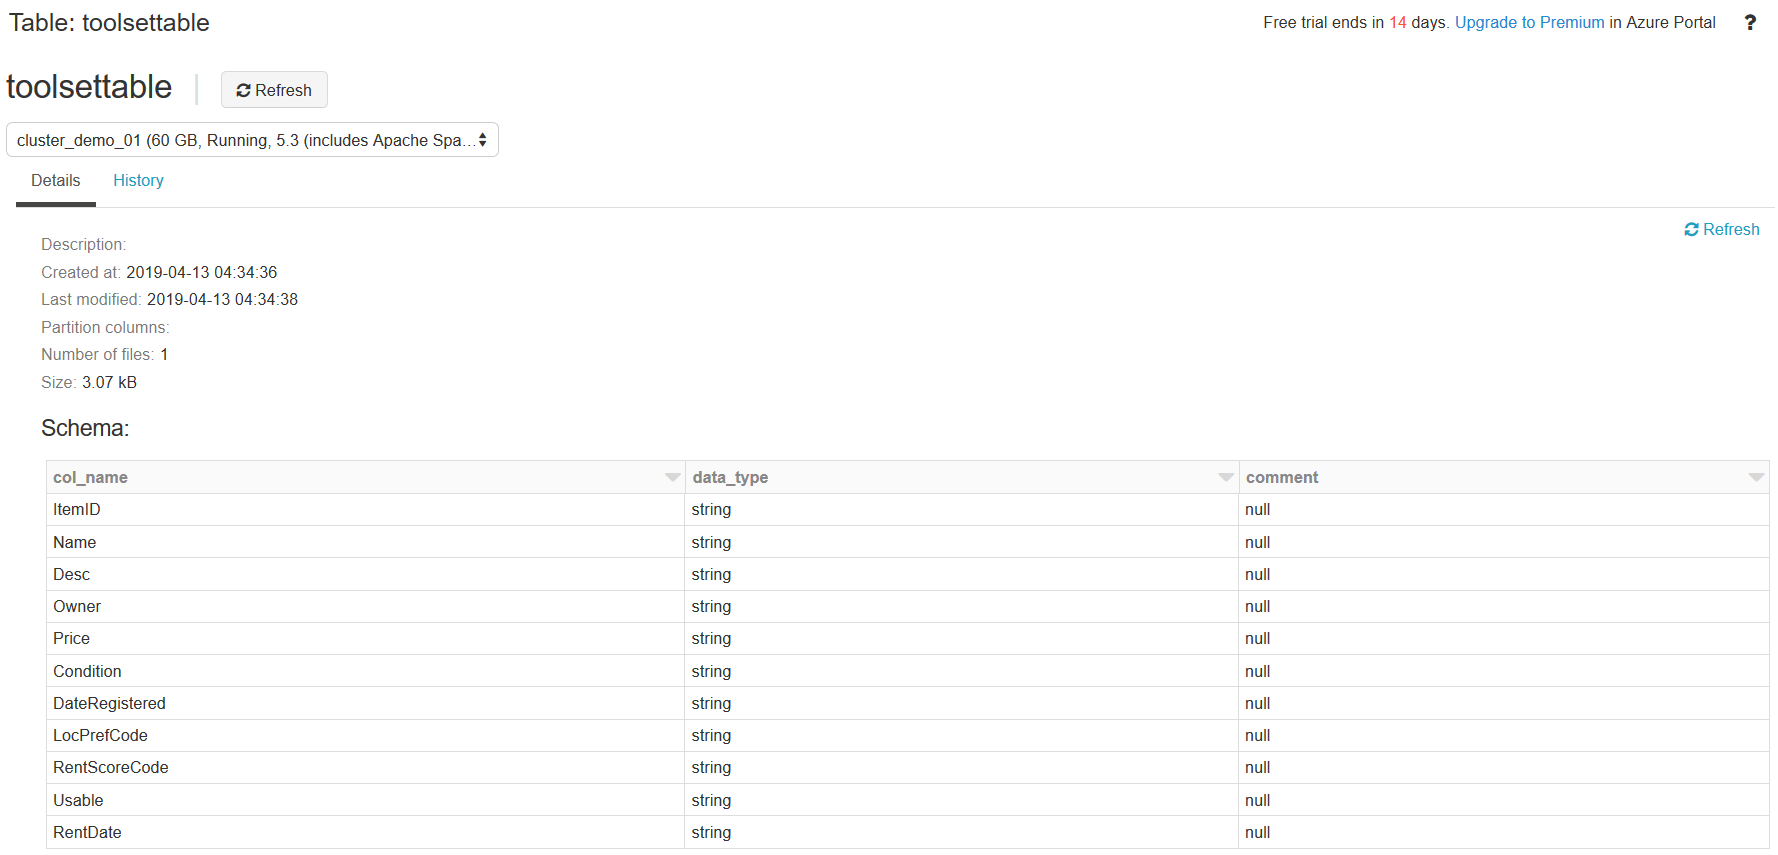
The following screenshot displays the table in the remote Azure Databricks hive store:
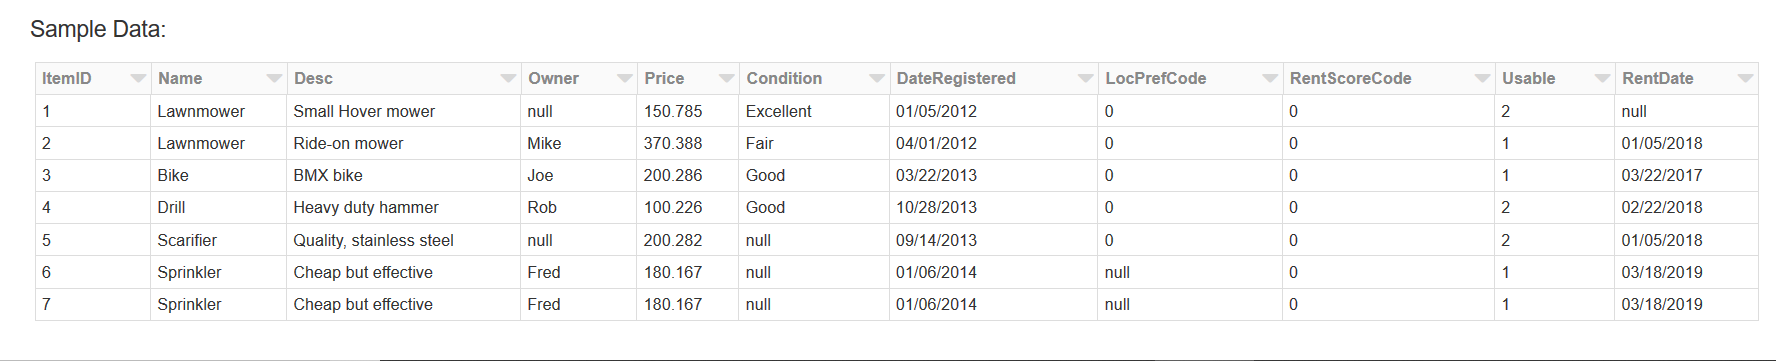
Show the first three rows of the tools table:

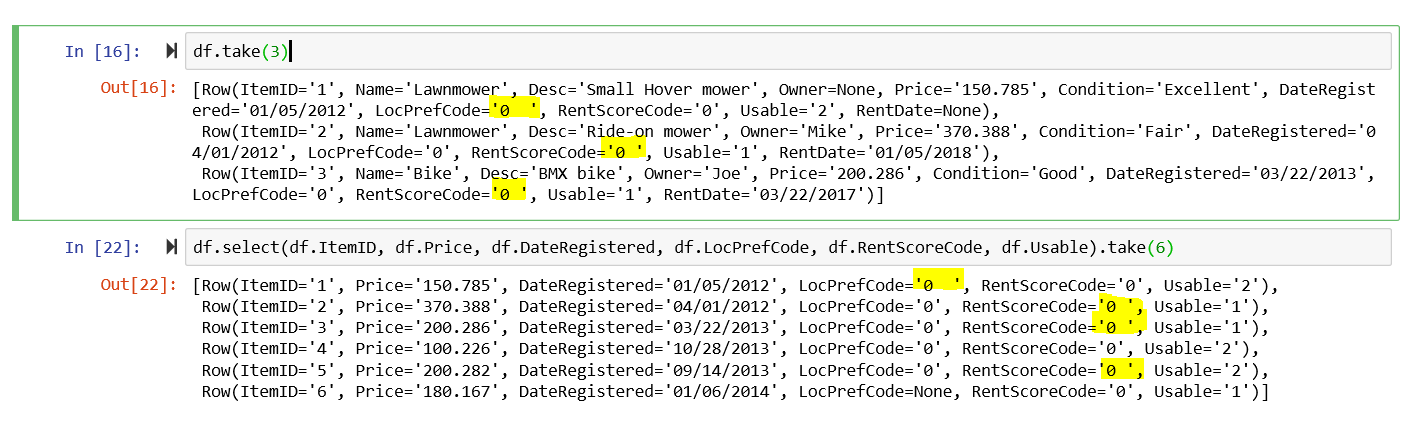
Use the PySpark select and take functions to display specific columns and the trailing and leading whitespaces in the values for select columns:
df.take(3)
Using the take() function alone leaves the displayed rows cluttered and hard to read. I used the select() function to filter out unnecessary fields and make the displayed rows more readable as shown below.
df.select(df.ItemID, df.Price, df.DateRegistered, df.LocPrefCode, df.RentScoreCode, df.Usable).take(6)
Use the PySpark Cast function to change the data type of selected columns:
The Price column was originally ingested as a String data type, but in this section we use the Cast() function to change the data type to a decimal.
The DataRegistered column is changed from a String type to a date type using the to_date() PySpark function. The Usable column is changed to a Boolean data type and the RentDate is changed to a Unix Time data type using from_unixtime
"""

    Cast Price(double) to Decimal, cast DateRegistered field of a given pattern/format of type string to date using the PySpark to_date function,

cast RentDate(String type) to TimestampType

and cast the Usable field of type string to boolean.
"""
from pyspark.sql.types import DecimalType, StringType, TimestampType, DateType, BooleanType
from pyspark.sql.functions import unix_timestamp, from_unixtime, to_date #(Converts a Column of pyspark.sql.types.StringType into pyspark.sql.types.DateType using the optionally specified format.)
spark.conf.set("spark.sql.session.timeZone", "America/Chicago")
#https://spark.apache.org/docs/latest/api/python/pyspark.sql.html#pyspark.sql.functions.to_date
df_data_prep = df.select(df.ItemID, df.Name, df.Owner, df.Price.cast(DecimalType(6,3)), df.Condition, to_date("DateRegistered", "MM/dd/yyyy").alias("DateRegistered"), df.LocPrefCode, df.RentScoreCode, df.Usable.cast(BooleanType()), from_unixtime((unix_timestamp("RentDate", "MM/dd/yyyy")),"MM/dd/yyyy").alias("RentDate_UnixTime"))

Use the withColumn function to Clean up trailing spaces and update values in LocationCode and RentScoreCode columns:
Also use the na.fill() to replace null/missing values with “777”.
#Use the withColumn function to Clean up trailing spaces and update values in LocationCode and RentScoreCode columns

from pyspark.sql.functions import when

df_data_prep = df_data_prep.withColumn("RentScoreCode", when(df_data_prep.RentScoreCode == "0 ",'0').otherwise(df_data_prep.RentScoreCode))

df_data_prep = df_data_prep.withColumn("LocPrefCode", when(df_data_prep.LocPrefCode == "0  ",'0').otherwise(df_data_prep.LocPrefCode))

df_data_prep = df_data_prep.na.fill('777')

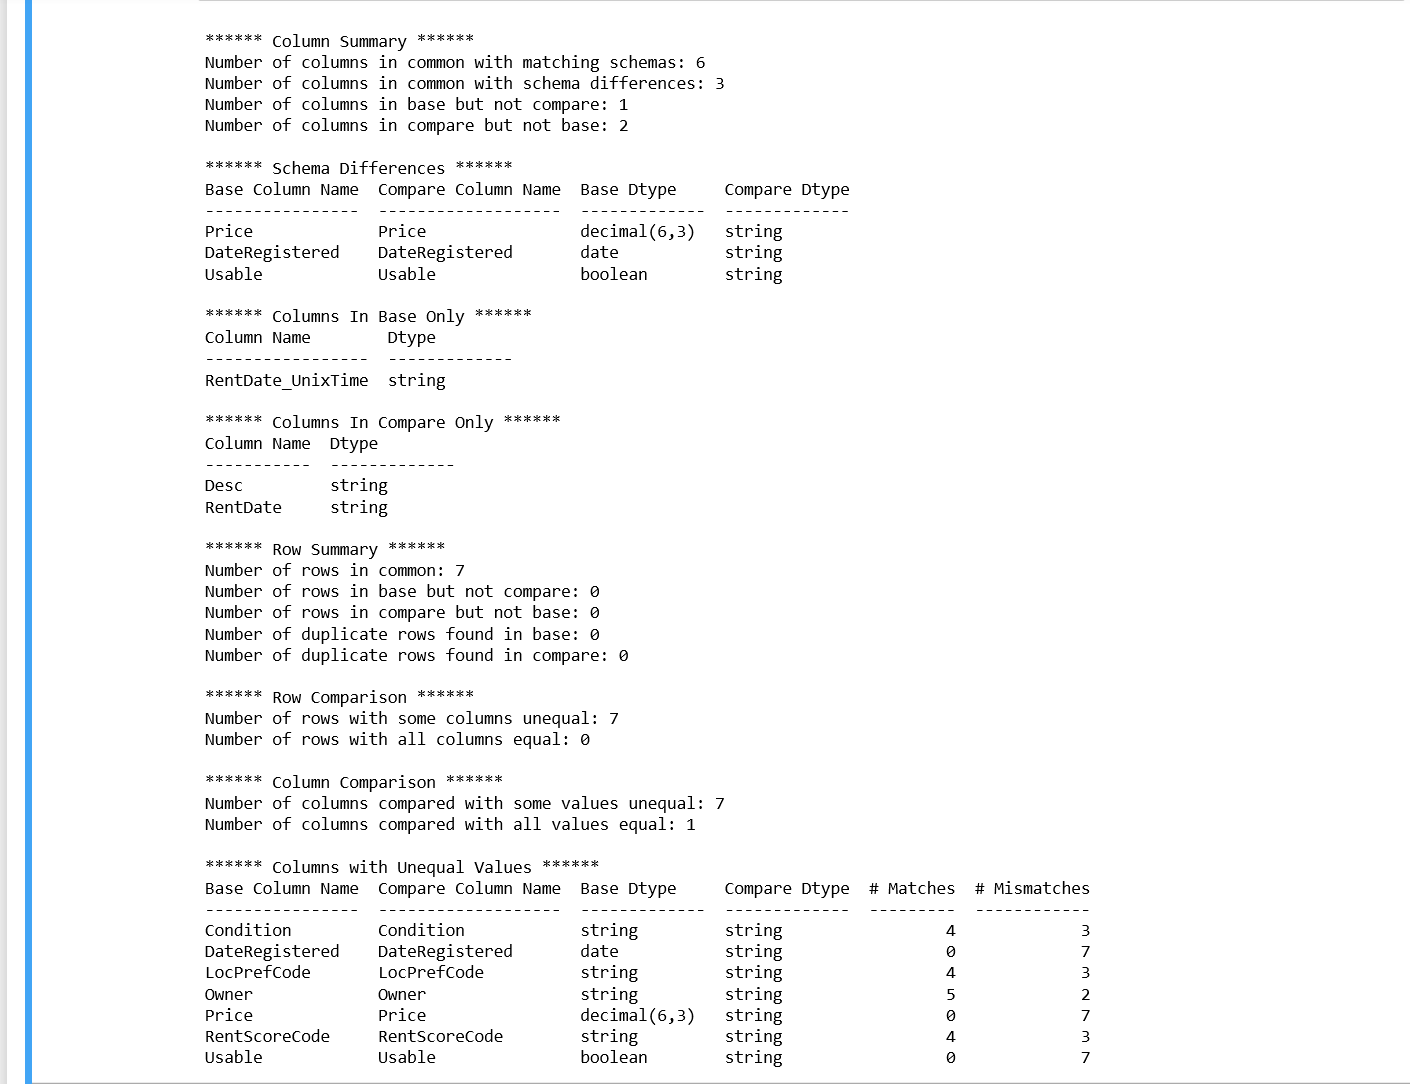
Use the datacompy library to compare both datasets. This library uses the spark Dataframes.:
#Use the datacompy library to compare both datasets. This library uses the spark dataframes. It runs a comparison on all relevant fields.

# All other fileds can be dropped from the dataframes before comparing.

import datacompy

compare_object = datacompy.SparkCompare(spark, df_data_prep, df, join_columns=[('ItemID', 'ItemID')],rel_tol=0.001)

compare_object.report()