Configuring an Azure VM From a Sysprepped Source Image using ARM PowerShell.

While working on an Azure IaaS deployment, I was required to configure an Azure VM using a generalized image in a different resourcegroup.In this post, I want to document my experience using Azure Resource Manager Powershell cmdlets to achieve the related tasks.

The Sysprep tool in the C:\Windows\System32 directory of the windows Azure virtual machine shuts down the vm after the process.

Use the Set-AzureRmVM -Name APPVM0 -Generalized cmdlet with the Generalized parameter to mark the virtual machine as generalized.

The Generalized source image was captured using the Save-AzureRmVMImage cmdlet. Following the cmdlet run, the image was saved to an auto created “system” container/folder in the Storage account.In the following section, the set of ARM (Azure Resource Manager) PowerShell scripts perform the operations on the source Storage account that create the objects and variables required to copy the source vhd blob between containers in storage accounts residing in different Azure Resource Groups.

#Creating an Azure Virtual Machine from a Captured Image .
#1/19/2017
#Charles Chukwudozie

#Login to the ARM Portal.
Login-AzureRmAccount

#Retrieve and save the source ResourceGroupName in a variable.
$srcresourcegroupname = (Get-AzureRmResourceGroup -Name rgJsonTest -Location centralus).ResourceGroupName

#Get a list of the Resource group resources and note the storage account name.
Get-AzureRmResource  |?{$_.ResourceGroupName -eq "$srcresourcegroupname"} | ft Name

#Get the storage account name and save it in a variable.
$srcstorageaccountname = (Get-AzureRmStorageAccount -ResourceGroupName $srcresourcegroupname -Name rgjsonstorage).StorageAccountName

#Get the storage account access key pair, extract one of the keys and save it to a variable.
$srckeys = Get-AzureRmStorageAccountKey -ResourceGroupName $srcresourcegroupname -Name $srcstorageaccountname
$srckey = $srckeys.Value[0]

#Create a storage context for authorization to the storage account and it's containers/folders.
$srccontext = New-AzureStorageContext -StorageAccountName $srcstorageaccountname -StorageAccountKey $srckey

#Retrieve the current containers in the storage account and select the system container.
Get-AzureStorageContainer -Context $srccontext

#Retrieve the captured source vhd blob container absoluteuri from the system container and assign it to a variable.System container was autocreated during the Save-AzureRmVMImage task.
$absoluteuri = (((Get-AzureStorageContainer -Context $srccontext -Name system).CloudBlobContainer).Uri).AbsoluteUri

#Retrieve the captured source blobs' path from the name property in the system(captured image location) container. Assign it to a variable.
$srcblobspath = (Get-AzureStorageBlob -Container system -Context $srccontext).Name

#Retrieve the vhd blob path from the array.
$srcvhdblobpath = $srcblobspath[0]

#Use the Split() method with the forward slash as seperator,number of element count argument and array position to isolate the source vhd blob only.
$srcvhdblob = $srcvhdblobpath.Split('/',4)[3]

#Concatenate the $absoluteuri and $srcblob variables to build the $srcvhduri variable.
$srcvhduri = $absoluteuri + "/" + $srcvhdblobpath

In the next section, the PowerShell scripts create the destination Azure Resource Groups and performs the operations required to initiate the source vhd blob copy between the source and destination Azure storage accounts in different Resource resource groups.

#Create destination ResourceGroup.

#Save the ResourceGroupName to a variable.
New-AzureRmResourceGroup -Name rgNewImageVMs -Location centralus
$destresourcegroupname = (Get-AzureRmResourceGroup -Name rgNewImageVMs).ResourceGroupName

#Create destination storage account and save the storage account name to a variable. Retrieve the storage account key and create acontext for authorization.
New-AzureRmStorageAccount -ResourceGroupName $destresourcegroupname -Name capimgstorageaccount -SkuName Standard_LRS -Location centralus -Kind Storage
$deststorageacctname = (Get-AzureRmStorageAccount -ResourceGroupName $destresourcegroupname -Name capimgstorageaccount).StorageAccountName
$destkey = (Get-AzureRmStorageAccountKey -ResourceGroupName $destresourcegroupname -Name $deststorageacctname).Value[0]
$destcontext = New-AzureStorageContext -StorageAccountName $deststorageacctname -StorageAccountKey $destkey

#Create a storage container as a copy target for the source image from above.
New-AzureStorageContainer -Name vhds -Permission Blob -Context $destcontext
$destcontainer = (Get-AzureStorageContainer -Name vhds -Context $destcontext).Name

#Initiate the copy of the source image to the destination storage account.
Start-AzureStorageBlobCopy -AbsoluteUri $srcvhduri -DestContainer $destcontainer -DestBlob $srcvhdblob -Context $srccontext -DestContext $destcontext
Get-AzureStorageBlobCopyState -Blob $srcvhdblob -Container $destcontainer -Context $destcontext 

In the third and final section of the script, the Azure VM configuration object is created using the copied source image.

#Create an Azure VM from the captured sysprepped image.

#Set the parameters and variables required to configure the new Azure VMConfig.
$credential = Get-Credential -UserName "localuser"  -Message "Type the username and password of the VM local administrator account."
$timezone = "Central Standard Time"

#Create a storage container for the new VM os disk location.
New-AzureStorageContainer -Name osdisks -Permission Blob -Context $destcontext

#Get the new os disk container name and save to a variable.
$vmcontainer = (Get-AzureStorageContainer -Name osdisks -Context $destcontext).Name

#Get the absolute uri of the source image and save the object to a variable.
$srcimgpreuri = (((Get-AzureStorageContainer -Context $destcontext -Name $destcontainer).CloudBlobContainer).Uri).AbsoluteUri

#Get the source image vhd blob path and save to a variable.
$srcimgblob = (Get-AzureStorageBlob -Container $destcontainer -Context $destcontext).Name

#Concatenate the source image uri and source vhd blob variables to build the source image uri variable.
$srcimageuri = $srcimgpreuri + "/" + $srcimgblob

#Get the new VM OS disk absolute uri.
$osuri = (((Get-AzureStorageContainer -Name osdisks -Context $destcontext).CloudBlobContainer).Uri).AbsoluteUri

#Concatenate the new VM OS disk absolute uri and it's corresponding vhd to build the new VM vhduri variable.
$vhduri = $osuri + "/" + "os.vhd"

#Create an Azure Public IP Address for the new VM.
$vmpip = New-AzureRmPublicIpAddress -Name vmpip -ResourceGroupName $destresourcegroupname -Location centralus -AllocationMethod Dynamic

#Create an Azure Subnet for the VM
New-AzureRmVirtualNetworkSubnetConfig -Name Subnet1 -AddressPrefix "10.0.16.0/27"

#Create an Azure VNet for the VM.
New-AzureRmVirtualNetwork -Name VNET1 -ResourceGroupName $destresourcegroupname -Location centralus -AddressPrefix "10.0.16.0/24" -Subnet $vmsubnetconfig
#Save the new vNet and subnet objects in variables for later use.
$vNet1 = Get-AzureRmVirtualNetwork -Name vNET1 -ResourceGroupName $destresourcegroupname
$subnet1 = Get-AzureRmVirtualNetworkSubnetConfig -Name Subnet1 -VirtualNetwork $vNet1

#Create the new VM network interface.
New-AzureRmNetworkInterface -Name vmNic1 -ResourceGroupName $destresourcegroupname -Location centralus -SubnetId $subnet1.Id -PublicIpAddressId $vmpip.Id
$vmNic1 = Get-AzureRmNetworkInterface -Name vmNic1 -ResourceGroupName $destresourcegroupname

#Create the new VM config object
$sysprepvm = New-AzureRmVMConfig -VMName "sysprepvm" -VMSize "Standard_A1_v2"
$sysprepvm = Set-AzureRmVMOSDisk -VM $sysprepvm -Name "os.vhd" -SourceImageUri $srcimageuri -VhdUri $vhduri -Windows -CreateOption FromImage
$sysprepvm = Set-AzureRmVMOperatingSystem -VM $sysprepvm -Windows -ComputerName $sysprepvm.Name -Credential $credential -EnableAutoUpdate -ProvisionVMAgent -TimeZone $timezone
$sysprepvm = Add-AzureRmVMNetworkInterface -VM $sysprepvm -Id $vmNic1.Id

#Instantiate the VM Object.
New-AzureRmVM -ResourceGroupName $destresourcegroupname -Location centralus -VM $sysprepvm

The following screen shot shows the final result of the Azure VM creation script.

azurevm

Posted in Azure, Azure Resource Manager, Azure Windows PowerShell | Tagged , , , , , , , , | 2 Comments

Deploy WS2012R2 AD Domain Controller in Azure-OnPrem Hybrid Environment using Resource Manager (IaaS) Virtual Machine.

As part of the process of extending my on premise infrastructure environment to Microsoft Azure, I have configured the Azure S2S VPN, an Azure Virtual network and other Azure based components within an ARM resource group to facilitate the implementation of the hybrid infrastructure.

In a recent post, I wrote about the steps to design and configure the Azure virtual networks and services required to make this possible. The following steps describe the process of installing and configuring the Active Directory Domain Services on the Azure VM to enable DC resilience for the on premise environment.

1) Login to the Azure VM with the local admin account and join the machine to my on premise domain. After the restart, login with an user account with domain admin and enterprise admin group membership. Before installing Active Directory Domain Services, use the Get-WindowsFeature -Name *ad* cmdlet to verify the correct feature name.

dcinstall01

2) Install the ADDS feature:

Install-WindowsFeature -Name AD-Domain-Services -IncludeAllSubFeature -IncludeManagementTools

dcinstall02

3) Use the Test-ADDSDomainControllerInstallation cmdlet to determine the domain environment’s readiness to accept the new Windows Server 2012 R2 Domain Controller installation. The cmdlet accepts the SafeModeAdministratorPassword and DomainName as required parameters:

PS C:\Windows\system32> $password = ConvertTo-SecureString -String 'password' -AsPlainText -Force
PS C:\Windows\system32> Test-ADDSDomainControllerInstallation -DomainName mylab.net -SafeModeAdministratorPass
word $password | fl

dcinstall03

4) Based on the Test results, the VM needs to be assigned a static IP Address as a requirement of functioning as a Domain Controller with DNS installed. This VM sits on Microsoft Azure. Using the Azure Resource Manager, I’ll make the current dynamic IP Address configuration static on the Network Interfaces blade of the Azure virtual manager.

dcinstall04

dcinstall05

dcinstall06

5) After successfully setting the Azure VM IP Address assignment to Static. I’ll login to the VM via internal rdp, configure the IPv4 address as static and run the Test-ADDSDomainControllerInstallation cmdlet again to confirm the error has been resolved.

6) Use the Install-ADDSDomainController -DomainName mylab.net -SafeModeAdministratorPassword $password -InstallDns -Verbose cmdlet with the the specified parameters to promote the machine to a Domain Controller.

dcinstall07

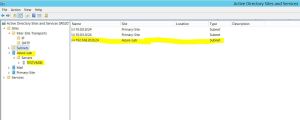
7) After the system restart, I set about configuring a new Azure-Lab Active Directory Site and Subnet using the Active Directory Sites and Services console to reflect the Azure virtual network subnet/location. I added the the new subnet to the Azure-Lab Site. This will enable the new Azure-Lab site handle any login and authentication originating from my Azure Virtual Network.

dcinstall08

Posted in Active Directory Domain Services, AD Forest, Azure, Azure VPN | Leave a comment

Copying an Azure Cloud Blob (VHD) between different Storage Accounts and Resource Groups with ARM PowerShell.

While working with Azure, I came across a situation where I needed to quickly provision an Azure Virtual Machine from an existing sysprepped VHD in a different storage account and resource group using the Azure Resource Manager deployment model. This can be achieved using Azure Resource Manager PowerShell cmdlets. It is worth noting that an Azure storage account has two authentication keys: a primary and a secondary. Either of these can be used for any operation. There are two keys to allow occasional rollover of the keys to enhance security.The storage account context is used for authentication against the storage account.

The key Azure Resource Manager resources and components to consider for this operation are:

1) The URI of the source vhd or blob. This resource will be assigned a variable: $srcvhduri.
2) The source Storage Account name : $srcstoraccountname.
3) The Access key of the source Storage Account: $srckey1.
4) The security context of the source storage environment: $srccontext.
5) The destination Storage account name: $deststoraccountname.
6) The Access key of the destination storage account: $destkey1.
7) The security context of the destination Storage account: $destcontext.

We’ll start this operation by initiating a login to the Azure Cloud subscription using PowerShell:

1) Use the PS C:\Scripts> Login-AzureRmAccount cmdlet to login the Azure subscription:

azurecopy1

2) Confirm and verify the resources in the source resource group using the following Azure PowerShell script:
PS C:\Scripts> Get-AzureRmResource | ?{$_.ResourceGroupName -eq 'rgXtine'} | ft Name

azurecopy2

3) Verify the source storage account key using the following Azure Resource Manager PowerShell script:
PS C:\Scripts> Get-AzureRmStorageAccountKey -ResourceGroupName rgXtine -Name vhdstoragexfqygzi2vdtwo

azurecopy3

The storage account access keys come in pairs and can be regenerated at anytime. I’m interested in using just one of the access keys.

4) In the next script, I’ll retrieve one of the keys and save it in a variable.

$srckey1 = (Get-AzureRmStorageAccountKey -ResourceGroupName rgXtine -Name vhdstoragexfqygzi2vdtwo).Value[0]

azurecopy4

5) Next, I’ll copy the blob/vhd url from the Azure portal or Azure Storage Explorer and assign the string to a variable.

azurecopy5

6) Get the source storage account and save it in a variable:
$srcstoraccount = Get-AzureRmStorageAccount -ResourceGroupName rgXtine . Retreive the source storage account name and save in a variable: $srcstoraccountname = $srcstoraccount.StorageAccountName

7) Get the source storage account context and assign to a variable:
$srccontext = New-AzureStorageContext -StorageAccountName $srcstoraccountname -StorageAccountKey $srckey1

8) Run the same steps as above for the destination/target storage account of the copy operation:

a) Destination Storage account:

$deststoraccount=Get-AzureRmStorageAccount -ResourceGroupName rgCapturedImage -Name newcapimgstoracct2016

b) Retrieve the destination storage account name:

$deststoraccountname = $deststoraccount.StorageAccountName

c) Retrieve the destination storage account access key and assign it to variable:

PS$destkey1 = (Get-AzureRmStorageAccountKey -ResourceGroupName rgcapturedimage -Name newcapimgstoracct2016)
.Value[0]

d) Get the authentication context for the destination storage account:

$destcontext=New-AzureStorageContext -StorageAccountName $deststoraccountname -StorageAccountKey $destkey1

9) Create a destination storage container for the copied vhd/blob object:

PS C:\Scripts> New-AzureStorageContainer -Name images2 -Permission Blob -Context $destcontext

azurecopy6

10) Confirm the name of the Azure blob or vhd file object to be copied.

azurecopy7

11) Use the Start-AzureStorageBlobCopy cmdlet to copy the Azure blob to the target container.

azurecopy8

I can check the copy status by using the Get-AzureStorageBlobCopyState cmdlet. This cmdlet displays the status of the copy task, source blob, completion time and total bytes.

azurecopy9

I could also confirm the blob is in the target container using the Azure Storage Explorer:

azurecopy10

Posted in Azure, Azure Windows PowerShell | Tagged , , , , , , , | Leave a comment

Enable Hyper-V Server 2012 R2 Core Virtual Machine Protection using existing Azure Site Replication Policy.

In this post, I’ll be writing about my steps for enabling on premise Virtual Machine protection to Azure Site Recovery using an existing Hyper-V Site Replication policy. In this deployment, I’ll be adding and registering a Hyper-V Core Server 2012 R2 to Azure Site Recovery. The process differs from the steps in registering a full Windows Server 2012 R2 host in Azure Site Recovery.

1) Login to Azure Resource Manager portal.

2) Under the default Dashboard, select All Resources and select the already existing Recovery Services Vault. My current vault is the LabVaultASR.

azurerepl1

3) On the current vault page, navigate to Settings, Manage, Site Recovery Infrastructure and select the recovery infrastructure that works best for you. In my scenario for this post, I’m working with non SCVMM Hyper-V hosts. I’ll select Hyper-V Hosts under the Hyper-V sites section.

azurerepl2

4) Use the +Server button to add another Hyper-V host.

azurerepl3

5) On the Add Server page, ensure that Hyper-V is selected. Download and install the installer for Azure Site Recovery Provider. This will install both the Provider and Agent services on the on premise Hyper-V host. I’ll also download the vault registration key to register the host with my Hyper-V site.

I’m running the Hyper-V core 2012 R2 on my on premise Hyper-V host. I login to the server, start a PowerShell console as Administrator and run the Provider file from the PowerShell prompt. This starts the installation GUI. I selected to enable Microsoft Update, click next and finish the installation. Click next to Register the server with Azure.

azurerepl4

I encountered an error trying to register the Hyper-V host with my Azure vault.

azurerepl5

The error occurred because I can’t register the server with the GUI on a Hyper-V core server. I need the command line tool and switches to properly register a Hyper-V Server 2012 R2 core with Azure vault. After downloading the key, I made sure to unblock the vault key file by right clicking on the file, selecting properties and using the “Unblock” button on the General tab to unblock the file. Then I ran the following command to register the server:

C:\Program Files\Microsoft Azure Site Recovery Provider>DRConfigurator.exe /r /friendlyname LAB00.MyAzureLab.net /Credentials "c:\ASR\LabVaultASR_LabHyper-V-Site_Wed Sep 21 2016.VaultCredentials"

azurerepl6

Confirm that the registration was successful in Azure.

azurerepl7

6) To configure and enable protection for Virtual Machines, navigate to the Recovery Services Vault(LabVaultASR in my deployment), Settings, Protected Items and select Replicated Items.

7) On the Replicated Items page, select the +Replicate button to start the VM protection/replication process.

azurerepl8

8) On the Enable Replication page, select the Source Hyper-V site and click Ok. On the Target page, select ensure that Azure is selected as the Target.Select the subscription. Select the Post-failover deployment model, in my deployment, I’ll be using the Azure Classic model. Select the Storage account. I want to Configure now for selected machines. And I also selected my already configure Azure Virtual Network.Click Ok.

azurerepl9

9) Select a VM to enable for protection on the Select VM page. Click Ok.

azurerepl10

10) Select the relevant values on the VM properties page.Click Ok.

azurerepl11

11) On the Replication settings page, select the existing Replication Policy. Click Ok.

azurerepl12

12) Click on the Enable Replication button to enable protection for the configured VM.

13) After successfully enabling protection of the VM, click the refresh button to display the newly protected VM on the Replicated Items page.

azurerepl13

After completing the Replication and Protection steps, I can view and monitor the status and health of my replica virtual machines in Azure Site Recovery by clicking on my Recovery Services Vault name.

I can view and assess the status of the Site Recovery provider on my registered Hyper-V host/servers. I can check out the properties and health of my replicated items, recovery plans and Site Recovery jobs.

azurerepl14

Posted in Azure, Azure Site Recovery, Failover Cluster, Failover Cluster Manager, Hyper-v, Hyper-v 2012 R2, Hyper-v Manager, Microsoft Hyper-v | Tagged , , , , , , , , , , , | Leave a comment

Implementing Azure Site Recovery Protection for my non-SCVMM Hyper-V Virtual Machines.

BCDR (Business Continuity and Disaster Recovery options) is a big deal for any I.T. Pro. My decision to go with with Microsoft Azure Site Recovery cloud service was easy after considering other options available to me, cost and the specific needs of my infrastructure environment. It was by far a better solution in terms of CapEx, OpEx, and geographical redundancy and flexibility. Other options require an upfront cost that includes but is not limited to: renting a location, cost of buying or renting physical servers in addition to telecoms cost.

According to Microsoft, Site Recovery is an Azure service that contributes to your BCDR strategy by orchestrating replication of on-premises physical servers and virtual machines to the cloud (Azure) or to a secondary datacenter. When outages occur in your primary location, you fail over to the secondary location to keep apps and workloads available. You fail back to your primary location when it returns to normal operations.

Azure Site Recovery can be deployed in two scenarios. In an environment with System Center Virtual Machine Manager 2012R2 (SCVMM2012R2) or an environment without SCVMM2012R2, with just Hyper-V Manager. In this post, I attempt to document and outline my steps in deploying and configuring Site Recovery protection for my virtual workloads in a Hyper-V Manager environment.

The steps are are as follows:

1) Login to the Azure portal : https://portal.azure.com (assuming you already have a subscription and account. if not, you can create an account and pay-as-you-go subscription). Expand on the “More Services” link and navigate to “Recovery Services Vault” , click on Add to create a new Vault:

asr1

I made sure to create the new Recovery Vault resource in the same location as my Virtual Network. Click Create after filling the fields as shown in the screen shot above.

2) Click on the newly created Vault resource to view the available configuration options. If this is your first Site Recovery deployment, navigate to the Settings,Getting Started, Site Recovery, Step 1: Prepare Infrastructure, Protection goal.These options will quickly walk you through the deployment steps and scenarios that best suit your protection goals. In Protection goal select To Azure, and select Yes, with Hyper-V. Select No to confirm you’re not using VMM. Then click OK.

asr2

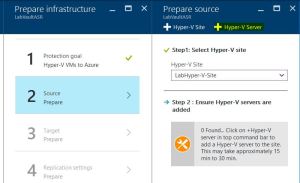
3) Select the Step 2: Prepare Infrastructure, Source. To add a new Hyper-V site as a container for your Hyper-V hosts or clusters, click +Hyper-V Site.

asr3

On the Create Hyper-V site page specify a name for the site. Then click OK. Select the newly created site and click +Hyper-V Server to add a server to the site.
asr4

On the Add Server page, for the Server type field, verify that Hyper-V server is displayed.Click the download link to download the Azure Site Recovery Provider installation file. Run this file to install both the Provider and the Recovery Services agent on each Hyper-V host. I’ll use the “Download” button to download the vault registration key to register my host in the newly created Hyper-V site. The key is valid for 5 days after it is generated.

asr5

Run the Provider setup file on each host you added to the Hyper-V site. If you’re installing on a Hyper-V cluster, run setup on each cluster node. Installing and registering each Hyper-V Cluster nodes ensures that virtual machines remain protected even if they migrate across nodes.

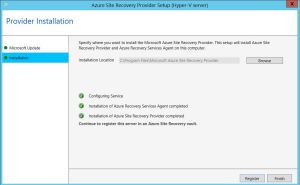
4) Run the Provider setup file. Choose to use Microsoft Update to update the software unless SCCM is in place to serve the same objective.Click install on the Provider Installation window.
asr6

5) After installation, click on the “Register” button to register with the ASR vault in Azure.On Vault Settings page, click Browse to select the vault key file that was downloaded previously. Selecting the Vault key will automatically fill the remaining vault settings field.

asr7

6) I don’t have a proxy server in my environment, so I’ll select the option to connect to ASR directly. Click next to complete the registration process with ASR. After registration completes, metadata from the Hyper-V server host is retrieved by Azure Site Recovery. I’ll hold off on the on premise configuration and move back to the Azure portal. After a page refresh, I can see Hyper-V host server is displayed on the Settings, Site Recovery Infrastructure, Hyper-V Hosts page. Click Ok to save the changes on the Azure Prepare Source page.

asr8

7) Click Prepare infrastructure, Target and select the Azure subscription you want to use. In step 2, I’ll select Classic as the deployment model to be used for my VMs after failover. This will enable me take advantage of my already existing storage account and virtual network (created in the Azure classic portal). If the Resource Manager deployment model is selected, I’ll use the +Storage Account button to create the Azure storage account to be used for replication.

asr9

I’ll create a test storage account using ARM. On the Create Storage Account page, enter a name for the storage account in lower case letters (required). Select Geo-redundant storage under the Replication field. Click OK.

asr10

I’ve chosen to use the Classic deployment model, I’ll confirm my storage accounts and virtual network and click OK on the Target configuration page.

asr11

8) The next step is to configure replication settings.To create a new replication policy click Prepare infrastructure, Replication Settings, +Create and associate.

9) In Create and associate policy specify a policy name.

10) In Copy frequency specify how often you want to replicate delta data after the initial replication (every 30 seconds, 5 or 15 minutes).

11) In Recovery point retention, specify in hours how long the retention window will be for each recovery point. Protected machines can be recovered to any point within the window.

12) In App-consistent snapshot frequency specify how frequently (1-12 hours) recovery points containing application-consistent snapshots will be created. Hyper-V uses two types of snapshots — a standard snapshot that provides an incremental snapshot of the entire virtual machine, and an application-consistent snapshot that takes a point-in-time snapshot of the application data inside the virtual machine. Application-consistent snapshots use Volume Shadow Copy Service (VSS) to ensure that applications are in a consistent state when the snapshot is taken. Note that if you enable application-consistent snapshots, it will affect the performance of applications running on source virtual machines. Ensure that the value you set is less than the number of additional recovery points you configure.

13) In Initial replication start time specify when to start the initial replication. The replication occurs over your internet bandwidth so it is recommended to schedule it outside of busy hours. I want to start my replication immediately since this is a test environment. Then click OK.

asr12

When you create a new policy it’s automatically associated with the Hyper-V site. Click OK. You can associate a Hyper-V site (and the VMs in it) with multiple replication policies in Settings, Replication, policy name, Associate Hyper-V Site.

asr13

14) I’ve chosen to download and run the Capacity planner for Hyper-V replica at a later date.

15) After Prepping the Infrastructure, we’ll go ahead and Enable Replication using the “Replicate Application” step. Click Step 2: Replicate application, Source. In the Source blade, select the Hyper-V site. Then click OK. After enabling replication for the first time, click +Replicate in the vault to enable replication for additional machines.

asr14

16) In Target I selected the vault subscription, and the failover model I want to use in Azure (classic, because I created my initial storage account and network in classic) after failover. I selected my Classic storage account. If you want to use a different storage account than those you have you can create one. To create a storage account using the ARM model click Create new. If you want to create a storage account using the classic model you’ll do that in the Azure portal. Then click OK. Select the Azure network and subnet to which Azure VMs will connect when they’re spun up after failover. Select Configure now for selected machines to apply the network setting to all machines you select for protection. Select Configure later to select the Azure network per machine. If you want to use a different network from those you have you can create one. To create a network using the ARM model click Create new.If you want to create a network using the classic model you’ll do that in the Azure portal. Select a subnet if applicable. Then click OK.

asr15

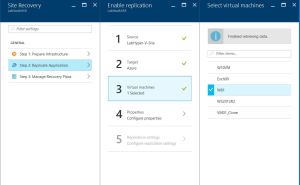
17) In Virtual Machines > Select virtual machines click and select each machine you want to replicate. You can only select machines for which replication can be enabled. I selected to replicate just one virtual machine from my Hyper-V host: W81. Click OK.
asr16

18) In Properties, Configure properties, select the operating system for the selected VMs, and the OS disk. Verify that the Azure VM name (Target Name) complies with Azure virtual machine requirements and modify it if you need to. Then click OK. You can set additional properties later.

asr17

19) In Replication settings, Configure replication settings, select the replication policy you want to apply for the protected VMs. Then click OK. You can modify the replication policy in Settings > Replication policies > policy name > Edit Settings. Changes you apply will be used for machines that are already replicating, and new machines. Click the Enable Replication button after completing the Replicate Applications tasks.

asr18

You can track progress of the Enable Protection job in Settings, Jobs, Site Recovery jobs. After the Finalize Protection job runs the machine is ready for failover.

asr19

View and manage VM properties.

1) It is recommend to verify the properties of the source machine. Click Settings, Protected Items, Replicated Items and select the machine.

asr20

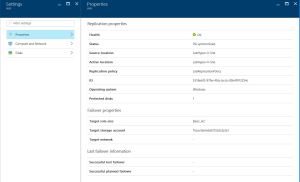
2) In Properties you can view replication and failover information for the VM.
asr21

3) In Compute and Network, Compute properties you can specify the Azure VM name and target size. Modify the name to comply with Azure requirements if you need to. You can also view and modify information about the target network, subnet, and IP address that will be assigned to the Azure VM. Note the following:

You can set the target IP address. If you don’t provide an address, the failed over machine will use DHCP. If you set an address that isn’t available at failover, the failover will fail. The same target IP address can be used for test failover if the address is available in the test failover network.

The number of network adapters is dictated by the size you specify for the target virtual machine, as follows:
If the number of network adapters on the source machine is less than or equal to the number of adapters allowed for the target machine size, then the target will have the same number of adapters as the source.
If the number of adapters for the source virtual machine exceeds the number allowed for the target size then the target size maximum will be used.
For example if a source machine has two network adapters and the target machine size supports four, the target machine will have two adapters. If the source machine has two adapters but the supported target size only supports one then the target machine will have only one adapter.
If the VM has multiple network adapters they will all connect to the same network.

asr22

4) In Disks you can see the operating system and data disks on the VM that will be replicated.

5) At this time, the Azure Replicated Items synchronization status is at 31%. After it’s complete, I will test failover to my virtual network. I initially tried to enable Azure Site Recovery protection on a replica virtual machine. The task failed with the following error: “Avoid enabling Microsoft Azure Site Recovery protection for a virtual machine that already has replication enabled.” More details are displayed in the screen shot below.

asr24

asr23

The following screen shot displays the current status of the VM replication to the Azure Recovery Vault at the on premise Hyper-V manager.

asr25

Test Failover.

1) With the Replicated virtual machine fully synchronized to Azure, I’ll go ahead and Test Failover. As a first step, I’ll install the Azure VM Agent. This is recommended by Microsoft. It gets the best performance from the VM, makes booting faster and helps with troubleshooting. I installed the agent from the PowerShell console as Administrator.

2) To test the failover of my virtual machine, I’ll login to the Azure portal, navigate to the Recovery Services Vault, Settings, Protected Items, Replicated Items, select the virtual machine and select the Test Failover button.

asr26

3) On the Test Failover page, I’ll select the Azure network to which the Azure VM will be connected after failover occurs. At this point, I will verify that the on premise Primary virtual Machine is set to DHCP before shutting it down.

asr27

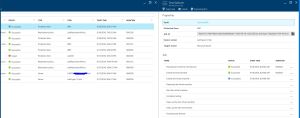
4) Click OK to begin the failover. I can track the progress of the failover by clicking on the VM to open its properies, or navigate to the Test Failover job in Settings, Site Recovery jobs.
asr28

5) When the failover reaches the Complete testing phase as shown below, I navigated to the Azure Portal Virtual Machine page to verify that the VM started successfully, view the properties of the Azure test VM and retrieve it’s private IP Address based on my Azure virtual Network. I already setup Azure Site to Site VPN to my on premise infrastructure as described in an earlier post, so I’m able to internally RDP into the test Azure VM. The below screen shot shows the internal DHCP IP Address of the Azure test VM.

asr29

asr30

6) I disabled the windows firewall on the on premise primary VM before shutdown, so I’m able to successfully ping the Azure test VM. RDP into the Azure test VM using it’s internal IP Address.

asr31

7) I am able to successfully ping my on premise WS 2012 r2 domain controller. I successfully verified the settings and state of the Azure test VM W81-test. I verified that the VM disk is the right size. There’s also a temporary disk attached by Azure. There is a Data Loss warning file on this disk with message : Any data stored on this drive is SUBJECT TO LOSS and THERE IS NO WAY TO RECOVER IT.Please do not use this disk for storing any personal or application data.

asr32

8) Click Complete the test on the Site Recovery Jobs page to finish it. Click Notes to record and save any observations associated with the test failover. Click “The test failover is complete . Clean up the test environment” check box to automatically power off and delete the test virtual machine. Click Ok. At this stage any elements or VMs created automatically by Site Recovery during the test failover are deleted. Any additional elements you’ve created for test failover aren’t deleted. If a test failover continues longer than two weeks it’s completed by force.

asr33

9) After successfully cleaning up the test failove environment, I will turn on my primary on prem VM. Please note that I did not have to turn off the primary VM for the failover testing. This is a testing environment, so I can afford to shutdown theh VM. In my production environment, I would isolate the Azure virtual network preferrably to run this test successfully and avoid any conflict between the on premise primary VM and the Azure test replica. At anytime, I could also pause the replication from the on premise primary VM.

asr34

Posted in Azure Site Recovery, BCDR, Business Continuity, Disaster Recovery | Tagged , , , , , , , , , , , , , , , , , | 3 Comments

Resolving Windows Server DirectAccess Network Location Server DNS Scavenging Issue.

A few weeks after deploying DirectAccess in my infrastructure environment, I encountered an issue where DirectAccess stopped working . My first step was to check the Operational Status of DirectAccess in the Remote Access Management console of the DirectAccess server.

The Network Location Server status was flagged as Critical as indicated in the screen shot.

daserror1

My first step was to attempt to ping the the network location server DNS record:

PS C:\Windows\system32> ping directaccess-nls.mylab.net
Ping request could not find host directaccess-nls.mylab.net. Please check the name and try again.

I opened the DNS console and couldn’t find the the DNS record for the NLS record. The record was deleted because I have DNS scavenging turned on in my environment.

To resolve this issue, I ran through the DirectAccess Server Infrastructure Server Setup wizard. After running through the wizard, I clicked Finish to apply the changes and create the Network Location Server DNS name automatically. After confirming the DNS name was created successfully in the DNS console, right click on the NLS record and select properties to turn off “Delete this record when it becomes stale” . Click apply and Ok . This step should prevent DNS Scavenging from removing the record at the next aging cycle.

daserror2

I hope someone finds this helpful as it helped me.

Posted in DirectAccess | Tagged , , , , | Leave a comment

Configuring Azure Site to Site VPN to my On-Premise Infrastructure using the Azure Classic Portal.

I’ve been exploring the requirements for extending my on premise infrastructure to the Microsoft Azure IaaS public cloud. Azure Site to Site IPsec VPN is a key part of achieving that objective.There are two deployment models in Azure; the Azure Service Manager(Using the Azure Classic Portal) and the Azure Resource Manager (the new Azure Portal). My deployment steps in this implementation use the Azure Classic Portal. Moving forward though, I intend to use the Azure Resource Manger for future deployments.The following are key requirements:

1) Public IP Addresses of both VPN Endpoints (Azure and On Premise environments).
2) A Pre-shared key.
3) Remote Networks of both Endpoints.

Azure Side VPN Components:

1) Azure Virtual Network and address space.(The private address range with Subnet Mask. Allows you to add private IP Addresses to your servers and Azure side virtual machines.)
2) Local Network.(Public IP Address of the Endpoint we are establishing a VPN with.Also contains the remote networks which can be found at the remote endpoint.This tells the VPN where it might find our on premise networks.)
3) The Azure Gateway.(The public IP of our Azure Endpoint.Routing type is set up here:Dynamic Routing enables multi site to site VPN and Static routing enables only Site to Site VPN.)
4) The Azure VPN Scripts.(Azure generated VPN script that auto configures the remote endpoint on premise RRAS Server).

The IP Address space in Azure is specified using the CIDR notification (Classless Interdomain Routing. A way of subnetting networks into smaller networks to save addresses).

Required Azure VPN Firewall Ports:
UDP 1701
UDP 4500
UDP 500
Protocol 50

The steps are as follows:

1) Login to https://manage.windowsazure.com.
2) Navigate to the Networks tab and click on the Create a virtual network link.

azurevpn1

3) On the Virtual Network Details page, enter a name for your virtual network and location and click next.

azurevpn2

4) Ignore the DNS Servers and VPN Connectivity page and click next.
5) On the Virtual Network Address Spaces page, enter your designated address space and subnet.I’m using the Class B 172.16.0.0/24 for my address space which gives me 254 hosts. For the subnet, I’m using a /27 subnet which will give me 30 hosts. I renamed my subnet to AzureSubnet. I still have enough address spaces for my gateway network. I can add more subnets and rename them if I choose to. Click next;

IP Address Space : 172.16.0.0
Address Class : Classless /24
Network Address : 172.16.0.0

Subnet-1 Address : 172.16.0.0
Subnet Mask : 255.255.255.224
Hosts per Subnet : 30

azurevpn3

azurevpn6

6) In the next step, we will create the Local Network. The Local Network defines the IP Address space of our On Premise remote networks. Still on the “Networks” page, navigate to the “Local Networks” tab and click on the Add a local network link. On the Specify your local network details, enter a name for the On Premise endpoint network and corresponding public IP Address is available.Click next.

azurevpn4

7) On the Specify the address space page, enter the address space of the On-Premise remote endpoint network you intend to work with and finish.

azurevpn5

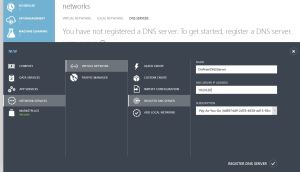
8) Create the DNS Servers. Still on the networks page, select the DNS Server tab. Click on the Register a DNS server link to create a DNS server. I’m using my On Premise DNS server.

azurevpn7

azurevpn8

9) In the next step, we’ll configure the Gateway network. On the “Networks” page, under the virtual network tab, click on the newly created virtual network.On the virtual network page, select the Configure tab.In the dns servers section, select the newly created DNS server.In the Site-to-Site Connectivity section, tick the “Connect to the local network” box. For the “Local Network” field, select the On-PremiseInfra local network from the drop down.

In the Virtual Network Address Spaces, Azure automatically added the Gateway network with the /29 in the address space with 3 host addresses. Save the configuration changes.

azurevpn9

azurevpn10

10) On the Dashboard tab, click on the Create Gateway button at the bottom of the page and select Dynamic Routing to create the Gateway.

azurevpn11

As indicated in the following screen shot, the Gateway was created successfully but is still disconnected.

azurevpn12

11) In the next steps, we will setup and configure the On Premise RRAS (Routing and Remote Access Server ) for connection to the Azure VPN endpoint.For this step, I have created a virtual machine running Windows Server 2012R2 to act as the RRAS server. I’m using the RRAS server as my On Premise endpoint router because it supports Dynamic Routing.

In my System Center Virtual Machine Manager 2012R2 environment, I’ll create the external host virtual switch for connecting the Azure virtual machine to the internet.

azurevpn13

12) In the SCVMM 2012R2 VMs and Services pane, I’ll console into the virtual machine designated for the Azure VPN setup and rename the network adapters. Select the designated external network adapter and rename it to External.Rename the internal NIC to Internal. In the network properties for the External NIC, enter the IP Address configuration as follows:

azurevpn14

azurevpn15

azurevpn16

13) After configuring the networking on the RRAS Virtual Machine, we’ll proceed to to setup RRAS by downloading the “VPN Device Script” from the Azure portal.Navigate to “Networks”, click on the virtual network and on the Dashboard page, download the VPN script. On the “Download a VPN Device Configuration Script” page, select Vendor as Microsoft, platform is RRAS and operating system is Windows Server 2012 R2. After download, rename the VpnDeviceScript.cfg file to VpnDeviceScript.ps1 (PowerShell file):

azurevpn17

14) Run the VpnDeviceScript.ps1 script to auto install and configure routing and Remote Access on the endpoint rras virtual machine.

azurevpn18

It might seem the script run ended in error. But in the few times I have run through this process, I find that the script actually executed successfully and RRAS was well setup. This can be verified by logging into the Azure portal to find that the gateway automatically established a vpn connection to my On Premise network.

azurevpn19

15) In this step, I will setup a virtual machine in Azure to test connectivity with my on premise infrastructure and extend my on premise network to Azure cloud. Login to the Azure classic portal, navigate to the Virtual Machines option and click on the Create a virtual machine link.

azurevpn20

On the “New” page, select Compute-Virtual Machine and select the “From Gallery” option which allows you to better customize your VM.

azurevpn21

On the “Choose an Image” page, I selected Microsoft, Windows Server, and Windows Server 2012 R2 Datacenter . Click next.

azurevpn22

On the “Virtual machine configuration”, I filled the values as shown in the screen shot. Click next.

azurevpn23

It is important that we pay attention to this screen. The Cloud Service DNS Name must be unique. To make sure the server goes into my virtual network, I made sure to select my virtual network (AzureLabNetwork) in the Region/Virtual Network field. I left the default endpoint configurations of the Remote Desktop and PowerShell ports for access to the VM.This field can be edited as needed.Click next to install the VM agent and Finish.

azurevpn24

It took about 5 minutes to complete the provisioning process for the VM.

azurevpn25

I can verify the internal IP Address of the Azure Virtual Machine by clicking on the VM instance and selecting the Dashboard tab.

azurevpn26

By default, Ping is disabled on the Azure VM. The Windows Firewall is turned on . I turned off the firewall (it’s a test environment. Another option is to create an Allow Firewall rule for Ping packets. To test vpn connectivity, I was able to successfully rdp into the Azure VM using it’s internal IP Address from my on premise RRAS server. I can also successfully ping the Azure VM on it’s internal IP Address from my on premise RRAS server as shown below and vice versa.

azurevpn27

azurevpn28

We can verify from the above screen shot that the Azure Virtual machine is using the on premise domain controller (10.0.0.20) as it’s DNS server. I have configured a route to the Azure virtual network on my on premise Cisco router/gateway:

LabL3Switch(config)#ip route 172.16.0.0 255.255.255.0 10.0.0.26

This will enable connectivity from the rest of the on premise network to the virtual network and vice versa, I can ping a local network machine by name.At this point I could go ahead and configure the Azure VM as a domain controller for on premise to Azure virtual network multi master replication and domain controller redundancy. The Azure virtual machine will require a static IP Address if it is to be configured as a domain controller. This can be achieved by using the new Azure Portal (ARM) as indicated in the following screen shot:

azurevpn29

Posted in Azure, Azure VPN | Tagged , , , , , , , , , , | Leave a comment

Force Disable of Azure Replication from Orphaned On Premise Hyper-V Virtual Machine.

After successfully stopping and removing protection for one of my replica virtual machines in Azure Site Recovery, I observed that the on premise primary virtual machine replication status changed to a failed state. This would be normal behavior considering that replication settings at the Azure target had been removed.

azureerror2

My attempts at disabling replication at the primary VM via the GUI failed. I encountered the following error shown in the screen shot below trying to remove it using the PowerShell cmdlet: Remove-VMReplication -VMName w81:

azureerror1

Please note that I had initially setup Hyper-V (non-SCVMM) to Azure VM replication. The on premise Hyper-V host seemed to believe that the VM replication is still being managed by Azure. After doing some research, I found a four line code on the Microsoft Azure website under the section “Clean up protection settings manually (between Hyper-V sites and Azure)” , that utilizes the WMI Object.

$vmName = "SQLVM1"
$vm = Get-WmiObject -Namespace "root\virtualization\v2" -Query "Select * From Msvm_ComputerSystem Where ElementName = '$vmName'"
$replicationService = Get-WmiObject -Namespace "root\virtualization\v2" -Query "Select * From Msvm_ReplicationService"
$replicationService.RemoveReplicationRelationship($vm.__PATH)

I downloaded and saved the script as a PowerShell function (Remove-OrphanedVMReplication.ps1) after replacing the "SQLVM1" string with the name of my virtual machine. I ran the script in a PowerShell console as Administrator and it successfully disabled replication at the primary on premise VM.

azureerror3

After further research, I will add that Azure Site Recovery has two options for removing a replicated item from Azure:

1) Disable Protection for the Machine (Recommended). As stated in the screen shot, this option will remove the machine and it will no longer be protected by ASR. Protection configuration and settings will be automatically cleaned up. Leaving the on premise Primary VM in a clean replication state.

azureerror4

2) Stop Managing the Machine. Also, as shown, this option removes the replica VM and it will no longer be available in ASR. The Protection settings for the Primary on premise VM will be unaffected, leaving the administrator with the clean up task as described with the script above. I had used this option to remove the replica VM above. This left the on premise VM in the state that required a manual clean up.

azureerror5

Posted in Azure, Azure Site Recovery, Azure VPN | Tagged , , , , , , , , , , , | 6 Comments